| --- |
| layout: dev-cn |
| title: 搭建开发环境 |
| categories: development |
| permalink: /cn/development/dev_env.html |
| --- |
| |
| 开发者想要在他们的开发机器上运行 Kylin 测试用例或应用。 |
| |
| 跟随这个教程,您可以通过运行一个具体测试样例构建 Kylin 测试 cubes,且您能针对已构建的 cube 进一步运行其它测试样例。 |
| |
| ## Hadoop 客户端环境 |
| |
| Off-Hadoop-CLI 安装需要您有一个有 hadoop 客户端的机器(或一个 hadoop 沙箱)以及本地开发机器。为了简化操作,我们强烈建议您从 hadoop 沙箱上运行 Kylin 开始。在下面的教程中,我们将使用 Hortonworks®Sandbox2.4.0.0-169,您可以从 Hortonworks 下载页面下载它,展开“Hortonworks Sandbox Archive”链接,然后搜索“HDP® 2.4 on Hortonworks Sandbox”进行下载。建议您为沙箱虚拟机提供足够的内存,首选 8G 或更多。 |
| **提示:**使用HDP-2.4.0.0.169 沙箱并使用 10GB 或者更多内存进行部署会更好。一些新版本的 HDP 沙箱使用 Docker 部署它们的集群服务并且封装在虚拟机里面。你需要上传你的项目到 Docker 容器中来运行集成测试,这不太方便。更高的内存将减少虚拟机杀掉测试进程的可能性。 |
| |
| ### 启动 Hadoop |
| |
| 启动完成之后,你可以使用 root 账户登陆。 |
| |
| 在 Hortonworks sandbox 中,ambari 会帮助您运行 hadoop: |
| |
| {% highlight Groff markup %} |
| ambari-agent start |
| ambari-server start |
| {% endhighlight %} |
| |
| 然后重置 ambari 的 admin 用户密码为 `admin`: |
| |
| {% highlight Groff markup %} |
| ambari-admin-password-reset |
| {% endhighlight %} |
| |
| 上述命令执行成功后您可以以 admin 的身份登陆到 ambari 主页 <http://yoursandboxip:8080> 去检查所有组件的状态。默认情况下 ambari 使 HBase 失效,您需要手动启动 `HBase` 服务。 |
| 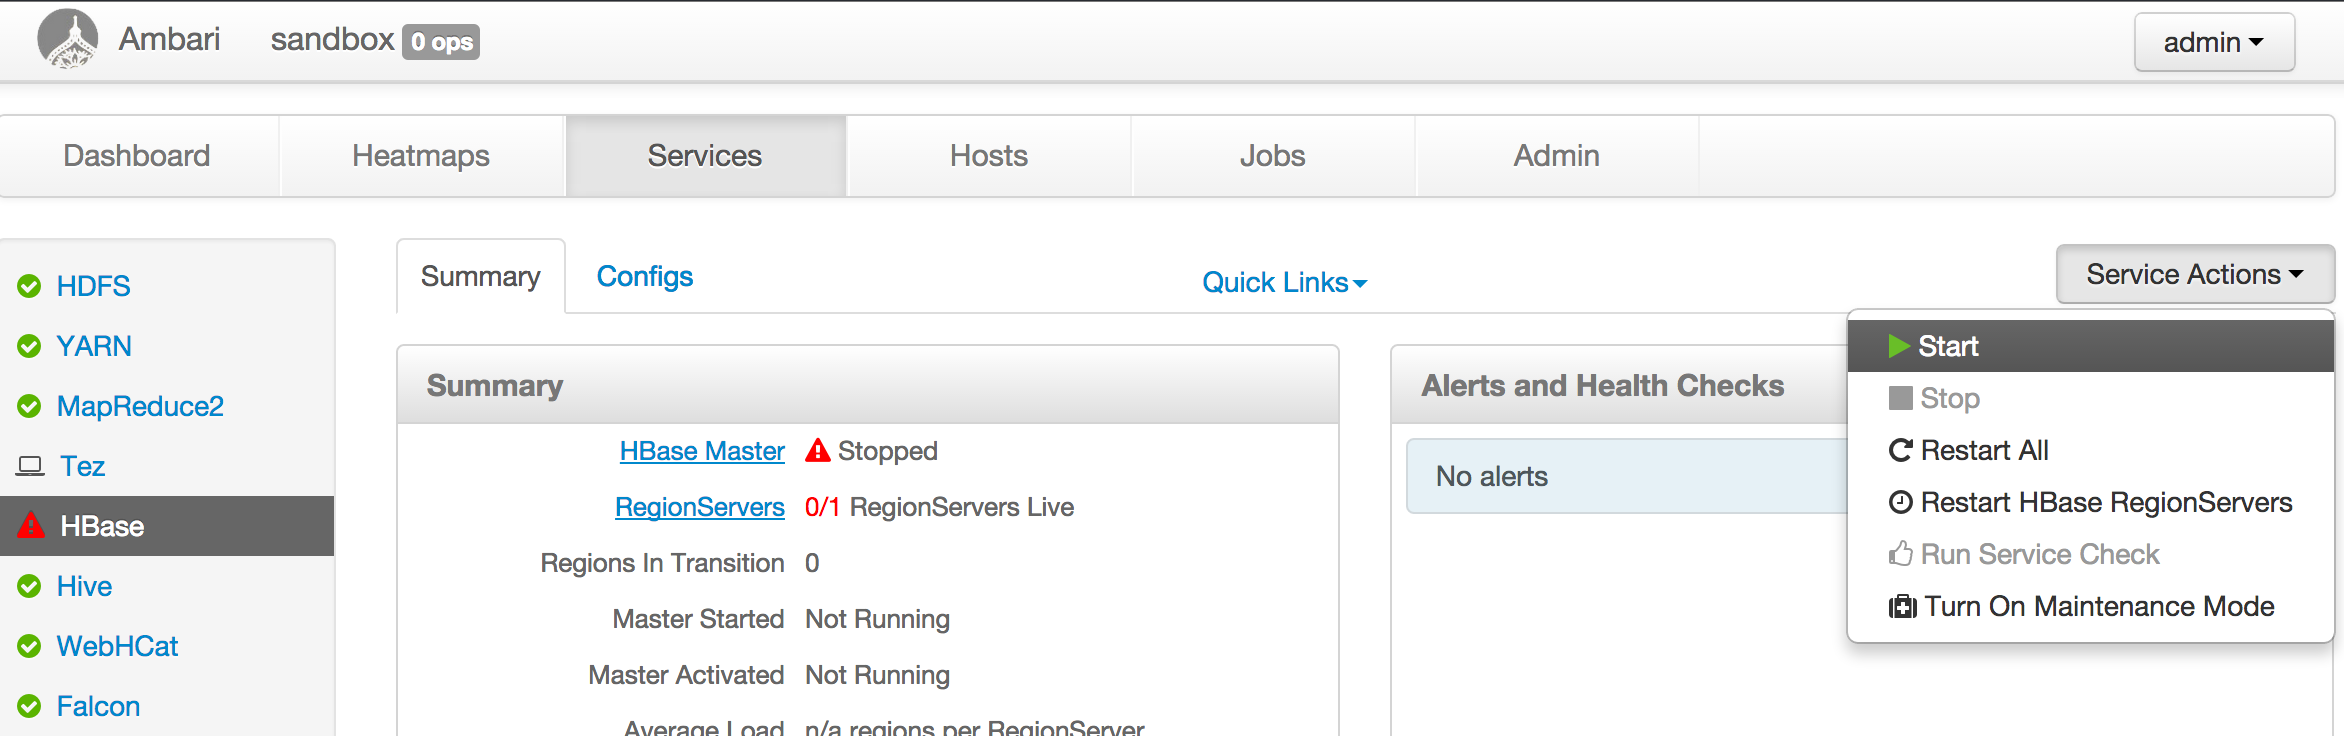 |
| |
| 对于 hadoop 分布式,基本上启动 hadoop 集群,确保 HDFS,YARN,Hive,HBase 运行着即可。 |
| |
| 注意: |
| |
| * 为 YARN resource manager 分配 3-4GB 内存; |
| * 升级 Sandbox 里的 Java 到 Java 8(Kyin 2.5 需要 Java 8),链接原本的 JAVA_HOME 指向新的将改变每一个用户的 JDK 版本。否则,你也许会遇到 `UnsupportedClassVersionError` 异常。这里有一些邮件是关于这个问题的:[spark task error occurs when run IT in sanbox](https://lists.apache.org/thread.html/46eb7e4083fd25a461f09573fc4225689e61c0d8150463a2c0eb65ef@%3Cdev.kylin.apache.org%3E); |
| **提示:** 这里有一些关于沙箱的教程会有帮助。 [Learning the Ropes of the HDP Sandbox](https://hortonworks.com/tutorial/learning-the-ropes-of-the-hortonworks-sandbox) |
| |
| ## 开发机器的环境 |
| |
| |
| ### 安装 Maven |
| |
| 最新的 Maven 下载地址:<http://maven.apache.org/download.cgi>,我们创建一个符号,以便 `mvn` 可以在任何地方运行。 |
| |
| {% highlight Groff markup %} |
| cd ~ |
| wget http://xenia.sote.hu/ftp/mirrors/www.apache.org/maven/maven-3/3.2.5/binaries/apache-maven-3.2.5-bin.tar.gz |
| tar -xzvf apache-maven-3.2.5-bin.tar.gz |
| ln -s /root/apache-maven-3.2.5/bin/mvn /usr/bin/mvn |
| {% endhighlight %} |
| |
| ### 安装 Spark |
| |
| 在像 /usr/local/spark 这样的本地文件夹下手动安装 Spark;你需要确认所需要的 Spark 的版本,以及从 Spark 下载页面获取下载链接。 Kylin 2.3 - 2.4 需要 Spark 2.1,Kylin 2.5 需要 Spark 2.3,例如: |
| |
| {% highlight Groff markup %} |
| wget -O /tmp/spark-2.1.2-bin-hadoop2.7.tgz https://archive.apache.org/dist/spark/spark-2.1.2/spark-2.1.2-bin-hadoop2.7.tgz |
| cd /usr/local |
| tar -zxvf /tmp/spark-2.1.2-bin-hadoop2.7.tgz |
| ln -s spark-2.1.2-bin-hadoop2.7 spark |
| {% endhighlight %} |
| |
| |
| 为 HBase 客户端创建本地临时文件夹(如果其不存在): |
| |
| {% highlight Groff markup %} |
| mkdir -p /hadoop/hbase/local/jars |
| chmod 777 /hadoop/hbase/local/jars |
| {% endhighlight %} |
| |
| ### 编译 |
| |
| 首先将 Kylin 工程下载到本地: |
| |
| {% highlight Groff markup %} |
| git clone https://github.com/apache/kylin.git |
| {% endhighlight %} |
| |
| 将 Kylin 工件安装到 Maven 仓库: |
| |
| {% highlight Groff markup %} |
| mvn clean install -DskipTests |
| {% endhighlight %} |
| 如果遇到关于某个插件不存在或是没有找到的错误,请检查 pom.xml 文件中是否有插件的版本号被注释,并根据注释说明操作。 |
| |
| ### 修改本地配置 |
| |
| 必须修改本地配置以指向 hadoop 沙箱(或 CLI)机器。你可以选择以下两种方式的其中一种: |
| |
| 第一种方式:修改配置文件 |
| |
| * 在 **examples/test_case_data/sandbox/kylin.properties** 中 |
| * 找到 `sandbox` 并替换成您的 hadoop hosts(如果您使用的是 HDP 沙箱,这步可以跳过) |
| * 找到 `kylin.job.use-remote-cli` 并修改为 "true"(在代码库中其默认值为 false,假定其运行在 hadoop CLI 上) |
| * 找到 `kylin.job.remote.cli.username` 和 `kylin.job.remote.cli.password`,填写用于登录 hadoop 集群执行 hadoop 命令的用户名和密码;如果您使用的是 HDP 沙箱,默认用户名使 `root` 密码是 `hadoop`。 |
| |
| * 在 **examples/test_case_data/sandbox** 中 |
| * 遍历每一个 xml 配置文件,找到所有的 `sandbox` 和 `sandbox.hortonworks.com`,替换成您的 hadoop hosts;(如果您使用的是 HDP 沙箱,这步可以跳过) |
| |
| 第二种方式:替换 host |
| |
| * 更新您的 `hosts` 文件,将 `sandbox` 和 `sandbox.hortonworks.com` 映射为沙箱机器的 IP 。 |
| |
| ### 运行单元测试 |
| 运行单元测试来测试每一个 classes 基本功能的有效性。 |
| |
| {% highlight Groff markup %} |
| mvn test -fae -Dhdp.version=<hdp-version> -P sandbox |
| {% endhighlight %} |
| |
| ### 运行集成测试 |
| 在真正运行集成测试前,需要为测试数据的填充运行一些端到端的 cube 构建作业,同时验证 cube 过程。然后是集成测试。 |
| |
| 其可能需要一段时间(也许两个小时),请保持耐心。 |
| |
| {% highlight Groff markup %} |
| mvn verify -fae -Dhdp.version=<hdp-version> -P sandbox |
| {% endhighlight %} |
| |
| 关于测试想要了解更多,请参考[如何测试](/cn/development/howto_test.html). |
| |
| ### 本地运行 Kylin Web 服务器 |
| |
| 拷贝 server/src/main/webapp/WEB-INF 到 webapp/app/WEB-INF |
| |
| {% highlight Groff markup %} |
| cp -r server/src/main/webapp/WEB-INF webapp/app/WEB-INF |
| {% endhighlight %} |
| |
| 为 Kylin web GUI 下载 JS。`npm` 是 `Node.js` 的一部分,请搜索有关如何在您的操作系统上安装它的信息。 |
| |
| {% highlight Groff markup %} |
| cd webapp |
| npm install -g bower |
| bower --allow-root install |
| {% endhighlight %} |
| |
| 如果在 bower install 的过程当中遇到问题,可以尝试命令: |
| |
| {% highlight Groff markup %} |
| git config --global url."git://".insteadOf https:// |
| {% endhighlight %} |
| |
| 如因网络问题或者包在默认仓库内无法获取导致安装失败,可参考[如何设置Kylin的前端仓库](/cn/development/howto_setup_frontend_registry.html)配置Kylin前端仓库 |
| |
| 注意,如果是在 Windows 上,安装完 bower,需要将 "bower.cmd" 的路径加入系统环境变量 'PATH' 中,然后运行: |
| |
| {% highlight Groff markup %} |
| bower.cmd --allow-root install |
| {% endhighlight %} |
| |
| 在 IDE,运行 `org.apache.kylin.rest.DebugTomcat`。将工作目录设置为 /server 文件夹,使用 "kylin-server" 的 classpath。在运行之前,请在 IDE 安装 Scala 插件,以保证能够编译 Spark 代码。对于 IntelliJ IDEA 2017 或之前的用户,需要修改 "server/kylin-server.iml" 文件,将所有的 "PROVIDED" 替换为 "COMPILE";对于 IntelliJ IDEA 2018 用户,请勾选 “Include dependencies with 'Provided' scope”,否则可能会抛出 "java.lang.NoClassDefFoundError: org/apache/catalina/LifecycleListener" 错误。 |
| |
| 调节 VM options,例如: |
| |
| ``` |
| -Dhdp.version=2.4.0.0-169 -DSPARK_HOME=/usr/local/spark -Dkylin.hadoop.conf.dir=/workspace/kylin/examples/test_case_data/sandbox -Xms800m -Xmx800m -XX:PermSize=64M -XX:MaxNewSize=256m -XX:MaxPermSize=128m |
| ``` |
| |
| 添加 Hadoop 相关环境变量: |
| |
| ``` |
| HADOOP_USER_NAME=root |
| ``` |
| |
| 查看 Kylin Web `http://localhost:7070/kylin`(用户名:ADMIN,密码:KYLIN) |
| |
| |
| ## 安装 IDE 编码格式化工具 |
| |
| 如果你正在为 Kylin 编写代码,你应该确保你的代码符合预期的格式。 |
| |
| 对于 Eclipse 用户,只需在提交代码之前格式化代码。 |
| |
| 对于 intellij IDEA 用户,您还需要执行一些额外步骤: |
| |
| 1. 安装 "Eclipse Code Formatter" 并在 core-common/.settings 中使用 "org.eclipse.jdt.core.prefs" 和 "org.eclipse.jdt.ui.prefs" 来配置 "Eclipse Java Formatter config file" 和 "Import order" |
| |
|  |
| |
| 2. 去 Preference => Code Style => Java,将 "Scheme" 设为默认,并设置 "Class count to use import with '\*'" 和 "Names count to use static import with '\*'" 为 99。 |
| |
|  |
| |
| 3. 禁用 intellij IDEA 的 "Optimize imports on the fly" |
| |
|  |
| |
| 3. 提交代码前格式化代码。 |
| |
| ## 设置 IDE license 头部模板 |
| |
| 每一个源文件都应该包括以下的 Apache License 头部 |
| {% highlight Groff markup %} |
| Licensed to the Apache Software Foundation (ASF) under one |
| or more contributor license agreements. See the NOTICE file |
| distributed with this work for additional information |
| regarding copyright ownership. The ASF licenses this file |
| to you under the Apache License, Version 2.0 (the |
| "License"); you may not use this file except in compliance |
| with the License. You may obtain a copy of the License at |
| |
| http://www.apache.org/licenses/LICENSE-2.0 |
| |
| Unless required by applicable law or agreed to in writing, software |
| distributed under the License is distributed on an "AS IS" BASIS, |
| WITHOUT WARRANTIES OR CONDITIONS OF ANY KIND, either express or implied. |
| See the License for the specific language governing permissions and |
| limitations under the License. |
| {% endhighlight %} |
| |
| 当打包时 checkstyle 插件将会检查头部规则。license 文件在 `dev-support/checkstyle-apache-header.txt`。为了方便开发人员,请将头部添加为 `Copyright Profile`,并将其设置为 Kylin 项目的默认值。 |
|  |