| <!--- Licensed to the Apache Software Foundation (ASF) under one --> |
| <!--- or more contributor license agreements. See the NOTICE file --> |
| <!--- distributed with this work for additional information --> |
| <!--- regarding copyright ownership. The ASF licenses this file --> |
| <!--- to you under the Apache License, Version 2.0 (the --> |
| <!--- "License"); you may not use this file except in compliance --> |
| <!--- with the License. You may obtain a copy of the License at --> |
| |
| <!--- http://www.apache.org/licenses/LICENSE-2.0 --> |
| |
| <!--- Unless required by applicable law or agreed to in writing, --> |
| <!--- software distributed under the License is distributed on an --> |
| <!--- "AS IS" BASIS, WITHOUT WARRANTIES OR CONDITIONS OF ANY --> |
| <!--- KIND, either express or implied. See the License for the --> |
| <!--- specific language governing permissions and limitations --> |
| <!--- under the License. --> |
| |
| # Installing MXNet on Ubuntu |
| |
| The following installation instructions are for installing MXNet on computers running **Ubuntu 16.04**. Support for later versions of Ubuntu is [not yet available](#contributions). |
| <hr> |
| |
| ## Contents |
| |
| * [CUDA Dependencies](#cuda-dependencies) |
| * [Quick Installation](#quick-installation) |
| * [Python](#install-mxnet-for-python) |
| * [pip Packages](#pip-package-availability) |
| * [Build from Source](#build-mxnet-from-source) |
| * [Installing Language Packages](#installing-language-packages-for-mxnet) |
| * [R](#install-the-mxnet-package-for-r) |
| * [Julia](#install-the-mxnet-package-for-julia) |
| * [Scala](#install-the-mxnet-package-for-scala) |
| * [Java](#install-the-mxnet-package-for-java) |
| * [Perl](#install-the-mxnet-package-for-perl) |
| * [Contributions](#contributions) |
| * [Next Steps](#next-steps) |
| |
| <hr> |
| |
| ## CUDA Dependencies |
| |
| If you plan to build with GPU, you need to set up the environment for CUDA and cuDNN. |
| |
| First, download and install [CUDA toolkit](https://developer.nvidia.com/cuda-toolkit). CUDA 9.2 is recommended. |
| |
| Then download [cuDNN 7.1.4](https://developer.nvidia.com/cudnn). |
| |
| Unzip the file and change to the cuDNN root directory. Move the header and libraries to your local CUDA Toolkit folder: |
| |
| ```bash |
| tar xvzf cudnn-9.2-linux-x64-v7.1 |
| sudo cp -P cuda/include/cudnn.h /usr/local/cuda/include |
| sudo cp -P cuda/lib64/libcudnn* /usr/local/cuda/lib64 |
| sudo chmod a+r /usr/local/cuda/include/cudnn.h /usr/local/cuda/lib64/libcudnn* |
| sudo ldconfig |
| ``` |
| |
| <hr> |
| |
| |
| ## Quick Installation |
| |
| ### Install MXNet for Python |
| |
| #### Dependencies |
| |
| The following scripts will install Ubuntu 16.04 dependencies for MXNet Python development. |
| |
| ```bash |
| wget https://raw.githubusercontent.com/apache/incubator-mxnet/master/ci/docker/install/ubuntu_core.sh |
| wget https://raw.githubusercontent.com/apache/incubator-mxnet/master/ci/docker/install/ubuntu_python.sh |
| sudo ./ubuntu_core.sh |
| sudo ./ubuntu_python.sh |
| ``` |
| |
| Using the latest MXNet with CUDA 9.2 package is recommended for the fastest training speeds with MXNet. |
| |
| **Recommended for training:** |
| ```bash |
| pip install mxnet-cu92 |
| ``` |
| |
| **Recommended for inference:** |
| ```bash |
| pip install mxnet-cu92mkl |
| ``` |
| |
| Alternatively, you can use the table below to select the package that suits your purpose. |
| |
| | MXNet Version | Basic | CUDA | MKL-DNN | CUDA/MKL-DNN | |
| |-|-|-|-|-| |
| | Latest | mxnet | mxnet-cu92 | mxnet-mkl | mxnet-cu92mkl | |
| |
| |
| #### pip Package Availability |
| |
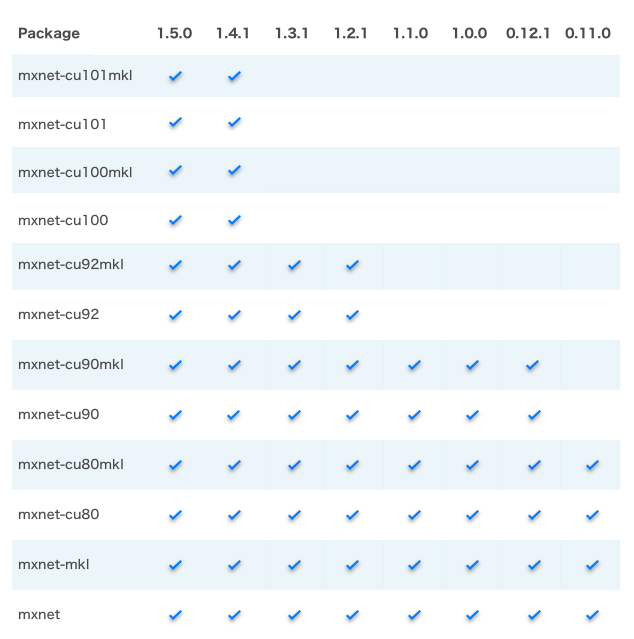
| The following table presents the pip packages that are recommended for each version of MXNet. |
| <!-- Table does not render - using a picture alternative |
| | Package / MXNet Version | 1.3.0 | 1.2.1 | 1.1.0 | 1.0.0 | 0.12.1 | 0.11.0 | |
| |-|:-:|:-:|:-:|:-:|:-:|:-:| |
| | mxnet-cu92mkl | <i class="fas fa-check"></i> | <i class="fas fa-check"></i> | <i class="far fa-times-circle"></i> | <i class="far fa-times-circle"></i> | <i class="far fa-times-circle"></i> | <i class="far fa-times-circle"></i> | |
| | mxnet-cu92 | <i class="fas fa-check"></i> | <i class="fas fa-check"></i> | <i class="far fa-times-circle"></i> | <i class="far fa-times-circle"></i> | <i class="far fa-times-circle"></i> | <i class="far fa-times-circle"></i> | |
| | mxnet-cu90mkl | <i class="fas fa-check"></i> | <i class="fas fa-check"></i> | <i class="fas fa-check"></i> | <i class="fas fa-check"></i> | <i class="fas fa-check"></i> | <i class="far fa-times-circle"></i> | |
| | mxnet-cu90 | <i class="fas fa-check"></i> | <i class="fas fa-check"></i> | <i class="fas fa-check"></i> | <i class="fas fa-check"></i> | <i class="fas fa-check"></i> | <i class="far fa-times-circle"></i> | |
| | mxnet-cu80mkl | <i class="fas fa-check"></i> | <i class="fas fa-check"></i> | <i class="fas fa-check"></i> | <i class="fas fa-check"></i> | <i class="fas fa-check"></i> | <i class="fas fa-check"></i> | |
| | mxnet-cu80 | <i class="fas fa-check"></i> | <i class="fas fa-check"></i> | <i class="fas fa-check"></i> | <i class="fas fa-check"></i> | <i class="fas fa-check"></i> | <i class="fas fa-check"></i> | |
| | mxnet-mkl | <i class="fas fa-check"></i> | <i class="fas fa-check"></i> | <i class="fas fa-check"></i> | <i class="fas fa-check"></i> | <i class="fas fa-check"></i> | <i class="fas fa-check"></i> | |
| | mxnet | <i class="fas fa-check"></i> | <i class="fas fa-check"></i> | <i class="fas fa-check"></i> | <i class="fas fa-check"></i> | <i class="fas fa-check"></i> | <i class="fas fa-check"></i> | |
| --> |
| |
|  |
| |
| To install an older version of MXNet with one of the packages in the previous table add `==` with the version you require. For example for version 1.1.0 of MXNet with CUDA 8, you would use `pip install mxnet-cu80==1.1.0`. |
| |
| <hr> |
| |
| |
| ## Build MXNet from Source |
| |
| You can build MXNet from source, and then you have the option of installing language-specific bindings, such as Scala, Java, Julia, R or Perl. This is a two-step process: |
| |
| 1. Build the shared library from the MXNet C++ source code. |
| 2. (optional) Install the supported language-specific packages for MXNet. Be sure to check that section first, as some scripts may be available to handle all of the dependencies, MXNet build, and language bindings for you. Here they are again for quick access: |
| |
| * [R](#install-the-mxnet-package-for-r) |
| * [Julia](#install-the-mxnet-package-for-julia) |
| * [Scala](#install-the-mxnet-package-for-scala) |
| * [Java](#install-the-mxnet-package-for-java) |
| * [Perl](#install-the-mxnet-package-for-perl) |
| |
| **Note:** To change the compilation options for your build, edit the ```make/config.mk``` file prior to building MXNet. More information on this is mentioned in the different language package instructions. |
| |
| ### Build the Shared Library |
| |
| #### Quick MXNet Build |
| You can quickly build MXNet from source with the following script found in the `/docs/install` folder: |
| |
| ```bash |
| cd docs/install |
| ./install_mxnet_ubuntu_python.sh |
| ``` |
| |
| Or you can go through a manual process described next. |
| |
| #### Manual MXNet Installation |
| |
| It is recommended that you review the general [build from source](build_from_source.html) instructions before continuing. |
| |
| On Ubuntu versions 16.04 or later, you need the following dependencies: |
| |
| **Step 1:** Install build tools and git. |
| ```bash |
| sudo apt-get update |
| sudo apt-get install -y build-essential git |
| ``` |
| |
| **Step 2:** Install a Math Library. |
| |
| Details on the different math libraries are found in the build from source guide's [Math Library Selection](build_from_source.html#math-library-selection) section. |
| |
| For OpenBLAS use: |
| |
| ```bash |
| sudo apt-get install -y libopenblas-dev |
| ``` |
| |
| For other libraries, visit the [Math Library Selection](build_from_source.html#math-library-selection) section. |
| |
| **Step 3:** Install OpenCV. |
| |
| *MXNet* uses [OpenCV](http://opencv.org/) for efficient image loading and augmentation operations. |
| |
| ```bash |
| sudo apt-get install -y libopencv-dev |
| ``` |
| |
| **Step 4:** Download MXNet sources and build MXNet core shared library. |
| |
| If building on CPU and using OpenBLAS: |
| |
| ```bash |
| git clone --recursive https://github.com/apache/incubator-mxnet.git |
| cd incubator-mxnet |
| make -j $(nproc) USE_OPENCV=1 USE_BLAS=openblas |
| ``` |
| |
| If building on CPU and using MKL and MKL-DNN (make sure MKL is installed according to [Math Library Selection](build_from_source.html#math-library-selection) and [MKL-DNN README](https://github.com/apache/incubator-mxnet/blob/master/MKLDNN_README.md)): |
| |
| ```bash |
| git clone --recursive https://github.com/apache/incubator-mxnet.git |
| cd incubator-mxnet |
| make -j $(nproc) USE_OPENCV=1 USE_BLAS=mkl USE_MKLDNN=1 |
| ``` |
| |
| If building on GPU and you want OpenCV and OpenBLAS (make sure you have installed the [CUDA dependencies first](#cuda-dependencies)): |
| |
| ```bash |
| git clone --recursive https://github.com/apache/incubator-mxnet.git |
| cd incubator-mxnet |
| make -j $(nproc) USE_OPENCV=1 USE_BLAS=openblas USE_CUDA=1 USE_CUDA_PATH=/usr/local/cuda USE_CUDNN=1 |
| ``` |
| |
| *Note* - USE_OPENCV and USE_BLAS are make file flags to set compilation options to use OpenCV and BLAS library. You can explore and use more compilation options in `make/config.mk` and also review common [usage examples](build_from_source.html#usage-examples). |
| |
| Building from source creates a library called ```libmxnet.so``` in the `lib` folder in your MXNet project root. |
| |
| You may also want to add the MXNet shared library to your `LD_LIBRARY_PATH`: |
| |
| ```bash |
| export LD_LIBRARY_PATH=$PWD/lib |
| ``` |
| |
| After building the MXNet library, you may install language bindings. |
| |
| <hr> |
| |
| |
| ## Installing Language Packages for MXNet |
| |
| After you have installed the MXNet core library. You may install MXNet interface packages for the programming language of your choice: |
| - [Python](#install-mxnet-for-python) |
| - [C++](#install-the-mxnet-package-for-c++) |
| - [Clojure](#install-the-mxnet-package-for-clojure) |
| - [Julia](#install-the-mxnet-package-for-julia) |
| - [Perl](#install-the-mxnet-package-for-perl) |
| - [R](#install-the-mxnet-package-for-r) |
| - [Scala](#install-the-mxnet-package-for-scala) |
| - [Java](#install-the-mxnet-package-for-java) |
| |
| <hr> |
| |
| ### Install MXNet for Python |
| |
| To install the MXNet Python binding navigate to the root of the MXNet folder then run the following: |
| |
| ```bash |
| $ cd python |
| $ pip install -e . |
| ``` |
| |
| Note that the `-e` flag is optional. It is equivalent to `--editable` and means that if you edit the source files, these changes will be reflected in the package installed. |
| |
| #### Optional Python Packages |
| |
| You may optionally install ```graphviz``` library that is used for visualizing network graphs you build on MXNet. You may also install [Jupyter Notebook](http://jupyter.readthedocs.io/) which is used for running MXNet tutorials and examples. |
| |
| ```bash |
| sudo pip install graphviz |
| sudo pip install jupyter |
| ``` |
| <hr> |
| |
| |
| ### Install the MXNet Package for C++ |
| |
| Refer to the [C++ Package setup guide](c_plus_plus.html). |
| <hr> |
| |
| |
| ### Install the MXNet Package for Clojure |
| |
| Refer to the [Clojure setup guide](https://github.com/apache/incubator-mxnet/tree/master/contrib/clojure-package). |
| <hr> |
| |
| |
| ### Install the MXNet Package for Julia |
| |
| The MXNet package for Julia is hosted in a separate repository, MXNet.jl, which is available on [GitHub](https://github.com/dmlc/MXNet.jl). To use Julia binding it with an existing libmxnet installation, set the ```MXNET_HOME``` environment variable by running the following command: |
| |
| ```bash |
| export MXNET_HOME=/<path to>/libmxnet |
| ``` |
| |
| The path to the existing libmxnet installation should be the root directory of libmxnet. In other words, you should be able to find the ```libmxnet.so``` file at ```$MXNET_HOME/lib```. For example, if the root directory of libmxnet is ```~```, you would run the following command: |
| |
| ```bash |
| export MXNET_HOME=/~/libmxnet |
| ``` |
| |
| You might want to add this command to your ```~/.bashrc``` file. If you do, you can install the Julia package in the Julia console using the following command: |
| |
| ```julia |
| Pkg.add("MXNet") |
| ``` |
| |
| For more details about installing and using MXNet with Julia, see the [MXNet Julia documentation](http://dmlc.ml/MXNet.jl/latest/user-guide/install/). |
| <hr> |
| |
| |
| ### Install the MXNet Package for Perl |
| |
| Before you build MXNet for Perl from source code, you must complete [building the shared library](#build-the-shared-library). After you build the shared library, run the following command from the MXNet source root directory to build the MXNet Perl package: |
| |
| ```bash |
| sudo apt-get install libmouse-perl pdl cpanminus swig libgraphviz-perl |
| cpanm -q -L "${HOME}/perl5" Function::Parameters Hash::Ordered PDL::CCS |
| |
| MXNET_HOME=${PWD} |
| export LD_LIBRARY_PATH=${MXNET_HOME}/lib |
| export PERL5LIB=${HOME}/perl5/lib/perl5 |
| |
| cd ${MXNET_HOME}/perl-package/AI-MXNetCAPI/ |
| perl Makefile.PL INSTALL_BASE=${HOME}/perl5 |
| make install |
| |
| cd ${MXNET_HOME}/perl-package/AI-NNVMCAPI/ |
| perl Makefile.PL INSTALL_BASE=${HOME}/perl5 |
| make install |
| |
| cd ${MXNET_HOME}/perl-package/AI-MXNet/ |
| perl Makefile.PL INSTALL_BASE=${HOME}/perl5 |
| make install |
| ``` |
| <hr> |
| |
| |
| ### Install the MXNet Package for R |
| |
| Building *MXNet* from source is a 2 step process. |
| 1. Build the *MXNet* core shared library, `libmxnet.so`, from source. |
| 2. Build the R bindings. |
| |
| #### Quick MXNet-R Installation |
| You can quickly build MXNet-R with the following two scripts found in the `/docs/install` folder: |
| |
| ```bash |
| git clone --recursive https://github.com/apache/incubator-mxnet.git mxnet |
| cd mxnet/docs/install |
| ./install_mxnet_ubuntu_python.sh |
| ./install_mxnet_ubuntu_r.sh |
| ``` |
| |
| Or you can go through a manual process described next. |
| |
| #### Manual MXNet-R Installation |
| |
| **Minimum Requirements** |
| 1. [GCC 4.8](https://gcc.gnu.org/gcc-4.8/) or later to compile C++ 11. |
| 2. [GNU Make](https://www.gnu.org/software/make/) |
| |
| <br/> |
| |
| **Build the MXNet core shared library** |
| |
| **Step 1** Install build tools and git. |
| ```bash |
| $ sudo apt-get update |
| $ sudo apt-get install -y build-essential git |
| ``` |
| |
| **Step 2** Install OpenBLAS. |
| |
| *MXNet* uses [BLAS](https://en.wikipedia.org/wiki/Basic_Linear_Algebra_Subprograms) and [LAPACK](https://en.wikipedia.org/wiki/LAPACK) libraries for accelerated numerical computations on CPU machine. There are several flavors of BLAS/LAPACK libraries - [OpenBLAS](http://www.openblas.net/), [ATLAS](http://math-atlas.sourceforge.net/) and [MKL](https://software.intel.com/en-us/intel-mkl). In this step we install OpenBLAS. You can choose to install ATLAS or MKL. |
| ```bash |
| $ sudo apt-get install -y libopenblas-dev liblapack-dev |
| ``` |
| |
| **Step 3** Install OpenCV. |
| |
| *MXNet* uses [OpenCV](http://opencv.org/) for efficient image loading and augmentation operations. |
| ```bash |
| $ sudo apt-get install -y libopencv-dev |
| ``` |
| |
| **Step 4** Download MXNet sources and build MXNet core shared library. You can clone the repository as described in the following code block, or you may try the <a href="download.html">download links</a> for your desired MXNet version. |
| |
| ```bash |
| $ git clone --recursive https://github.com/apache/incubator-mxnet |
| $ cd incubator-mxnet |
| $ make -j $(nproc) USE_OPENCV=1 USE_BLAS=openblas |
| ``` |
| |
| *Note* - USE_OPENCV and USE_BLAS are make file flags to set compilation options to use OpenCV and BLAS library. You can explore and use more compilation options in `make/config.mk`. |
| |
| <br/> |
| |
| **Step 5** Make and install the MXNet-R bindings. |
| |
| ```bash |
| $ make rpkg |
| ``` |
| #### Verify MXNet-R Installation |
| |
| You can verify your MXNet-R installation as follows: |
| |
| ```bash |
| sudo -i R |
| ``` |
| |
| At the R prompt enter the following: |
| |
| ```r |
| library(mxnet) |
| a <- mx.nd.ones(c(2,3), ctx = mx.cpu()) |
| b <- a * 2 + 1 |
| b |
| ``` |
| |
| You should see the following output: |
| |
| ``` |
| [,1] [,2] [,3] |
| [1,] 3 3 3 |
| [2,] 3 3 3 |
| > quit() |
| ``` |
| <hr> |
| |
| |
| ### Install the MXNet Package for Scala |
| |
| To use the MXNet-Scala package, you can acquire the Maven package as a dependency. |
| |
| Further information is in the [MXNet-Scala Setup Instructions](scala_setup.html). |
| |
| If you use IntelliJ or a similar IDE, you may want to follow the [MXNet-Scala on IntelliJ tutorial](../tutorials/scala/mxnet_scala_on_intellij.html) instead. |
| <hr> |
| |
| ### Install the MXNet Package for Java |
| |
| To use the MXNet-Java package, you can acquire the Maven package as a dependency. |
| |
| Further information is in the [MXNet-Java Setup Instructions](java.html). |
| |
| If you use IntelliJ or a similar IDE, you may want to follow the [MXNet-Java on IntelliJ tutorial](../tutorials/java/mxnet_java_on_intellij.html) instead. |
| <hr> |
| |
| ## Contributions |
| |
| You are more than welcome to contribute easy installation scripts for other operating systems and programming languages. See the [community contributions page](../community/contribute.html) for further information. |
| |
| ## Next Steps |
| |
| * [Tutorials](../tutorials/index.html) |
| * [How To](../faq/index.html) |
| * [Architecture](../architecture/index.html) |
| |
| |
| <link rel="stylesheet" href="https://use.fontawesome.com/releases/v5.1.0/css/all.css" integrity="sha384-lKuwvrZot6UHsBSfcMvOkWwlCMgc0TaWr+30HWe3a4ltaBwTZhyTEggF5tJv8tbt" crossorigin="anonymous"> |