Image Segmentation
This topic describes an example image segmentation application using MXNet.
You can get the source code for this example from GitHub.
Sample Results
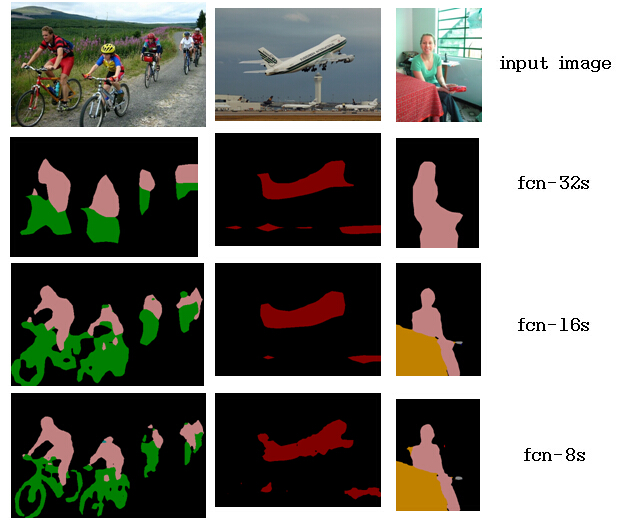
We trained a simple fcn-xs model, using the following parameters:
| model | lr (fixed) | epoch |
| ---- | ----: | ---------: |
| fcn-32s | 1e-10 | 31 |
| fcn-16s | 1e-12 | 27 |
| fcn-8s | 1e-14 | 19 |
(```when using the newest mxnet, you'd better using larger learning rate, such as 1e-4, 1e-5, 1e-6 instead, because the newest mxnet will do gradient normalization in SoftmaxOutput```)
The training image number is only 2027, and the validation image number is 462.
Training fcn-xs in MXNet
Step 1: Download the vgg16fc model and experiment data.
- The vgg16fc model. Download the
VGG_FC_ILSVRC_16_layers-symbol.jsonandVGG_FC_ILSVRC_16_layers-0074.paramsfrom baidu yun, and dropbox.
This is the full convolution style of the origin VGG_ILSVRC_16_layers.caffemodel. The corresponding vgg16 modelVGG_ILSVRC_16_layers_deploy.prototxt, has a license for non-commercial use only. - The experiment data. Download
VOC2012.rarrobots.ox.ac.uk, and extract it. The file/folder will look similar to:JPEGImages folder,SegmentationClass folder,train.lst,val.lst,test.lst.
Step 2: Train the fcn-xs model.
- If you want to train the fcn-8s model, it's better to train the fcn-32s and fcn-16s models first. When training the fcn-32s model, run the shell
./run_fcnxs.sh. The script in it is:
python -u fcn_xs.py --model=fcn32s --prefix=VGG_FC_ILSVRC_16_layers --epoch=74 --init-type=vgg16
- In fcn_xs.py, you might need to change the directory
root_dir,flist_name, ``fcnxs_model_prefix``` for your own data. - When you train the fcn-16s or fcn-8s model, change the code in
run_fcnxs.shso that when you train fcn-16s, you comment out the fcn32s script, as follows:
python -u fcn_xs.py --model=fcn16s --prefix=FCN32s_VGG16 --epoch=31 --init-type=fcnxs
- The output log looks similar to this (when training fcn-8s):
        INFO:root:Start training with gpu(3)
        INFO:root:Epoch[0] Batch [50]   Speed: 1.16 samples/sec Train-accuracy=0.894318
        INFO:root:Epoch[0] Batch [100]  Speed: 1.11 samples/sec Train-accuracy=0.904681
        INFO:root:Epoch[0] Batch [150]  Speed: 1.13 samples/sec Train-accuracy=0.908053
        INFO:root:Epoch[0] Batch [200]  Speed: 1.12 samples/sec Train-accuracy=0.912219
        INFO:root:Epoch[0] Batch [250]  Speed: 1.13 samples/sec Train-accuracy=0.914238
        INFO:root:Epoch[0] Batch [300]  Speed: 1.13 samples/sec Train-accuracy=0.912170
        INFO:root:Epoch[0] Batch [350]  Speed: 1.12 samples/sec Train-accuracy=0.912080
Using the Trained Model for Image Segmentation
Download the pre-trained model from yun.baidu. The symbol and model files are
FCN8s_VGG16-symbol.jsonandFCN8s_VGG16-0019.params.Put the image in your directory for segmentation, and change the
img = YOUR_IMAGE_NAMEinimage_segmentaion.py.Use
image_segmentaion.pyto segment one image by running it in a shell:python image_segmentaion.py
This produces the segmentation image sample shown above.
Tips
- We don't need to resize or crop the image to the same size, so the batch_size during training is set to 1.
- The fcn-xs model is based on the vgg16 model, with some crop, deconv, and element-sum layers added, so the model is big. Moreover, the example uses whole image size training. If the input image is large (such as 700 pixels x 500 pixels), it might consume a lot of memory. We recommend that you use a GPU with 12 GB of memory.
- If you don't have a GPU with 12 GB of memory, consider reducing the
cut_off_sizewhen you construct your FileIter, like this:
        train_dataiter = FileIter(
          root_dir             = "./VOC2012",
          flist_name           = "train.lst",
          cut_off_size         = 400,
          rgb_mean             = (123.68, 116.779, 103.939),
          )
Help make this example more powerful by contributing!