title: 如何编写单元测试代码 sidebar_position: 10
框架选型
Junit5+Mockito+jacoco+h2本地数据库 Idea增强插件
- JUnitGenerator V2.0 用于生成测试用例的标准模块
- GenerateAllSet 用于快速new创建对象,并设置默认值
- MybatisX dao与mapper的关联映射 方便查看
配置IDEA的Junit的模板
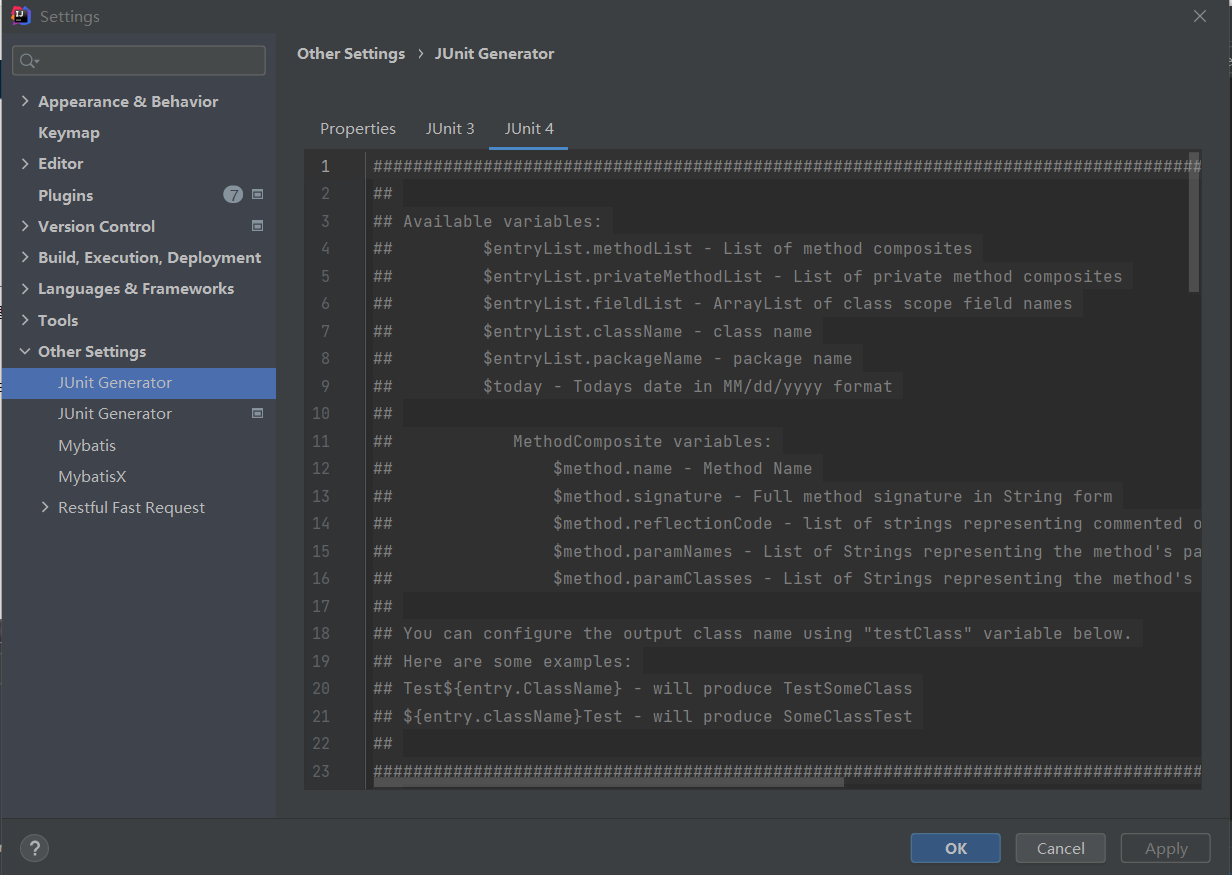
########################################################################################
##
## Available variables:
##         $entryList.methodList - List of method composites
##         $entryList.privateMethodList - List of private method composites
##         $entryList.fieldList - ArrayList of class scope field names
##         $entryList.className - class name
##         $entryList.packageName - package name
##         $today - Todays date in MM/dd/yyyy format
##
##            MethodComposite variables:
##                $method.name - Method Name
##                $method.signature - Full method signature in String form
##                $method.reflectionCode - list of strings representing commented out reflection code to access method (Private Methods)
##                $method.paramNames - List of Strings representing the method's parameters' names
##                $method.paramClasses - List of Strings representing the method's parameters' classes
##
## You can configure the output class name using "testClass" variable below.
## Here are some examples:
## Test${entry.ClassName} - will produce TestSomeClass
## ${entry.className}Test - will produce SomeClassTest
##
########################################################################################
##
## 首字母大写
#macro (cap $strIn)$strIn.valueOf($strIn.charAt(0)).toUpperCase()$strIn.substring(1)#end
## 首字母小写 自定义down
#macro (down $strIn)$strIn.valueOf($strIn.charAt(0)).toLowerCase()$strIn.substring(1)#end
## Iterate through the list and generate testcase for every entry.
#foreach ($entry in $entryList)
#set( $testClass="${entry.className}Test")
##

/*
 * Licensed to the Apache Software Foundation (ASF) under one or more
 * contributor license agreements.  See the NOTICE file distributed with
 * this work for additional information regarding copyright ownership.
 * The ASF licenses this file to You under the Apache License, Version 2.0
 * (the "License"); you may not use this file except in compliance with
 * the License.  You may obtain a copy of the License at
 *
 *    http://www.apache.org/licenses/LICENSE-2.0
 *
 * Unless required by applicable law or agreed to in writing, software
 * distributed under the License is distributed on an "AS IS" BASIS,
 * WITHOUT WARRANTIES OR CONDITIONS OF ANY KIND, either express or implied.
 * See the License for the specific language governing permissions and
 * limitations under the License.
 */

package $entry.packageName;

import org.junit.jupiter.api.AfterEach;
import org.junit.jupiter.api.BeforeEach;
import org.junit.jupiter.api.DisplayName;
import org.junit.jupiter.api.Test;
import org.springframework.beans.factory.annotation.Autowired;

/**
 * ${entry.className} Tester
*/
public class $testClass {

    @Autowired
    private ${entry.className} #down(${entry.className});

    @BeforeEach
    @DisplayName("Each unit test method is executed once before execution")
    public void before() throws Exception {
    }

    @AfterEach
    @DisplayName("Each unit test method is executed once before execution")
    public void after() throws Exception {
    }

#foreach($method in $entry.methodList)

    @Test
    @DisplayName("Method description: ...")
    public void test#cap(${method.name})() throws Exception {
        //TODO: Test goes here...
    }

#end

#foreach($method in $entry.privateMethodList)

    @Test
    @DisplayName("Method description: ...")
    public void test#cap(${method.name})() throws Exception {
        //TODO: Test goes here...
    #foreach($string in $method.reflectionCode)
    $string
    #end
    }

#end
}
#end
1.配置配置测试类生成路径
原配置:${SOURCEPATH}/test/${PACKAGE}/${FILENAME}
修改后配置:${SOURCEPATH}/../../test/java/${PACKAGE}/${FILENAME}
如图: 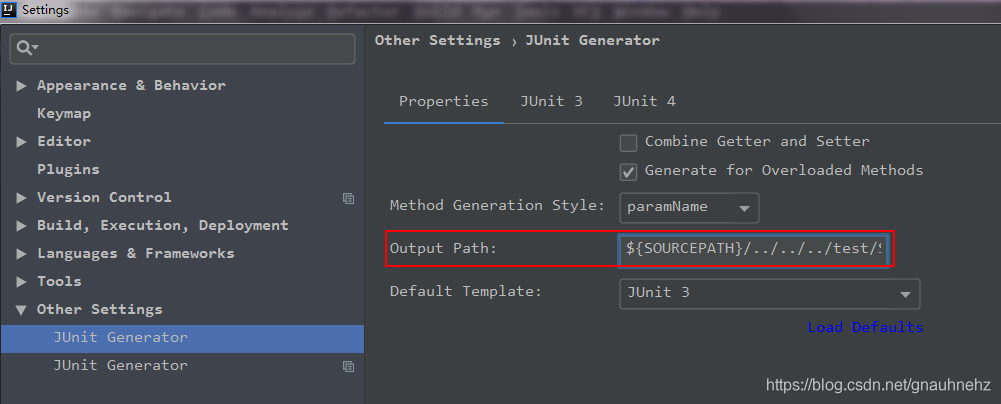 2.选择类——>右键——>Generate——>Junit Test,生成测试类
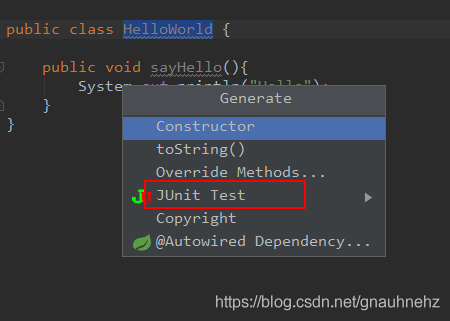
单元测试准则
目录以及命名准则
1.单元测试代码目录 必须写在如下工程目录:src/test/java,不允许写在业务代码目录下。
说明:源码编译时会跳过此目录,而单元测试框架默认是扫描此目录,测试的配置文件必须放在:src/test/resources文件下2.测试类所在的包名应该和被测试类所在的包名保持一致
示例:
业务类 src/main/java/org/apache/linkis/jobhistory/dao/JobDetailMapper.java
对应的测试类 src/test/java/org/apache/linkis/jobhistory/dao/JobDetailMapperTest.java3.测试类的命名定义规范:使用Test作为类名的后缀
测试类的命名如下:
被测试的业务+Test、被测试的接口+Test、被测试的类+Test4.测试用例的命名定义规范:使用test作为方法名的前缀
测试用例的命名规则是:test+方法名。避免使用test1、test2没有含义的名称,其次需要有必要的函数方法注释。
编写准则
1.单元测试中不准使用 System.out 来进行人肉验证,或则if判断来验证(可以使用log进行关键日志输出),必须使用断言 assert 来验证。
2.保持单元测试的独立性。为了保证单元测试稳定可靠且便于维护,单元测试用例之间决不能互相调用,也不能依赖执行的先后次序。
反例:method2 需要依赖 method1 的执行,将执行结果作为 method2 的输入3.单元测试必须可以重复执行的,不能受到外界环境的影响。 说明:单元测试通常会被放到持续集成中,每次有代码 check in 时单元测试都会被执行。如果单测对外部环境(网络、服务、中间件等)有依赖,容易导致持续集成机制的不可用。
正例:为了不受外界环境影响,要求设计代码时就把被测类的相关依赖改成注入,在测试时用 spring 这样的依赖注入框架注入一个本地(内存)实现或者 Mock 实现。4.增量代码确保单元测试通过。
说明:新增代码必须补充单元测试,如果新增代码影响了原有单元测试,请修正5.对于单元测试,要保证测试粒度足够小,有助于精确定位问题。单测粒度一般都是方法级别(工具类或则枚举类等极少场景可以是类级别)。
说明:只有测试粒度小才能在出错时尽快定位到出错位置。单测不负责检查跨类或者跨系统的交互逻辑,那是集成测试的领域。
断言的使用
所有的测试用例的结果验证都必须使用断言模式 优先使用Junit5的Assertions断言,极少数场景允许使用AssertJ的断言
Junit5常规断言
| 方法 | 说明 | 备注 |
|---|---|---|
| assertEquals | 判断两个对象或两个原始类型是否相等 | |
| assertNotEquals | 判断两个对象或两个原始类型是否不相等 | |
| assertTrue | 判断给定的布尔值是否为 true | |
| assertFalse | 判断给定的布尔值是否为 false | |
| assertNull | 判断给定的对象引用是否为 null | |
| assertNotNull | 判断给定的对象引用是否不为 null | |
| assertAll | 将多个判断逻辑放在一起处理,只要有一个报错就会导致整体测试不通过 |
Junit5组合断言和异常断言
组合断言 assertAll方法可以将多个判断逻辑放在一起处理,只要有一个报错就会导致整体测试不通过:
    @Test
    @DisplayName("assert all")
    public void all() {
    //将多个判断放在一起执行,只有全部通过才算通过
     assertAll("Math",
        () -> assertEquals(2, 1 + 1),
        () -> assertTrue(1 > 0)
     );
    }
**异常断言 ** Assertions.assertThrows方法,用来测试Executable实例执行execute方法时是否抛出指定类型的异常; 如果execute方法执行时不抛出异常,或者抛出的异常与期望类型不一致,都会导致测试失败; 示例:
    @Test
    @DisplayName("异常的断言")
    void exceptionTesting() {
        // 其execute方法执行时,如果抛出了异常,并且异常的类型是assertThrows的第一个参数(这里是ArithmeticException.class),
        // 返回值是异常的实例
        Exception exception = assertThrows(ArithmeticException.class, () -> Math.floorDiv(1,0));
        log.info("assertThrows通过后,返回的异常实例:{}", exception.getMessage());
    }
断言使用准则
对象实例是否相等断言
1.是否是同一个对象实例
  使用Junitd的Assertions.assertEquals
  Assertions.assertEquals(expectedJobDetail, actualJobDetail)
不是同一个实例,但是比较实例的属性值是否完全相等 AssertJ
  常用场景 数据库更新操作前/后的对象比较
  使用AssertJ的assertThat断言usingRecursiveComparison模式
  Assertions.assertThat(actualObject).usingRecursiveComparison().isEqualTo(expectedObject);
2.list等集合结果的断言 结果集集合的大小需要断言 范围或则具体大size
结果集集合中的每个对象需要断言,推荐结合stream模式的Predicate进行使用 示例:
  ArrayList<JobRespProtocol> jobRespProtocolArrayList=service.batchChange(jobDetailReqBatchUpdate);
  //list配和stream的predicate进行断言判断
  Predicate<JobRespProtocol> statusPrecate = e -> e.getStatus()==0;
  assertEquals(2, jobRespProtocolArrayList.size());
  assertTrue(jobRespProtocolArrayList.stream().anyMatch(statusPrecate));
Mock模拟返回数据
有时我们单测一些api或者service模块,其中的service或者dao对于一些方法的返回值默认是null,但是逻辑里面有对这个返回null的对象进行判断或者二次取值的话,就是引发一些异常
示例:
    PageInfo<UDFAddVo> pageInfo =
        udfService.getManagerPages(udfName, udfTypes, userName, curPage, pageSize);
    message = Message.ok();
    // 这里的pageInfo是null,后续的get方法就会出现异常
    message.data("infoList", pageInfo.getList());
    message.data("totalPage", pageInfo.getPages());
    message.data("total", pageInfo.getTotal());
mock模拟数据示例:
    PageInfo<UDFAddVo> pageInfo = new PageInfo<>();
    pageInfo.setList(new ArrayList<>());
    pageInfo.setPages(10);
    pageInfo.setTotal(100);
    // 对 udfService.getManagerPages 方法进行任意传递参数,模拟返回pageInfo对象
    // 有了这个模拟数据,上面示例在执行get方法的时候,就不会有异常
    Mockito.when(
            udfService.getManagerPages(
                Mockito.anyString(),
                Mockito.anyCollection(),
                Mockito.anyString(),
                Mockito.anyInt(),
                Mockito.anyInt()))
        .thenReturn(pageInfo);
单元测试的编写
类的划分
按类的大功能可以大体分类
- Controller 提供http服务的controller 配合mockmvc做单元测试
- Service 业务逻辑代码的service层
- Dao 与数据库操作的Dao层
- util工具功能类 常用的功能工具
- exception类 自定义的异常类
- enum类 枚举类
- entity类 用于DB交互以及方法处理的参数VO对象等实体类(若除了正常得get set外还有其他自定义函数的需要进行单元测试)
Controller类的单元测试
使用Mockmvc 主要验证 接口请求RequestMethod方式,基本参数,以及返回结果预期。 主要场景:带上非必要参数和不带非必要参数的场景 异常
 @Test
    public void testList() throws Exception {
        //带上非必要参数
        MultiValueMap<String, String> paramsMap = new LinkedMultiValueMap<>();
        paramsMap.add("startDate", String.valueOf(System.currentTimeMillis()));
        MvcResult mvcResult = mockMvc.perform(get("/jobhistory/list")
                .params(paramsMap))
                .andExpect(status().isOk())
                .andExpect(content().contentType(MediaType.APPLICATION_JSON))
                .andReturn();

        Message res = JsonUtils.jackson().readValue(mvcResult.getResponse().getContentAsString(), Message.class);
        assertEquals(res.getStatus(), MessageStatus.SUCCESS());
        logger.info(mvcResult.getResponse().getContentAsString());

        //不带非必要参数
        mvcResult = mockMvc.perform(get("/jobhistory/list"))
                .andExpect(status().isOk())
                .andExpect(content().contentType(MediaType.APPLICATION_JSON))
                .andReturn();

        res = JsonUtils.jackson().readValue(mvcResult.getResponse().getContentAsString(), Message.class);
        assertEquals(res.getStatus(), MessageStatus.SUCCESS());

        logger.info(mvcResult.getResponse().getContentAsString());
    }
Server 类的单元测试
//todo
Dao 类的单元测试
使用H2数据库,配置文件中application.properties中需要配置H2数据库的基本信息,以及mybatis的相关路径信息
#h2数据库配置
spring.datasource.driver-class-name=org.h2.Driver
#连接数据库
spring.datasource.url=jdbc:h2:mem:test;MODE=MySQL;DB_CLOSE_DELAY=-1;DATABASE_TO_LOWER=true
#初始化数据库表的脚本
spring.datasource.schema=classpath:create.sql
#初始化数据库表中的数据的脚本
spring.datasource.data=classpath:data.sql
spring.datasource.username=sa
spring.datasource.password=
spring.datasource.hikari.connection-test-query=select 1
spring.datasource.hikari.minimum-idle=5
spring.datasource.hikari.auto-commit=true
spring.datasource.hikari.validation-timeout=3000
spring.datasource.hikari.pool-name=linkis-test
spring.datasource.hikari.maximum-pool-size=50
spring.datasource.hikari.connection-timeout=30000
spring.datasource.hikari.idle-timeout=600000
spring.datasource.hikari.leak-detection-threshold=0
spring.datasource.hikari.initialization-fail-timeout=1

#配置mybatis-plus的mapper信息 因为使用的是mybatis-plus,使用mybatis-plus浅醉
mybatis-plus.mapper-locations=classpath:org/apache/linkis/jobhistory/dao/impl/JobDetailMapper.xml,classpath:org/apache/linkis/jobhistory/dao/impl/JobHistoryMapper.xml
mybatis-plus.type-aliases-package=org.apache.linkis.jobhistory.entity
mybatis-plus.configuration.log-impl=org.apache.ibatis.logging.stdout.StdOutImpl
编写规范
- 使用@Transactional以及@Rollback 实现数据回滚,避免数据污染
- 每一个DaoTest应该有一个创建初始化数据公共方法(或导入数据的方式csv)来准备数据,相关的查询,更新,删除等操作都应该先调用该公共方法进行数据的准备
- 创建测试的数据,如果某属性值是自增id,则不应该进行赋值
- 创建的测试数据,应尽可能和实际样例数据保持一致
- 更新数据测试时,如果字段允许,请带上
modify-原始值前缀