| <!-- |
| |
| Licensed to the Apache Software Foundation (ASF) under one |
| or more contributor license agreements. See the NOTICE file |
| distributed with this work for additional information |
| regarding copyright ownership. The ASF licenses this file |
| to you under the Apache License, Version 2.0 (the |
| "License"); you may not use this file except in compliance |
| with the License. You may obtain a copy of the License at |
| |
| http://www.apache.org/licenses/LICENSE-2.0 |
| |
| Unless required by applicable law or agreed to in writing, |
| software distributed under the License is distributed on an |
| "AS IS" BASIS, WITHOUT WARRANTIES OR CONDITIONS OF ANY |
| KIND, either express or implied. See the License for the |
| specific language governing permissions and limitations |
| under the License. |
| |
| --> |
| |
| ## Python Native API |
| |
| ### Requirements |
| |
| You have to install thrift (>=0.13) before using the package. |
| |
| |
| |
| ### How to use (Example) |
| |
| First, download the package: `pip3 install apache-iotdb` |
| |
| You can get an example of using the package to read and write data at here: [Example](https://github.com/apache/iotdb/blob/master/client-py/SessionExample.py) |
| |
| An example of aligned timeseries: [Aligned Timeseries Session Example](https://github.com/apache/iotdb/blob/master/client-py/SessionAlignedTimeseriesExample.py) |
| |
| (you need to add `import iotdb` in the head of the file) |
| |
| Or: |
| |
| ```python |
| from iotdb.Session import Session |
| |
| ip = "127.0.0.1" |
| port_ = "6667" |
| username_ = "root" |
| password_ = "root" |
| session = Session(ip, port_, username_, password_) |
| session.open(False) |
| zone = session.get_time_zone() |
| session.close() |
| ``` |
| |
| ### Initialization |
| |
| * Initialize a Session |
| |
| ```python |
| session = Session(ip, port_, username_, password_, fetch_size=1024, zone_id="UTC+8") |
| ``` |
| |
| * Open a session, with a parameter to specify whether to enable RPC compression |
| |
| ```python |
| session.open(enable_rpc_compression=False) |
| ``` |
| |
| Notice: this RPC compression status of client must comply with that of IoTDB server |
| |
| * Close a Session |
| |
| ```python |
| session.close() |
| ``` |
| |
| ### Data Definition Interface (DDL Interface) |
| |
| #### Database Management |
| |
| * CREATE DATABASE |
| |
| ```python |
| session.set_storage_group(group_name) |
| ``` |
| |
| * Delete one or several databases |
| |
| ```python |
| session.delete_storage_group(group_name) |
| session.delete_storage_groups(group_name_lst) |
| ``` |
| #### Timeseries Management |
| |
| * Create one or multiple timeseries |
| |
| ```python |
| session.create_time_series(ts_path, data_type, encoding, compressor, |
| props=None, tags=None, attributes=None, alias=None) |
| |
| session.create_multi_time_series( |
| ts_path_lst, data_type_lst, encoding_lst, compressor_lst, |
| props_lst=None, tags_lst=None, attributes_lst=None, alias_lst=None |
| ) |
| ``` |
| |
| * Create aligned timeseries |
| |
| ```python |
| session.create_aligned_time_series( |
| device_id, measurements_lst, data_type_lst, encoding_lst, compressor_lst |
| ) |
| ``` |
| |
| Attention: Alias of measurements are **not supported** currently. |
| |
| * Delete one or several timeseries |
| |
| ```python |
| session.delete_time_series(paths_list) |
| ``` |
| |
| * Check whether the specific timeseries exists |
| |
| ```python |
| session.check_time_series_exists(path) |
| ``` |
| |
| ### Data Manipulation Interface (DML Interface) |
| |
| #### Insert |
| |
| It is recommended to use insertTablet to help improve write efficiency. |
| |
| * Insert a Tablet,which is multiple rows of a device, each row has the same measurements |
| * **Better Write Performance** |
| * **Support null values**: fill the null value with any value, and then mark the null value via BitMap (from v0.13) |
| |
| |
| We have two implementations of Tablet in Python API. |
| |
| * Normal Tablet |
| |
| ```python |
| values_ = [ |
| [False, 10, 11, 1.1, 10011.1, "test01"], |
| [True, 100, 11111, 1.25, 101.0, "test02"], |
| [False, 100, 1, 188.1, 688.25, "test03"], |
| [True, 0, 0, 0, 6.25, "test04"], |
| ] |
| timestamps_ = [1, 2, 3, 4] |
| tablet_ = Tablet( |
| device_id, measurements_, data_types_, values_, timestamps_ |
| ) |
| session.insert_tablet(tablet_) |
| |
| values_ = [ |
| [None, 10, 11, 1.1, 10011.1, "test01"], |
| [True, None, 11111, 1.25, 101.0, "test02"], |
| [False, 100, None, 188.1, 688.25, "test03"], |
| [True, 0, 0, 0, None, None], |
| ] |
| timestamps_ = [16, 17, 18, 19] |
| tablet_ = Tablet( |
| device_id, measurements_, data_types_, values_, timestamps_ |
| ) |
| session.insert_tablet(tablet_) |
| ``` |
| * Numpy Tablet |
| |
| Comparing with Tablet, Numpy Tablet is using [numpy.ndarray](https://numpy.org/doc/stable/reference/generated/numpy.ndarray.html) to record data. |
| With less memory footprint and time cost of serialization, the insert performance will be better. |
| |
| **Notice** |
| 1. time and numerical value columns in Tablet is ndarray |
| 2. recommended to use the specific dtypes to each ndarray, see the example below |
| (if not, the default dtypes are also ok). |
| |
| ```python |
| import numpy as np |
| data_types_ = [ |
| TSDataType.BOOLEAN, |
| TSDataType.INT32, |
| TSDataType.INT64, |
| TSDataType.FLOAT, |
| TSDataType.DOUBLE, |
| TSDataType.TEXT, |
| ] |
| np_values_ = [ |
| np.array([False, True, False, True], TSDataType.BOOLEAN.np_dtype()), |
| np.array([10, 100, 100, 0], TSDataType.INT32.np_dtype()), |
| np.array([11, 11111, 1, 0], TSDataType.INT64.np_dtype()), |
| np.array([1.1, 1.25, 188.1, 0], TSDataType.FLOAT.np_dtype()), |
| np.array([10011.1, 101.0, 688.25, 6.25], TSDataType.DOUBLE.np_dtype()), |
| np.array(["test01", "test02", "test03", "test04"], TSDataType.TEXT.np_dtype()), |
| ] |
| np_timestamps_ = np.array([1, 2, 3, 4], TSDataType.INT64.np_dtype()) |
| np_tablet_ = NumpyTablet( |
| device_id, measurements_, data_types_, np_values_, np_timestamps_ |
| ) |
| session.insert_tablet(np_tablet_) |
| |
| # insert one numpy tablet with None into the database. |
| np_values_ = [ |
| np.array([False, True, False, True], TSDataType.BOOLEAN.np_dtype()), |
| np.array([10, 100, 100, 0], TSDataType.INT32.np_dtype()), |
| np.array([11, 11111, 1, 0], TSDataType.INT64.np_dtype()), |
| np.array([1.1, 1.25, 188.1, 0], TSDataType.FLOAT.np_dtype()), |
| np.array([10011.1, 101.0, 688.25, 6.25], TSDataType.DOUBLE.np_dtype()), |
| np.array(["test01", "test02", "test03", "test04"], TSDataType.TEXT.np_dtype()), |
| ] |
| np_timestamps_ = np.array([98, 99, 100, 101], TSDataType.INT64.np_dtype()) |
| np_bitmaps_ = [] |
| for i in range(len(measurements_)): |
| np_bitmaps_.append(BitMap(len(np_timestamps_))) |
| np_bitmaps_[0].mark(0) |
| np_bitmaps_[1].mark(1) |
| np_bitmaps_[2].mark(2) |
| np_bitmaps_[4].mark(3) |
| np_bitmaps_[5].mark(3) |
| np_tablet_with_none = NumpyTablet( |
| device_id, measurements_, data_types_, np_values_, np_timestamps_, np_bitmaps_ |
| ) |
| session.insert_tablet(np_tablet_with_none) |
| ``` |
| |
| * Insert multiple Tablets |
| |
| ```python |
| session.insert_tablets(tablet_lst) |
| ``` |
| |
| * Insert a Record |
| |
| ```python |
| session.insert_record(device_id, timestamp, measurements_, data_types_, values_) |
| ``` |
| |
| * Insert multiple Records |
| |
| ```python |
| session.insert_records( |
| device_ids_, time_list_, measurements_list_, data_type_list_, values_list_ |
| ) |
| ``` |
| |
| * Insert multiple Records that belong to the same device. |
| With type info the server has no need to do type inference, which leads a better performance |
| |
| |
| ```python |
| session.insert_records_of_one_device(device_id, time_list, measurements_list, data_types_list, values_list) |
| ``` |
| |
| #### Insert with type inference |
| |
| When the data is of String type, we can use the following interface to perform type inference based on the value of the value itself. For example, if value is "true" , it can be automatically inferred to be a boolean type. If value is "3.2" , it can be automatically inferred as a flout type. Without type information, server has to do type inference, which may cost some time. |
| |
| * Insert a Record, which contains multiple measurement value of a device at a timestamp |
| |
| ```python |
| session.insert_str_record(device_id, timestamp, measurements, string_values) |
| ``` |
| |
| #### Insert of Aligned Timeseries |
| |
| The Insert of aligned timeseries uses interfaces like insert_aligned_XXX, and others are similar to the above interfaces: |
| |
| * insert_aligned_record |
| * insert_aligned_records |
| * insert_aligned_records_of_one_device |
| * insert_aligned_tablet |
| * insert_aligned_tablets |
| |
| |
| ### IoTDB-SQL Interface |
| |
| * Execute query statement |
| |
| ```python |
| session.execute_query_statement(sql) |
| ``` |
| |
| * Execute non query statement |
| |
| ```python |
| session.execute_non_query_statement(sql) |
| ``` |
| |
| * Execute statement |
| |
| ```python |
| session.execute_statement(sql) |
| ``` |
| |
| ### Schema Template |
| #### Create Schema Template |
| The step for creating a metadata template is as follows |
| 1. Create the template class |
| 2. Adding child Node,InternalNode and MeasurementNode can be chose |
| 3. Execute create schema template function |
| |
| ```python |
| template = Template(name=template_name, share_time=True) |
| |
| i_node_gps = InternalNode(name="GPS", share_time=False) |
| i_node_v = InternalNode(name="vehicle", share_time=True) |
| m_node_x = MeasurementNode("x", TSDataType.FLOAT, TSEncoding.RLE, Compressor.SNAPPY) |
| |
| i_node_gps.add_child(m_node_x) |
| i_node_v.add_child(m_node_x) |
| |
| template.add_template(i_node_gps) |
| template.add_template(i_node_v) |
| template.add_template(m_node_x) |
| |
| session.create_schema_template(template) |
| ``` |
| #### Modify Schema Template measurements |
| Modify measurements in a template, the template must be already created. These are functions that add or delete some measurement nodes. |
| * add node in template |
| ```python |
| session.add_measurements_in_template(template_name, measurements_path, data_types, encodings, compressors, is_aligned) |
| ``` |
| |
| * delete node in template |
| ```python |
| session.delete_node_in_template(template_name, path) |
| ``` |
| |
| #### Set Schema Template |
| ```python |
| session.set_schema_template(template_name, prefix_path) |
| ``` |
| |
| #### Uset Schema Template |
| ```python |
| session.unset_schema_template(template_name, prefix_path) |
| ``` |
| |
| #### Show Schema Template |
| * Show all schema templates |
| ```python |
| session.show_all_templates() |
| ``` |
| * Count all measurements in templates |
| ```python |
| session.count_measurements_in_template(template_name) |
| ``` |
| |
| * Judge whether the path is measurement or not in templates, This measurement must be in the template |
| ```python |
| session.count_measurements_in_template(template_name, path) |
| ``` |
| |
| * Judge whether the path is exist or not in templates, This path may not belong to the template |
| ```python |
| session.is_path_exist_in_template(template_name, path) |
| ``` |
| |
| * Show nodes under in schema template |
| ```python |
| session.show_measurements_in_template(template_name) |
| ``` |
| |
| * Show the path prefix where a schema template is set |
| ```python |
| session.show_paths_template_set_on(template_name) |
| ``` |
| |
| * Show the path prefix where a schema template is used (i.e. the time series has been created) |
| ```python |
| session.show_paths_template_using_on(template_name) |
| ``` |
| |
| #### Drop Schema Template |
| Delete an existing metadata template,dropping an already set template is not supported |
| ```python |
| session.drop_schema_template("template_python") |
| ``` |
| |
| |
| ### Pandas Support |
| |
| To easily transform a query result to a [Pandas Dataframe](https://pandas.pydata.org/pandas-docs/stable/reference/api/pandas.DataFrame.html) |
| the SessionDataSet has a method `.todf()` which consumes the dataset and transforms it to a pandas dataframe. |
| |
| Example: |
| |
| ```python |
| from iotdb.Session import Session |
| |
| ip = "127.0.0.1" |
| port_ = "6667" |
| username_ = "root" |
| password_ = "root" |
| session = Session(ip, port_, username_, password_) |
| session.open(False) |
| result = session.execute_query_statement("SELECT * FROM root.*") |
| |
| # Transform to Pandas Dataset |
| df = result.todf() |
| |
| session.close() |
| |
| # Now you can work with the dataframe |
| df = ... |
| ``` |
| |
| |
| ### IoTDB Testcontainer |
| |
| The Test Support is based on the lib `testcontainers` (https://testcontainers-python.readthedocs.io/en/latest/index.html) which you need to install in your project if you want to use the feature. |
| |
| To start (and stop) an IoTDB Database in a Docker container simply do: |
| ```python |
| class MyTestCase(unittest.TestCase): |
| |
| def test_something(self): |
| with IoTDBContainer() as c: |
| session = Session("localhost", c.get_exposed_port(6667), "root", "root") |
| session.open(False) |
| result = session.execute_query_statement("SHOW TIMESERIES") |
| print(result) |
| session.close() |
| ``` |
| |
| by default it will load the image `apache/iotdb:latest`, if you want a specific version just pass it like e.g. `IoTDBContainer("apache/iotdb:0.12.0")` to get version `0.12.0` running. |
| |
| ### IoTDB DBAPI |
| |
| IoTDB DBAPI implements the Python DB API 2.0 specification (https://peps.python.org/pep-0249/), which defines a common |
| interface for accessing databases in Python. |
| |
| #### Examples |
| + Initialization |
| |
| The initialized parameters are consistent with the session part (except for the sqlalchemy_mode). |
| ```python |
| from iotdb.dbapi import connect |
| |
| ip = "127.0.0.1" |
| port_ = "6667" |
| username_ = "root" |
| password_ = "root" |
| conn = connect(ip, port_, username_, password_,fetch_size=1024,zone_id="UTC+8",sqlalchemy_mode=False) |
| cursor = conn.cursor() |
| ``` |
| + simple SQL statement execution |
| ```python |
| cursor.execute("SELECT ** FROM root") |
| for row in cursor.fetchall(): |
| print(row) |
| ``` |
| |
| + execute SQL with parameter |
| |
| IoTDB DBAPI supports pyformat style parameters |
| ```python |
| cursor.execute("SELECT ** FROM root WHERE time < %(time)s",{"time":"2017-11-01T00:08:00.000"}) |
| for row in cursor.fetchall(): |
| print(row) |
| ``` |
| |
| + execute SQL with parameter sequences |
| ```python |
| seq_of_parameters = [ |
| {"timestamp": 1, "temperature": 1}, |
| {"timestamp": 2, "temperature": 2}, |
| {"timestamp": 3, "temperature": 3}, |
| {"timestamp": 4, "temperature": 4}, |
| {"timestamp": 5, "temperature": 5}, |
| ] |
| sql = "insert into root.cursor(timestamp,temperature) values(%(timestamp)s,%(temperature)s)" |
| cursor.executemany(sql,seq_of_parameters) |
| ``` |
| |
| + close the connection and cursor |
| ```python |
| cursor.close() |
| conn.close() |
| ``` |
| |
| ### IoTDB SQLAlchemy Dialect (Experimental) |
| The SQLAlchemy dialect of IoTDB is written to adapt to Apache Superset. |
| This part is still being improved. |
| Please do not use it in the production environment! |
| #### Mapping of the metadata |
| The data model used by SQLAlchemy is a relational data model, which describes the relationships between different entities through tables. |
| While the data model of IoTDB is a hierarchical data model, which organizes the data through a tree structure. |
| In order to adapt IoTDB to the dialect of SQLAlchemy, the original data model in IoTDB needs to be reorganized. |
| Converting the data model of IoTDB into the data model of SQLAlchemy. |
| |
| The metadata in the IoTDB are: |
| |
| 1. Database |
| 2. Path |
| 3. Entity |
| 4. Measurement |
| |
| The metadata in the SQLAlchemy are: |
| 1. Schema |
| 2. Table |
| 3. Column |
| |
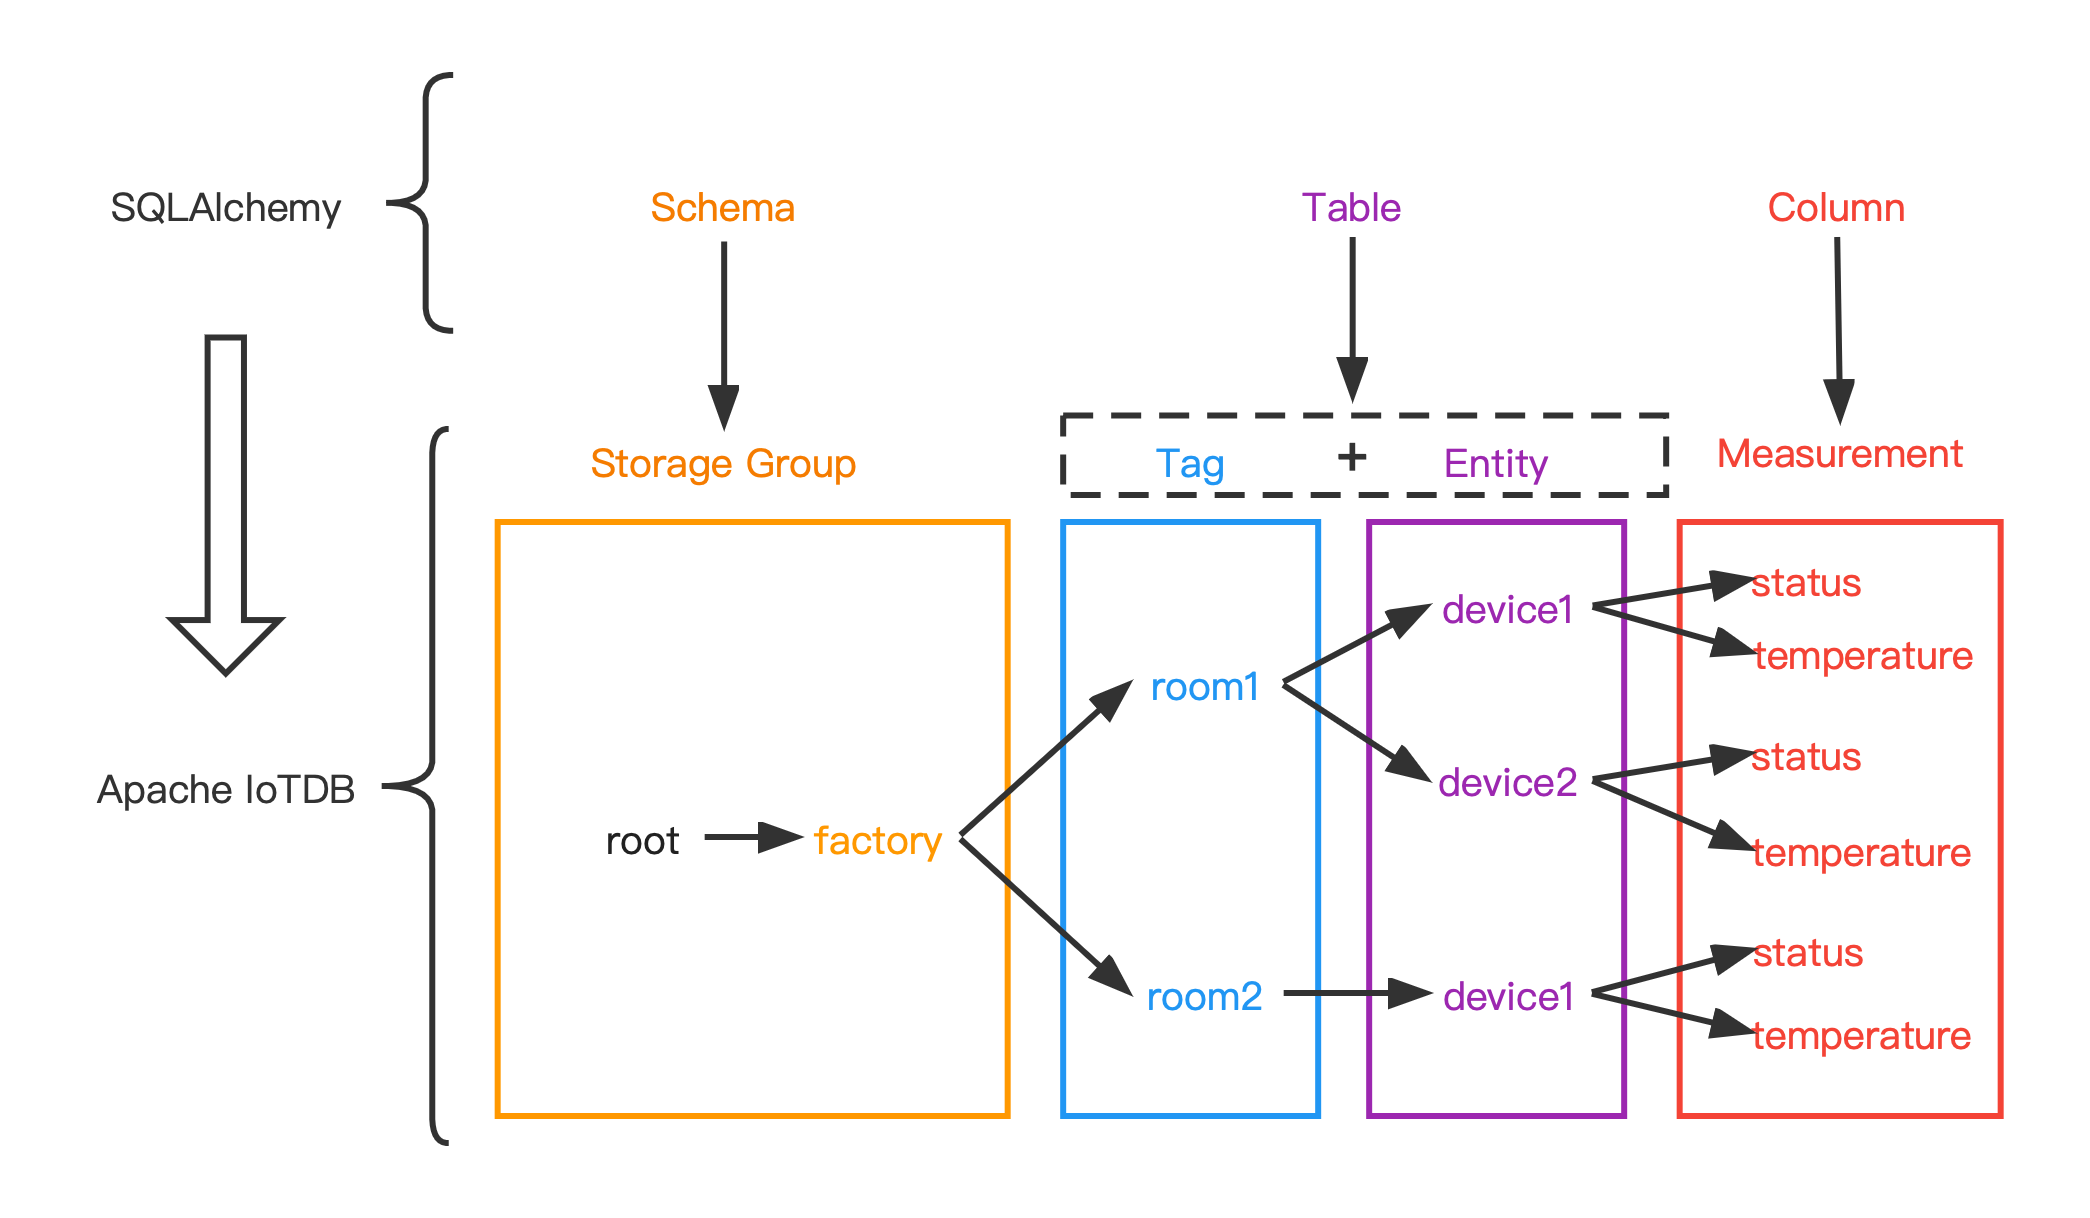
| The mapping relationship between them is: |
| |
| | The metadata in the SQLAlchemy | The metadata in the IoTDB | |
| | -------------------- | -------------------------------------------- | |
| | Schema | Database | |
| | Table | Path ( from database to entity ) + Entity | |
| | Column | Measurement | |
| |
| The following figure shows the relationship between the two more intuitively: |
| |
|  |
| |
| #### Data type mapping |
| | data type in IoTDB | data type in SQLAlchemy | |
| |--------------------|-------------------------| |
| | BOOLEAN | Boolean | |
| | INT32 | Integer | |
| | INT64 | BigInteger | |
| | FLOAT | Float | |
| | DOUBLE | Float | |
| | TEXT | Text | |
| | LONG | BigInteger | |
| |
| #### Example |
| |
| + execute statement |
| |
| ```python |
| from sqlalchemy import create_engine |
| |
| engine = create_engine("iotdb://root:root@127.0.0.1:6667") |
| connect = engine.connect() |
| result = connect.execute("SELECT ** FROM root") |
| for row in result.fetchall(): |
| print(row) |
| ``` |
| |
| + ORM (now only simple queries are supported) |
| |
| ```python |
| from sqlalchemy import create_engine, Column, Float, BigInteger, MetaData |
| from sqlalchemy.ext.declarative import declarative_base |
| from sqlalchemy.orm import sessionmaker |
| |
| metadata = MetaData( |
| schema='root.factory' |
| ) |
| Base = declarative_base(metadata=metadata) |
| |
| |
| class Device(Base): |
| __tablename__ = "room2.device1" |
| Time = Column(BigInteger, primary_key=True) |
| temperature = Column(Float) |
| status = Column(Float) |
| |
| |
| engine = create_engine("iotdb://root:root@127.0.0.1:6667") |
| |
| DbSession = sessionmaker(bind=engine) |
| session = DbSession() |
| |
| res = session.query(Device.status).filter(Device.temperature > 1) |
| |
| for row in res: |
| print(row) |
| ``` |
| |
| |
| ## Developers |
| |
| ### Introduction |
| |
| This is an example of how to connect to IoTDB with python, using the thrift rpc interfaces. Things are almost the same on Windows or Linux, but pay attention to the difference like path separator. |
| |
| |
| |
| ### Prerequisites |
| |
| Python3.7 or later is preferred. |
| |
| You have to install Thrift (0.11.0 or later) to compile our thrift file into python code. Below is the official tutorial of installation, eventually, you should have a thrift executable. |
| |
| ``` |
| http://thrift.apache.org/docs/install/ |
| ``` |
| |
| Before starting you need to install `requirements_dev.txt` in your python environment, e.g. by calling |
| ```shell |
| pip install -r requirements_dev.txt |
| ``` |
| |
| |
| |
| ### Compile the thrift library and Debug |
| |
| In the root of IoTDB's source code folder, run `mvn clean generate-sources -pl client-py -am`. |
| |
| This will automatically delete and repopulate the folder `iotdb/thrift` with the generated thrift files. |
| This folder is ignored from git and should **never be pushed to git!** |
| |
| **Notice** Do not upload `iotdb/thrift` to the git repo. |
| |
| |
| |
| |
| ### Session Client & Example |
| |
| We packed up the Thrift interface in `client-py/src/iotdb/Session.py` (similar with its Java counterpart), also provided an example file `client-py/src/SessionExample.py` of how to use the session module. please read it carefully. |
| |
| |
| Or, another simple example: |
| |
| ```python |
| from iotdb.Session import Session |
| |
| ip = "127.0.0.1" |
| port_ = "6667" |
| username_ = "root" |
| password_ = "root" |
| session = Session(ip, port_, username_, password_) |
| session.open(False) |
| zone = session.get_time_zone() |
| session.close() |
| ``` |
| |
| |
| |
| ### Tests |
| |
| Please add your custom tests in `tests` folder. |
| |
| To run all defined tests just type `pytest .` in the root folder. |
| |
| **Notice** Some tests need docker to be started on your system as a test instance is started in a docker container using [testcontainers](https://testcontainers-python.readthedocs.io/en/latest/index.html). |
| |
| |
| |
| ### Futher Tools |
| |
| [black](https://pypi.org/project/black/) and [flake8](https://pypi.org/project/flake8/) are installed for autoformatting and linting. |
| Both can be run by `black .` or `flake8 .` respectively. |
| |
| |
| |
| ## Releasing |
| |
| To do a release just ensure that you have the right set of generated thrift files. |
| Then run linting and auto-formatting. |
| Then, ensure that all tests work (via `pytest .`). |
| Then you are good to go to do a release! |
| |
| |
| |
| ### Preparing your environment |
| |
| First, install all necessary dev dependencies via `pip install -r requirements_dev.txt`. |
| |
| |
| |
| ### Doing the Release |
| |
| There is a convenient script `release.sh` to do all steps for a release. |
| Namely, these are |
| |
| * Remove all transient directories from last release (if exists) |
| * (Re-)generate all generated sources via mvn |
| * Run Linting (flake8) |
| * Run Tests via pytest |
| * Build |
| * Release to pypi |
| |