数据库编程
触发器
使用说明
触发器提供了一种侦听序列数据变动的机制。配合用户自定义逻辑,可完成告警、数据转发等功能。
触发器基于 Java 反射机制实现。用户通过简单实现 Java 接口,即可实现数据侦听。IoTDB 允许用户动态注册、卸载触发器,在注册、卸载期间,无需启停服务器。
侦听模式
IoTDB 的单个触发器可用于侦听符合特定模式的时间序列的数据变动,如时间序列 root.sg.a 上的数据变动,或者符合路径模式 root.**.a 的时间序列上的数据变动。您在注册触发器时可以通过 SQL 语句指定触发器侦听的路径模式。
触发器类型
目前触发器分为两类,您在注册触发器时可以通过 SQL 语句指定类型:
- 有状态的触发器。该类触发器的执行逻辑可能依赖前后的多条数据,框架会将不同节点写入的数据汇总到同一个触发器实例进行计算,来保留上下文信息,通常用于采样或者统计一段时间的数据聚合信息。集群中只有一个节点持有有状态触发器的实例。
- 无状态的触发器。触发器的执行逻辑只和当前输入的数据有关,框架无需将不同节点的数据汇总到同一个触发器实例中,通常用于单行数据的计算和异常检测等。集群中每个节点均持有无状态触发器的实例。
触发时机
触发器的触发时机目前有两种,后续会拓展其它触发时机。您在注册触发器时可以通过 SQL 语句指定触发时机:
- BEFORE INSERT,即在数据持久化之前触发。请注意,目前触发器并不支持数据清洗,不会对要持久化的数据本身进行变动。
- AFTER INSERT,即在数据持久化之后触发。
编写触发器
触发器依赖
触发器的逻辑需要您编写 Java 类进行实现。 在编写触发器逻辑时,需要使用到下面展示的依赖。如果您使用 Maven,则可以直接从 Maven 库中搜索到它们。请注意选择和目标服务器版本相同的依赖版本。
<dependency>
  <groupId>org.apache.iotdb</groupId>
  <artifactId>iotdb-server</artifactId>
  <version>1.0.0</version>
  <scope>provided</scope>
</dependency>
接口说明
编写一个触发器需要实现 org.apache.iotdb.trigger.api.Trigger 类。
import org.apache.iotdb.trigger.api.enums.FailureStrategy;
import org.apache.iotdb.tsfile.write.record.Tablet;

public interface Trigger {

  /**
   * This method is mainly used to validate {@link TriggerAttributes} before calling {@link
   * Trigger#onCreate(TriggerAttributes)}.
   *
   * @param attributes TriggerAttributes
   * @throws Exception e
   */
  default void validate(TriggerAttributes attributes) throws Exception {}

  /**
   * This method will be called when creating a trigger after validation.
   *
   * @param attributes TriggerAttributes
   * @throws Exception e
   */
  default void onCreate(TriggerAttributes attributes) throws Exception {}

  /**
   * This method will be called when dropping a trigger.
   *
   * @throws Exception e
   */
  default void onDrop() throws Exception {}

  /**
   * When restarting a DataNode, Triggers that have been registered will be restored and this method
   * will be called during the process of restoring.
   *
   * @throws Exception e
   */
  default void restore() throws Exception {}

  /**
   * Overrides this method to set the expected FailureStrategy, {@link FailureStrategy#OPTIMISTIC}
   * is the default strategy.
   *
   * @return {@link FailureStrategy}
   */
  default FailureStrategy getFailureStrategy() {
    return FailureStrategy.OPTIMISTIC;
  }

  /**
   * @param tablet see {@link Tablet} for detailed information of data structure. Data that is
   *     inserted will be constructed as a Tablet and you can define process logic with {@link
   *     Tablet}.
   * @return true if successfully fired
   * @throws Exception e
   */
  default boolean fire(Tablet tablet) throws Exception {
    return true;
  }
}
该类主要提供了两类编程接口:生命周期相关接口和数据变动侦听相关接口。该类中所有的接口都不是必须实现的,当您不实现它们时,它们不会对流经的数据操作产生任何响应。您可以根据实际需要,只实现其中若干接口。
下面是所有可供用户进行实现的接口的说明。
生命周期相关接口
| 接口定义 | 描述 |
|---|---|
| default void validate(TriggerAttributes attributes) throws Exception {} | 用户在使用 CREATE TRIGGER 语句创建触发器时,可以指定触发器需要使用的参数,该接口会用于验证参数正确性。 |
| default void onCreate(TriggerAttributes attributes) throws Exception {} | 当您使用CREATE TRIGGER语句创建触发器后,该接口会被调用一次。在每一个触发器实例的生命周期内,该接口会且仅会被调用一次。该接口主要有如下作用:帮助用户解析 SQL 语句中的自定义属性(使用TriggerAttributes)。 可以创建或申请资源,如建立外部链接、打开文件等。 |
| default void onDrop() throws Exception {} | 当您使用DROP TRIGGER语句删除触发器后,该接口会被调用。在每一个触发器实例的生命周期内,该接口会且仅会被调用一次。该接口主要有如下作用:可以进行资源释放的操作。可以用于持久化触发器计算的结果。 |
| default void restore() throws Exception {} | 当重启 DataNode 时,集群会恢复 DataNode 上已经注册的触发器实例,在此过程中会为该 DataNode 上的有状态触发器调用一次该接口。有状态触发器实例所在的 DataNode 宕机后,集群会在另一个可用 DataNode 上恢复该触发器的实例,在此过程中会调用一次该接口。该接口可以用于自定义恢复逻辑。 |
数据变动侦听相关接口
侦听接口
 /**
   * @param tablet see {@link Tablet} for detailed information of data structure. Data that is
   *     inserted will be constructed as a Tablet and you can define process logic with {@link
   *     Tablet}.
   * @return true if successfully fired
   * @throws Exception e
   */
  default boolean fire(Tablet tablet) throws Exception {
    return true;
  }
数据变动时,触发器以 Tablet 作为触发操作的单位。您可以通过 Tablet 获取相应序列的元数据和数据,然后进行相应的触发操作,触发成功则返回值应当为 true。该接口返回 false 或是抛出异常我们均认为触发失败。在触发失败时,我们会根据侦听策略接口进行相应的操作。
进行一次 INSERT 操作时,对于其中的每条时间序列,我们会检测是否有侦听该路径模式的触发器,然后将符合同一个触发器所侦听的路径模式的时间序列数据组装成一个新的 Tablet 用于触发器的 fire 接口。可以理解成:
Map<PartialPath, List<Trigger>> pathToTriggerListMap => Map<Trigger, Tablet>
请注意,目前我们不对触发器的触发顺序有任何保证。
下面是示例:
假设有三个触发器,触发器的触发时机均为 BEFORE INSERT
- 触发器 Trigger1 侦听路径模式:root.sg.*
- 触发器 Trigger2 侦听路径模式:root.sg.a
- 触发器 Trigger3 侦听路径模式:root.sg.b
写入语句:
insert into root.sg(time, a, b) values (1, 1, 1);
序列 root.sg.a 匹配 Trigger1 和 Trigger2,序列 root.sg.b 匹配 Trigger1 和 Trigger3,那么:
- root.sg.a 和 root.sg.b 的数据会被组装成一个新的 tablet1,在相应的触发时机进行 Trigger1.fire(tablet1)
- root.sg.a 的数据会被组装成一个新的 tablet2,在相应的触发时机进行 Trigger2.fire(tablet2)
- root.sg.b 的数据会被组装成一个新的 tablet3,在相应的触发时机进行 Trigger3.fire(tablet3)
侦听策略接口
在触发器触发失败时,我们会根据侦听策略接口设置的策略进行相应的操作,您可以通过下述接口设置 org.apache.iotdb.trigger.api.enums.FailureStrategy,目前有乐观和悲观两种策略:
- 乐观策略:触发失败的触发器不影响后续触发器的触发,也不影响写入流程,即我们不对触发失败涉及的序列做额外处理,仅打日志记录失败,最后返回用户写入数据成功,但触发部分失败。
- 悲观策略:失败触发器影响后续所有 Pipeline 的处理,即我们认为该 Trigger 触发失败会导致后续所有触发流程不再进行。如果该触发器的触发时机为 BEFORE INSERT,那么写入也不再进行,直接返回写入失败。
  /**
   * Overrides this method to set the expected FailureStrategy, {@link FailureStrategy#OPTIMISTIC}
   * is the default strategy.
   *
   * @return {@link FailureStrategy}
   */
  default FailureStrategy getFailureStrategy() {
    return FailureStrategy.OPTIMISTIC;
  }
您可以参考下图辅助理解,其中 Trigger1 配置采用乐观策略,Trigger2 配置采用悲观策略。Trigger1 和 Trigger2 的触发时机是 BEFORE INSERT,Trigger3 和 Trigger4 的触发时机是 AFTER INSERT。 正常执行流程如下:
示例
如果您使用 Maven,可以参考我们编写的示例项目 trigger-example。您可以在 这里 找到它。后续我们会加入更多的示例项目供您参考。
下面是其中一个示例项目的代码:
/*
 * Licensed to the Apache Software Foundation (ASF) under one
 * or more contributor license agreements.  See the NOTICE file
 * distributed with this work for additional information
 * regarding copyright ownership.  The ASF licenses this file
 * to you under the Apache License, Version 2.0 (the
 * "License"); you may not use this file except in compliance
 * with the License.  You may obtain a copy of the License at
 *
 *     http://www.apache.org/licenses/LICENSE-2.0
 *
 * Unless required by applicable law or agreed to in writing,
 * software distributed under the License is distributed on an
 * "AS IS" BASIS, WITHOUT WARRANTIES OR CONDITIONS OF ANY
 * KIND, either express or implied.  See the License for the
 * specific language governing permissions and limitations
 * under the License.
 */

package org.apache.iotdb.trigger;

import org.apache.iotdb.db.engine.trigger.sink.alertmanager.AlertManagerConfiguration;
import org.apache.iotdb.db.engine.trigger.sink.alertmanager.AlertManagerEvent;
import org.apache.iotdb.db.engine.trigger.sink.alertmanager.AlertManagerHandler;
import org.apache.iotdb.trigger.api.Trigger;
import org.apache.iotdb.trigger.api.TriggerAttributes;
import org.apache.iotdb.tsfile.file.metadata.enums.TSDataType;
import org.apache.iotdb.tsfile.write.record.Tablet;
import org.apache.iotdb.tsfile.write.schema.MeasurementSchema;

import org.slf4j.Logger;
import org.slf4j.LoggerFactory;

import java.io.IOException;
import java.util.HashMap;
import java.util.List;

public class ClusterAlertingExample implements Trigger {
  private static final Logger LOGGER = LoggerFactory.getLogger(ClusterAlertingExample.class);

  private final AlertManagerHandler alertManagerHandler = new AlertManagerHandler();

  private final AlertManagerConfiguration alertManagerConfiguration =
      new AlertManagerConfiguration("http://127.0.0.1:9093/api/v2/alerts");

  private String alertname;

  private final HashMap<String, String> labels = new HashMap<>();

  private final HashMap<String, String> annotations = new HashMap<>();

  @Override
  public void onCreate(TriggerAttributes attributes) throws Exception {
    alertname = "alert_test";

    labels.put("series", "root.ln.wf01.wt01.temperature");
    labels.put("value", "");
    labels.put("severity", "");

    annotations.put("summary", "high temperature");
    annotations.put("description", "{{.alertname}}: {{.series}} is {{.value}}");

    alertManagerHandler.open(alertManagerConfiguration);
  }

  @Override
  public void onDrop() throws IOException {
    alertManagerHandler.close();
  }

  @Override
  public boolean fire(Tablet tablet) throws Exception {
    List<MeasurementSchema> measurementSchemaList = tablet.getSchemas();
    for (int i = 0, n = measurementSchemaList.size(); i < n; i++) {
      if (measurementSchemaList.get(i).getType().equals(TSDataType.DOUBLE)) {
        // for example, we only deal with the columns of Double type
        double[] values = (double[]) tablet.values[i];
        for (double value : values) {
          if (value > 100.0) {
            LOGGER.info("trigger value > 100");
            labels.put("value", String.valueOf(value));
            labels.put("severity", "critical");
            AlertManagerEvent alertManagerEvent =
                new AlertManagerEvent(alertname, labels, annotations);
            alertManagerHandler.onEvent(alertManagerEvent);
          } else if (value > 50.0) {
            LOGGER.info("trigger value > 50");
            labels.put("value", String.valueOf(value));
            labels.put("severity", "warning");
            AlertManagerEvent alertManagerEvent =
                new AlertManagerEvent(alertname, labels, annotations);
            alertManagerHandler.onEvent(alertManagerEvent);
          }
        }
      }
    }
    return true;
  }
}
管理触发器
您可以通过 SQL 语句注册和卸载一个触发器实例,您也可以通过 SQL 语句查询到所有已经注册的触发器。
我们建议您在注册触发器时停止写入。
注册触发器
触发器可以注册在任意路径模式上。被注册有触发器的序列将会被触发器侦听,当序列上有数据变动时,触发器中对应的触发方法将会被调用。
注册一个触发器可以按如下流程进行:
- 按照编写触发器章节的说明,实现一个完整的 Trigger 类,假定这个类的全类名为
org.apache.iotdb.trigger.ClusterAlertingExample - 将项目打成 JAR 包。
- 使用 SQL 语句注册该触发器。注册过程中会仅只会调用一次触发器的
validate和onCreate接口,具体请参考编写触发器章节。
完整 SQL 语法如下:
// Create Trigger
createTrigger
    : CREATE triggerType TRIGGER triggerName=identifier triggerEventClause ON pathPattern AS className=STRING_LITERAL uriClause? triggerAttributeClause?
    ;

triggerType
    : STATELESS | STATEFUL
    ;

triggerEventClause
    : (BEFORE | AFTER) INSERT
    ;

    : USING URI uri
    ;

uri
    : STRING_LITERAL
    ;

triggerAttributeClause
    : WITH LR_BRACKET triggerAttribute (COMMA triggerAttribute)* RR_BRACKET
    ;

triggerAttribute
    : key=attributeKey operator_eq value=attributeValue
    ;
下面对 SQL 语法进行说明,您可以结合使用说明章节进行理解:
- triggerName:触发器 ID,该 ID 是全局唯一的,用于区分不同触发器,大小写敏感。
- triggerType:触发器类型,分为无状态(STATELESS)和有状态(STATEFUL)两类。
- triggerEventClause:触发时机,目前仅支持写入前(BEFORE INSERT)和写入后(AFTER INSERT)两种。
- pathPattern:触发器侦听的路径模式,可以包含通配符 * 和 **。
- className:触发器实现类的类名。
- uriClause:可选项,当不指定该选项时,我们默认 DBA 已经在各个 DataNode 节点的 trigger_root_dir 目录(配置项,默认为 IOTDB_HOME/ext/trigger)下放置好创建该触发器需要的 JAR 包。当指定该选项时,我们会将该 URI 对应的文件资源下载并分发到各 DataNode 的 trigger_root_dir/install 目录下。
- triggerAttributeClause:用于指定触发器实例创建时需要设置的参数,SQL 语法中该部分是可选项。
下面是一个帮助您理解的 SQL 语句示例:
CREATE STATELESS TRIGGER triggerTest
BEFORE INSERT
ON root.sg.**
AS 'org.apache.iotdb.trigger.ClusterAlertingExample'
USING URI 'http://jar/ClusterAlertingExample.jar'
WITH (
    "name" = "trigger",
    "limit" = "100"
)
上述 SQL 语句创建了一个名为 triggerTest 的触发器:
- 该触发器是无状态的(STATELESS)
- 在写入前触发(BEFORE INSERT)
- 该触发器侦听路径模式为 root.sg.**
- 所编写的触发器类名为 org.apache.iotdb.trigger.ClusterAlertingExample
- JAR 包的 URI 为 http://jar/ClusterAlertingExample.jar
- 创建该触发器实例时会传入 name 和 limit 两个参数。
卸载触发器
可以通过指定触发器 ID 的方式卸载触发器,卸载触发器的过程中会且仅会调用一次触发器的 onDrop 接口。
卸载触发器的 SQL 语法如下:
// Drop Trigger
dropTrigger
  : DROP TRIGGER triggerName=identifier
;
下面是示例语句:
DROP TRIGGER triggerTest1
上述语句将会卸载 ID 为 triggerTest1 的触发器。
查询触发器
可以通过 SQL 语句查询集群中存在的触发器的信息。SQL 语法如下:
SHOW TRIGGERS
该语句的结果集格式如下:
| TriggerName | Event | Type | State | PathPattern | ClassName | NodeId |
|---|---|---|---|---|---|---|
| triggerTest1 | BEFORE_INSERT / AFTER_INSERT | STATELESS / STATEFUL | INACTIVE / ACTIVE / DROPPING / TRANSFFERING | root.** | org.apache.iotdb.trigger.TriggerExample | ALL(STATELESS) / DATA_NODE_ID(STATEFUL) |
触发器状态说明
在集群中注册以及卸载触发器的过程中,我们维护了触发器的状态,下面是对这些状态的说明:
| 状态 | 描述 | 是否建议写入进行 |
|---|---|---|
| INACTIVE | 执行 CREATE TRIGGER 的中间状态,集群刚在 ConfigNode 上记录该触发器的信息,还未在任何 DataNode 上激活该触发器 | 否 |
| ACTIVE | 执行 CREATE TRIGGE 成功后的状态,集群所有 DataNode 上的该触发器都已经可用 | 是 |
| DROPPING | 执行 DROP TRIGGER 的中间状态,集群正处在卸载该触发器的过程中 | 否 |
| TRANSFERRING | 集群正在进行该触发器实例位置的迁移 | 否 |
重要注意事项
- 触发器从注册时开始生效,不对已有的历史数据进行处理。即只有成功注册触发器之后发生的写入请求才会被触发器侦听到。
- 触发器目前采用同步触发,所以编写时需要保证触发器效率,否则可能会大幅影响写入性能。您需要自己保证触发器内部的并发安全性。
- 集群中不能注册过多触发器。因为触发器信息全量保存在 ConfigNode 中,并且在所有 DataNode 都有一份该信息的副本。
- 建议注册触发器时停止写入。注册触发器并不是一个原子操作,注册触发器时,会出现集群内部分节点已经注册了该触发器,部分节点尚未注册成功的中间状态。为了避免部分节点上的写入请求被触发器侦听到,部分节点上没有被侦听到的情况,我们建议注册触发器时不要执行写入。
- 触发器将作为进程内程序执行,如果您的触发器编写不慎,内存占用过多,由于 IoTDB 并没有办法监控触发器所使用的内存,所以有 OOM 的风险。
- 持有有状态触发器实例的节点宕机时,我们会尝试在另外的节点上恢复相应实例,在恢复过程中我们会调用一次触发器类的 restore 接口,您可以在该接口中实现恢复触发器所维护的状态的逻辑。
- 触发器 JAR 包有大小限制,必须小于 min(
config_node_ratis_log_appender_buffer_size_max, 2G),其中config_node_ratis_log_appender_buffer_size_max是一个配置项,具体含义可以参考 IOTDB 配置项说明。 - 不同的 JAR 包中最好不要有全类名相同但功能实现不一样的类。例如:触发器 trigger1、trigger2 分别对应资源 trigger1.jar、trigger2.jar。如果两个 JAR 包里都包含一个
org.apache.iotdb.trigger.example.AlertListener类,当CREATE TRIGGER使用到这个类时,系统会随机加载其中一个 JAR 包中的类,最终导致触发器执行行为不一致以及其他的问题。
配置参数
| 配置项 | 含义 |
|---|---|
| trigger_lib_dir | 保存触发器 jar 包的目录位置 |
| stateful_trigger_retry_num_when_not_found | 有状态触发器触发无法找到触发器实例时的重试次数 |
连续查询(Continuous Query, CQ)
简介
连续查询(Continuous queries, aka CQ) 是对实时数据周期性地自动执行的查询,并将查询结果写入指定的时间序列中。
用户可以通过连续查询实现滑动窗口流式计算,如计算某个序列每小时平均温度,并写入一个新序列中。用户可以自定义 RESAMPLE 子句去创建不同的滑动窗口,可以实现对于乱序数据一定程度的容忍。
语法
CREATE (CONTINUOUS QUERY | CQ) <cq_id>
[RESAMPLE
  [EVERY <every_interval>]
  [BOUNDARY <execution_boundary_time>]
  [RANGE <start_time_offset>[, end_time_offset]]
]
[TIMEOUT POLICY BLOCKED|DISCARD]
BEGIN
    SELECT CLAUSE
        INTO CLAUSE
        FROM CLAUSE
        [WHERE CLAUSE]
        [GROUP BY(<group_by_interval>[, <sliding_step>]) [, level = <level>]]
        [HAVING CLAUSE]
        [FILL {PREVIOUS | LINEAR | constant}]
        [LIMIT rowLimit OFFSET rowOffset]
        [ALIGN BY DEVICE]
END
注意:
- 如果where子句中出现任何时间过滤条件,IoTDB将会抛出异常,因为IoTDB会自动为每次查询执行指定时间范围。
- GROUP BY TIME CLAUSE在连续查询中的语法稍有不同,它不能包含原来的第一个参数,即 [start_time, end_time),IoTDB会自动填充这个缺失的参数。如果指定,IoTDB将会抛出异常。
- 如果连续查询中既没有GROUP BY TIME子句,也没有指定EVERY子句,IoTDB将会抛出异常。
连续查询语法中参数含义的描述
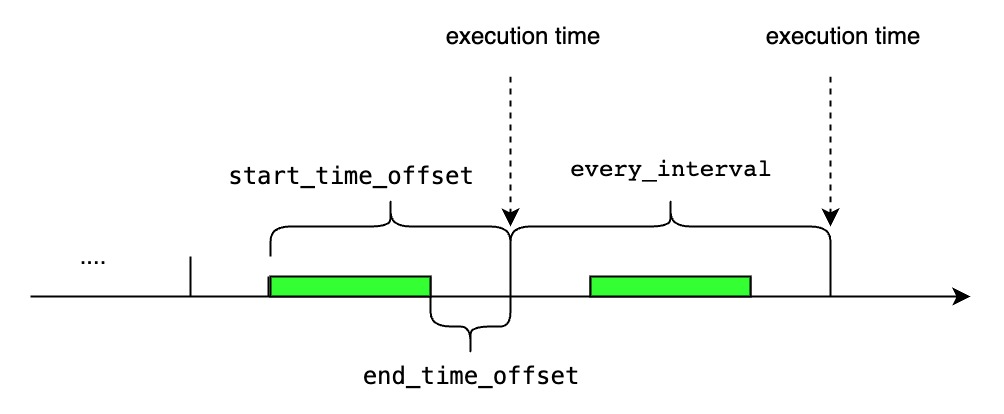
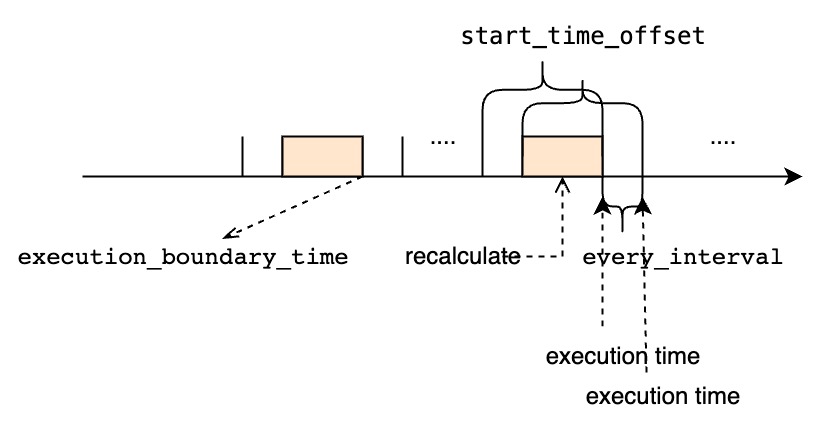
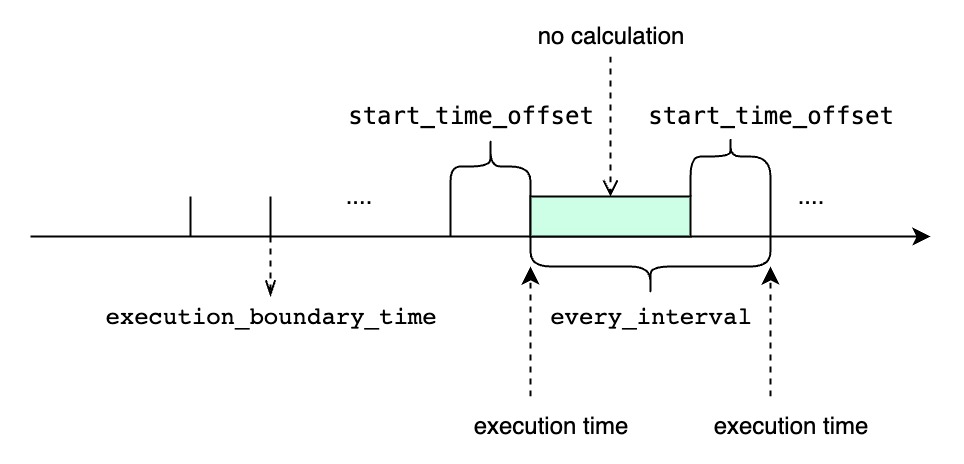
<cq_id>为连续查询指定一个全局唯一的标识。<every_interval>指定了连续查询周期性执行的间隔。现在支持的时间单位有:ns, us, ms, s, m, h, d, w, 并且它的值不能小于用户在iotdb-system.properties配置文件中指定的continuous_query_min_every_interval。这是一个可选参数,默认等于group by子句中的group_by_interval。<start_time_offset>指定了每次查询执行窗口的开始时间,即now()-<start_time_offset>。现在支持的时间单位有:ns, us, ms, s, m, h, d, w。这是一个可选参数,默认等于EVERY子句中的every_interval。<end_time_offset>指定了每次查询执行窗口的结束时间,即now()-<end_time_offset>。现在支持的时间单位有:ns, us, ms, s, m, h, d, w。这是一个可选参数,默认等于0.<execution_boundary_time>表示用户期待的连续查询的首个周期任务的执行时间。(因为连续查询只会对当前实时的数据流做计算,所以该连续查询实际首个周期任务的执行时间并不一定等于用户指定的时间,具体计算逻辑如下所示)<execution_boundary_time>可以早于、等于或者迟于当前时间。- 这个参数是可选的,默认等于
0。 - 首次查询执行窗口的开始时间为
<execution_boundary_time> - <start_time_offset>. - 首次查询执行窗口的结束时间为
<execution_boundary_time> - <end_time_offset>. - 第i个查询执行窗口的时间范围是
[<execution_boundary_time> - <start_time_offset> + (i - 1) * <every_interval>, <execution_boundary_time> - <end_time_offset> + (i - 1) * <every_interval>)。 - 如果当前时间早于或等于, 那连续查询的首个周期任务的执行时间就是用户指定的
execution_boundary_time. - 如果当前时间迟于用户指定的
execution_boundary_time,那么连续查询的首个周期任务的执行时间就是execution_boundary_time + i * <every_interval>中第一个大于或等于当前时间的值。
- <every_interval>,<start_time_offset> 和 <group_by_interval> 都应该大于 0
- <group_by_interval>应该小于等于<start_time_offset>
- 用户应该根据实际需求,为<start_time_offset> 和 <every_interval> 指定合适的值
- 如果<start_time_offset>大于<every_interval>,在每一次查询执行的时间窗口上会有部分重叠
- 如果<start_time_offset>小于<every_interval>,在连续的两次查询执行的时间窗口中间将会有未覆盖的时间范围
- start_time_offset 应该大于end_time_offset
<start_time_offset>等于<every_interval>
<start_time_offset>大于<every_interval>

<start_time_offset>小于<every_interval>
<every_interval>不为0
TIMEOUT POLICY指定了我们如何处理“前一个时间窗口还未执行完时,下一个窗口的执行时间已经到达的场景,默认值是BLOCKED.BLOCKED意味着即使下一个窗口的执行时间已经到达,我们依旧需要阻塞等待前一个时间窗口的查询执行完再开始执行下一个窗口。如果使用BLOCKED策略,所有的时间窗口都将会被依此执行,但是如果遇到执行查询的时间长于周期性间隔时,连续查询的结果会迟于最新的时间窗口范围。DISCARD意味着如果前一个时间窗口还未执行完,我们会直接丢弃下一个窗口的执行时间。如果使用DISCARD策略,可能会有部分时间窗口得不到执行。但是一旦前一个查询执行完后,它将会使用最新的时间窗口,所以它的执行结果总能赶上最新的时间窗口范围,当然是以部分时间窗口得不到执行为代价。
连续查询的用例
下面是用例数据,这是一个实时的数据流,我们假设数据都按时到达。
+-----------------------------+-----------------------------+-----------------------------+-----------------------------+-----------------------------+
|                         Time|root.ln.wf02.wt02.temperature|root.ln.wf02.wt01.temperature|root.ln.wf01.wt02.temperature|root.ln.wf01.wt01.temperature|
+-----------------------------+-----------------------------+-----------------------------+-----------------------------+-----------------------------+
|2021-05-11T22:18:14.598+08:00|                        121.0|                         72.0|                        183.0|                        115.0|
|2021-05-11T22:18:19.941+08:00|                          0.0|                         68.0|                         68.0|                        103.0|
|2021-05-11T22:18:24.949+08:00|                        122.0|                         45.0|                         11.0|                         14.0|
|2021-05-11T22:18:29.967+08:00|                         47.0|                         14.0|                         59.0|                        181.0|
|2021-05-11T22:18:34.979+08:00|                        182.0|                        113.0|                         29.0|                        180.0|
|2021-05-11T22:18:39.990+08:00|                         42.0|                         11.0|                         52.0|                         19.0|
|2021-05-11T22:18:44.995+08:00|                         78.0|                         38.0|                        123.0|                         52.0|
|2021-05-11T22:18:49.999+08:00|                        137.0|                        172.0|                        135.0|                        193.0|
|2021-05-11T22:18:55.003+08:00|                         16.0|                        124.0|                        183.0|                         18.0|
+-----------------------------+-----------------------------+-----------------------------+-----------------------------+-----------------------------+
配置连续查询执行的周期性间隔
在RESAMPLE子句中使用EVERY参数指定连续查询的执行间隔,如果没有指定,默认等于group_by_interval。
CREATE CONTINUOUS QUERY cq1
RESAMPLE EVERY 20s
BEGIN
  SELECT max_value(temperature)
  INTO root.ln.wf02.wt02(temperature_max), root.ln.wf02.wt01(temperature_max), root.ln.wf01.wt02(temperature_max), root.ln.wf01.wt01(temperature_max)
  FROM root.ln.*.*
  GROUP BY(10s)
END
cq1计算出temperature传感器每10秒的平均值,并且将查询结果存储在temperature_max传感器下,传感器路径前缀使用跟原来一样的前缀。
cq1每20秒执行一次,每次执行的查询的时间窗口范围是从过去20秒到当前时间。
假设当前时间是2021-05-11T22:18:40.000+08:00,如果把日志等级设置为DEBUG,我们可以在cq1执行的DataNode上看到如下的输出:
At **2021-05-11T22:18:40.000+08:00**, `cq1` executes a query within the time range `[2021-05-11T22:18:20, 2021-05-11T22:18:40)`.
`cq1` generate 2 lines:
>
+-----------------------------+---------------------------------+---------------------------------+---------------------------------+---------------------------------+
|                         Time|root.ln.wf02.wt02.temperature_max|root.ln.wf02.wt01.temperature_max|root.ln.wf01.wt02.temperature_max|root.ln.wf01.wt01.temperature_max|
+-----------------------------+---------------------------------+---------------------------------+---------------------------------+---------------------------------+
|2021-05-11T22:18:20.000+08:00|                            122.0|                             45.0|                             59.0|                            181.0|
|2021-05-11T22:18:30.000+08:00|                            182.0|                            113.0|                             52.0|                            180.0|
+-----------------------------+---------------------------------+---------------------------------+---------------------------------+---------------------------------+
>
At **2021-05-11T22:19:00.000+08:00**, `cq1` executes a query within the time range `[2021-05-11T22:18:40, 2021-05-11T22:19:00)`.
`cq1` generate 2 lines:
>
+-----------------------------+---------------------------------+---------------------------------+---------------------------------+---------------------------------+
|                         Time|root.ln.wf02.wt02.temperature_max|root.ln.wf02.wt01.temperature_max|root.ln.wf01.wt02.temperature_max|root.ln.wf01.wt01.temperature_max|
+-----------------------------+---------------------------------+---------------------------------+---------------------------------+---------------------------------+
|2021-05-11T22:18:40.000+08:00|                            137.0|                            172.0|                            135.0|                            193.0|
|2021-05-11T22:18:50.000+08:00|                             16.0|                            124.0|                            183.0|                             18.0|
+-----------------------------+---------------------------------+---------------------------------+---------------------------------+---------------------------------+
>
cq1并不会处理当前时间窗口以外的数据,即2021-05-11T22:18:20.000+08:00以前的数据,所以我们会得到如下结果:
> SELECT temperature_max from root.ln.*.*;
+-----------------------------+---------------------------------+---------------------------------+---------------------------------+---------------------------------+
|                         Time|root.ln.wf02.wt02.temperature_max|root.ln.wf02.wt01.temperature_max|root.ln.wf01.wt02.temperature_max|root.ln.wf01.wt01.temperature_max|
+-----------------------------+---------------------------------+---------------------------------+---------------------------------+---------------------------------+
|2021-05-11T22:18:20.000+08:00|                            122.0|                             45.0|                             59.0|                            181.0|
|2021-05-11T22:18:30.000+08:00|                            182.0|                            113.0|                             52.0|                            180.0|
|2021-05-11T22:18:40.000+08:00|                            137.0|                            172.0|                            135.0|                            193.0|
|2021-05-11T22:18:50.000+08:00|                             16.0|                            124.0|                            183.0|                             18.0|
+-----------------------------+---------------------------------+---------------------------------+---------------------------------+---------------------------------+
配置连续查询的时间窗口大小
使用RANGE子句中的start_time_offset参数指定连续查询每次执行的时间窗口的开始时间偏移,如果没有指定,默认值等于EVERY参数。
CREATE CONTINUOUS QUERY cq2
RESAMPLE RANGE 40s
BEGIN
  SELECT max_value(temperature)
  INTO root.ln.wf02.wt02(temperature_max), root.ln.wf02.wt01(temperature_max), root.ln.wf01.wt02(temperature_max), root.ln.wf01.wt01(temperature_max)
  FROM root.ln.*.*
  GROUP BY(10s)
END
cq2计算出temperature传感器每10秒的平均值,并且将查询结果存储在temperature_max传感器下,传感器路径前缀使用跟原来一样的前缀。
cq2每10秒执行一次,每次执行的查询的时间窗口范围是从过去40秒到当前时间。
假设当前时间是2021-05-11T22:18:40.000+08:00,如果把日志等级设置为DEBUG,我们可以在cq2执行的DataNode上看到如下的输出:
At **2021-05-11T22:18:40.000+08:00**, `cq2` executes a query within the time range `[2021-05-11T22:18:00, 2021-05-11T22:18:40)`.
`cq2` generate 4 lines:
>
+-----------------------------+---------------------------------+---------------------------------+---------------------------------+---------------------------------+
|                         Time|root.ln.wf02.wt02.temperature_max|root.ln.wf02.wt01.temperature_max|root.ln.wf01.wt02.temperature_max|root.ln.wf01.wt01.temperature_max|
+-----------------------------+---------------------------------+---------------------------------+---------------------------------+---------------------------------+
|2021-05-11T22:18:00.000+08:00|                             NULL|                             NULL|                             NULL|                             NULL|
|2021-05-11T22:18:10.000+08:00|                            121.0|                             72.0|                            183.0|                            115.0|
|2021-05-11T22:18:20.000+08:00|                            122.0|                             45.0|                             59.0|                            181.0|
|2021-05-11T22:18:30.000+08:00|                            182.0|                            113.0|                             52.0|                            180.0|
+-----------------------------+---------------------------------+---------------------------------+---------------------------------+---------------------------------+
>
At **2021-05-11T22:18:50.000+08:00**, `cq2` executes a query within the time range `[2021-05-11T22:18:10, 2021-05-11T22:18:50)`.
`cq2` generate 4 lines:
>
+-----------------------------+---------------------------------+---------------------------------+---------------------------------+---------------------------------+
|                         Time|root.ln.wf02.wt02.temperature_max|root.ln.wf02.wt01.temperature_max|root.ln.wf01.wt02.temperature_max|root.ln.wf01.wt01.temperature_max|
+-----------------------------+---------------------------------+---------------------------------+---------------------------------+---------------------------------+
|2021-05-11T22:18:10.000+08:00|                            121.0|                             72.0|                            183.0|                            115.0|
|2021-05-11T22:18:20.000+08:00|                            122.0|                             45.0|                             59.0|                            181.0|
|2021-05-11T22:18:30.000+08:00|                            182.0|                            113.0|                             52.0|                            180.0|
|2021-05-11T22:18:40.000+08:00|                            137.0|                            172.0|                            135.0|                            193.0|
+-----------------------------+---------------------------------+---------------------------------+---------------------------------+---------------------------------+
>
At **2021-05-11T22:19:00.000+08:00**, `cq2` executes a query within the time range `[2021-05-11T22:18:20, 2021-05-11T22:19:00)`.
`cq2` generate 4 lines:
>
+-----------------------------+---------------------------------+---------------------------------+---------------------------------+---------------------------------+
|                         Time|root.ln.wf02.wt02.temperature_max|root.ln.wf02.wt01.temperature_max|root.ln.wf01.wt02.temperature_max|root.ln.wf01.wt01.temperature_max|
+-----------------------------+---------------------------------+---------------------------------+---------------------------------+---------------------------------+
|2021-05-11T22:18:20.000+08:00|                            122.0|                             45.0|                             59.0|                            181.0|
|2021-05-11T22:18:30.000+08:00|                            182.0|                            113.0|                             52.0|                            180.0|
|2021-05-11T22:18:40.000+08:00|                            137.0|                            172.0|                            135.0|                            193.0|
|2021-05-11T22:18:50.000+08:00|                             16.0|                            124.0|                            183.0|                             18.0|
+-----------------------------+---------------------------------+---------------------------------+---------------------------------+---------------------------------+
>
cq2并不会写入全是null值的行,值得注意的是cq2会多次计算某些区间的聚合值,下面是计算结果:
> SELECT temperature_max from root.ln.*.*;
+-----------------------------+---------------------------------+---------------------------------+---------------------------------+---------------------------------+
|                         Time|root.ln.wf02.wt02.temperature_max|root.ln.wf02.wt01.temperature_max|root.ln.wf01.wt02.temperature_max|root.ln.wf01.wt01.temperature_max|
+-----------------------------+---------------------------------+---------------------------------+---------------------------------+---------------------------------+
|2021-05-11T22:18:10.000+08:00|                            121.0|                             72.0|                            183.0|                            115.0|
|2021-05-11T22:18:20.000+08:00|                            122.0|                             45.0|                             59.0|                            181.0|
|2021-05-11T22:18:30.000+08:00|                            182.0|                            113.0|                             52.0|                            180.0|
|2021-05-11T22:18:40.000+08:00|                            137.0|                            172.0|                            135.0|                            193.0|
|2021-05-11T22:18:50.000+08:00|                             16.0|                            124.0|                            183.0|                             18.0|
+-----------------------------+---------------------------------+---------------------------------+---------------------------------+---------------------------------+
同时配置连续查询执行的周期性间隔和时间窗口大小
使用RESAMPLE子句中的EVERY参数和RANGE参数分别指定连续查询的执行间隔和窗口大小。并且使用fill()来填充没有值的时间区间。
CREATE CONTINUOUS QUERY cq3
RESAMPLE EVERY 20s RANGE 40s
BEGIN
  SELECT max_value(temperature)
  INTO root.ln.wf02.wt02(temperature_max), root.ln.wf02.wt01(temperature_max), root.ln.wf01.wt02(temperature_max), root.ln.wf01.wt01(temperature_max)
  FROM root.ln.*.*
  GROUP BY(10s)
  FILL(100.0)
END
cq3计算出temperature传感器每10秒的平均值,并且将查询结果存储在temperature_max传感器下,传感器路径前缀使用跟原来一样的前缀。如果某些区间没有值,用100.0填充。
cq3每20秒执行一次,每次执行的查询的时间窗口范围是从过去40秒到当前时间。
假设当前时间是2021-05-11T22:18:40.000+08:00,如果把日志等级设置为DEBUG,我们可以在cq3执行的DataNode上看到如下的输出:
At **2021-05-11T22:18:40.000+08:00**, `cq3` executes a query within the time range `[2021-05-11T22:18:00, 2021-05-11T22:18:40)`.
`cq3` generate 4 lines:
>
+-----------------------------+---------------------------------+---------------------------------+---------------------------------+---------------------------------+
|                         Time|root.ln.wf02.wt02.temperature_max|root.ln.wf02.wt01.temperature_max|root.ln.wf01.wt02.temperature_max|root.ln.wf01.wt01.temperature_max|
+-----------------------------+---------------------------------+---------------------------------+---------------------------------+---------------------------------+
|2021-05-11T22:18:00.000+08:00|                            100.0|                            100.0|                            100.0|                            100.0|
|2021-05-11T22:18:10.000+08:00|                            121.0|                             72.0|                            183.0|                            115.0|
|2021-05-11T22:18:20.000+08:00|                            122.0|                             45.0|                             59.0|                            181.0|
|2021-05-11T22:18:30.000+08:00|                            182.0|                            113.0|                             52.0|                            180.0|
+-----------------------------+---------------------------------+---------------------------------+---------------------------------+---------------------------------+
>
At **2021-05-11T22:19:00.000+08:00**, `cq3` executes a query within the time range `[2021-05-11T22:18:20, 2021-05-11T22:19:00)`.
`cq3` generate 4 lines:
>
+-----------------------------+---------------------------------+---------------------------------+---------------------------------+---------------------------------+
|                         Time|root.ln.wf02.wt02.temperature_max|root.ln.wf02.wt01.temperature_max|root.ln.wf01.wt02.temperature_max|root.ln.wf01.wt01.temperature_max|
+-----------------------------+---------------------------------+---------------------------------+---------------------------------+---------------------------------+
|2021-05-11T22:18:20.000+08:00|                            122.0|                             45.0|                             59.0|                            181.0|
|2021-05-11T22:18:30.000+08:00|                            182.0|                            113.0|                             52.0|                            180.0|
|2021-05-11T22:18:40.000+08:00|                            137.0|                            172.0|                            135.0|                            193.0|
|2021-05-11T22:18:50.000+08:00|                             16.0|                            124.0|                            183.0|                             18.0|
+-----------------------------+---------------------------------+---------------------------------+---------------------------------+---------------------------------+
>
值得注意的是cq3会多次计算某些区间的聚合值,下面是计算结果:
> SELECT temperature_max from root.ln.*.*;
+-----------------------------+---------------------------------+---------------------------------+---------------------------------+---------------------------------+
|                         Time|root.ln.wf02.wt02.temperature_max|root.ln.wf02.wt01.temperature_max|root.ln.wf01.wt02.temperature_max|root.ln.wf01.wt01.temperature_max|
+-----------------------------+---------------------------------+---------------------------------+---------------------------------+---------------------------------+
|2021-05-11T22:18:00.000+08:00|                            100.0|                            100.0|                            100.0|                            100.0|
|2021-05-11T22:18:10.000+08:00|                            121.0|                             72.0|                            183.0|                            115.0|
|2021-05-11T22:18:20.000+08:00|                            122.0|                             45.0|                             59.0|                            181.0|
|2021-05-11T22:18:30.000+08:00|                            182.0|                            113.0|                             52.0|                            180.0|
|2021-05-11T22:18:40.000+08:00|                            137.0|                            172.0|                            135.0|                            193.0|
|2021-05-11T22:18:50.000+08:00|                             16.0|                            124.0|                            183.0|                             18.0|
+-----------------------------+---------------------------------+---------------------------------+---------------------------------+---------------------------------+
配置连续查询每次查询执行时间窗口的结束时间
使用RESAMPLE子句中的EVERY参数和RANGE参数分别指定连续查询的执行间隔和窗口大小。并且使用fill()来填充没有值的时间区间。
CREATE CONTINUOUS QUERY cq4
RESAMPLE EVERY 20s RANGE 40s, 20s
BEGIN
  SELECT max_value(temperature)
  INTO root.ln.wf02.wt02(temperature_max), root.ln.wf02.wt01(temperature_max), root.ln.wf01.wt02(temperature_max), root.ln.wf01.wt01(temperature_max)
  FROM root.ln.*.*
  GROUP BY(10s)
  FILL(100.0)
END
cq4计算出temperature传感器每10秒的平均值,并且将查询结果存储在temperature_max传感器下,传感器路径前缀使用跟原来一样的前缀。如果某些区间没有值,用100.0填充。
cq4每20秒执行一次,每次执行的查询的时间窗口范围是从过去40秒到过去20秒。
假设当前时间是2021-05-11T22:18:40.000+08:00,如果把日志等级设置为DEBUG,我们可以在cq4执行的DataNode上看到如下的输出:
At **2021-05-11T22:18:40.000+08:00**, `cq4` executes a query within the time range `[2021-05-11T22:18:00, 2021-05-11T22:18:20)`.
`cq4` generate 2 lines:
>
+-----------------------------+---------------------------------+---------------------------------+---------------------------------+---------------------------------+
|                         Time|root.ln.wf02.wt02.temperature_max|root.ln.wf02.wt01.temperature_max|root.ln.wf01.wt02.temperature_max|root.ln.wf01.wt01.temperature_max|
+-----------------------------+---------------------------------+---------------------------------+---------------------------------+---------------------------------+
|2021-05-11T22:18:00.000+08:00|                            100.0|                            100.0|                            100.0|                            100.0|
|2021-05-11T22:18:10.000+08:00|                            121.0|                             72.0|                            183.0|                            115.0|
+-----------------------------+---------------------------------+---------------------------------+---------------------------------+---------------------------------+
>
At **2021-05-11T22:19:00.000+08:00**, `cq4` executes a query within the time range `[2021-05-11T22:18:20, 2021-05-11T22:18:40)`.
`cq4` generate 2 lines:
>
+-----------------------------+---------------------------------+---------------------------------+---------------------------------+---------------------------------+
|                         Time|root.ln.wf02.wt02.temperature_max|root.ln.wf02.wt01.temperature_max|root.ln.wf01.wt02.temperature_max|root.ln.wf01.wt01.temperature_max|
+-----------------------------+---------------------------------+---------------------------------+---------------------------------+---------------------------------+
|2021-05-11T22:18:20.000+08:00|                            122.0|                             45.0|                             59.0|                            181.0|
|2021-05-11T22:18:30.000+08:00|                            182.0|                            113.0|                             52.0|                            180.0|
+-----------------------------+---------------------------------+---------------------------------+---------------------------------+---------------------------------+
>
值得注意的是cq4只会计算每个聚合区间一次,并且每次开始执行计算的时间都会比当前的时间窗口结束时间迟20s, 下面是计算结果:
> SELECT temperature_max from root.ln.*.*;
+-----------------------------+---------------------------------+---------------------------------+---------------------------------+---------------------------------+
|                         Time|root.ln.wf02.wt02.temperature_max|root.ln.wf02.wt01.temperature_max|root.ln.wf01.wt02.temperature_max|root.ln.wf01.wt01.temperature_max|
+-----------------------------+---------------------------------+---------------------------------+---------------------------------+---------------------------------+
|2021-05-11T22:18:00.000+08:00|                            100.0|                            100.0|                            100.0|                            100.0|
|2021-05-11T22:18:10.000+08:00|                            121.0|                             72.0|                            183.0|                            115.0|
|2021-05-11T22:18:20.000+08:00|                            122.0|                             45.0|                             59.0|                            181.0|
|2021-05-11T22:18:30.000+08:00|                            182.0|                            113.0|                             52.0|                            180.0|
+-----------------------------+---------------------------------+---------------------------------+---------------------------------+---------------------------------+
没有GROUP BY TIME子句的连续查询
不使用GROUP BY TIME子句,并在RESAMPLE子句中显式使用EVERY参数指定连续查询的执行间隔。
CREATE CONTINUOUS QUERY cq5
RESAMPLE EVERY 20s
BEGIN
  SELECT temperature + 1
  INTO root.precalculated_sg.::(temperature)
  FROM root.ln.*.*
  align by device
END
cq5计算以root.ln为前缀的所有temperature + 1的值,并将结果储存在另一个 database root.precalculated_sg中。除 database 名称不同外,目标序列与源序列路径名均相同。
cq5每20秒执行一次,每次执行的查询的时间窗口范围是从过去20秒到当前时间。
假设当前时间是2021-05-11T22:18:40.000+08:00,如果把日志等级设置为DEBUG,我们可以在cq5执行的DataNode上看到如下的输出:
At **2021-05-11T22:18:40.000+08:00**, `cq5` executes a query within the time range `[2021-05-11T22:18:20, 2021-05-11T22:18:40)`.
`cq5` generate 16 lines:
>
+-----------------------------+-------------------------------+-----------+
|                         Time|                         Device|temperature|
+-----------------------------+-------------------------------+-----------+
|2021-05-11T22:18:24.949+08:00|root.precalculated_sg.wf02.wt02|      123.0|
|2021-05-11T22:18:29.967+08:00|root.precalculated_sg.wf02.wt02|       48.0|
|2021-05-11T22:18:34.979+08:00|root.precalculated_sg.wf02.wt02|      183.0|
|2021-05-11T22:18:39.990+08:00|root.precalculated_sg.wf02.wt02|       45.0|
|2021-05-11T22:18:24.949+08:00|root.precalculated_sg.wf02.wt01|       46.0|
|2021-05-11T22:18:29.967+08:00|root.precalculated_sg.wf02.wt01|       15.0|
|2021-05-11T22:18:34.979+08:00|root.precalculated_sg.wf02.wt01|      114.0|
|2021-05-11T22:18:39.990+08:00|root.precalculated_sg.wf02.wt01|       12.0|
|2021-05-11T22:18:24.949+08:00|root.precalculated_sg.wf01.wt02|       12.0|
|2021-05-11T22:18:29.967+08:00|root.precalculated_sg.wf01.wt02|       60.0|
|2021-05-11T22:18:34.979+08:00|root.precalculated_sg.wf01.wt02|       30.0|
|2021-05-11T22:18:39.990+08:00|root.precalculated_sg.wf01.wt02|       53.0|
|2021-05-11T22:18:24.949+08:00|root.precalculated_sg.wf01.wt01|       15.0|
|2021-05-11T22:18:29.967+08:00|root.precalculated_sg.wf01.wt01|      182.0|
|2021-05-11T22:18:34.979+08:00|root.precalculated_sg.wf01.wt01|      181.0|
|2021-05-11T22:18:39.990+08:00|root.precalculated_sg.wf01.wt01|       20.0|
+-----------------------------+-------------------------------+-----------+
>
At **2021-05-11T22:19:00.000+08:00**, `cq5` executes a query within the time range `[2021-05-11T22:18:40, 2021-05-11T22:19:00)`.
`cq5` generate 12 lines:
>
+-----------------------------+-------------------------------+-----------+
|                         Time|                         Device|temperature|
+-----------------------------+-------------------------------+-----------+
|2021-05-11T22:18:44.995+08:00|root.precalculated_sg.wf02.wt02|       79.0|
|2021-05-11T22:18:49.999+08:00|root.precalculated_sg.wf02.wt02|      138.0|
|2021-05-11T22:18:55.003+08:00|root.precalculated_sg.wf02.wt02|       17.0|
|2021-05-11T22:18:44.995+08:00|root.precalculated_sg.wf02.wt01|       39.0|
|2021-05-11T22:18:49.999+08:00|root.precalculated_sg.wf02.wt01|      173.0|
|2021-05-11T22:18:55.003+08:00|root.precalculated_sg.wf02.wt01|      125.0|
|2021-05-11T22:18:44.995+08:00|root.precalculated_sg.wf01.wt02|      124.0|
|2021-05-11T22:18:49.999+08:00|root.precalculated_sg.wf01.wt02|      136.0|
|2021-05-11T22:18:55.003+08:00|root.precalculated_sg.wf01.wt02|      184.0|
|2021-05-11T22:18:44.995+08:00|root.precalculated_sg.wf01.wt01|       53.0|
|2021-05-11T22:18:49.999+08:00|root.precalculated_sg.wf01.wt01|      194.0|
|2021-05-11T22:18:55.003+08:00|root.precalculated_sg.wf01.wt01|       19.0|
+-----------------------------+-------------------------------+-----------+
>
cq5并不会处理当前时间窗口以外的数据,即2021-05-11T22:18:20.000+08:00以前的数据,所以我们会得到如下结果:
> SELECT temperature from root.precalculated_sg.*.* align by device;
+-----------------------------+-------------------------------+-----------+
|                         Time|                         Device|temperature|
+-----------------------------+-------------------------------+-----------+
|2021-05-11T22:18:24.949+08:00|root.precalculated_sg.wf02.wt02|      123.0|
|2021-05-11T22:18:29.967+08:00|root.precalculated_sg.wf02.wt02|       48.0|
|2021-05-11T22:18:34.979+08:00|root.precalculated_sg.wf02.wt02|      183.0|
|2021-05-11T22:18:39.990+08:00|root.precalculated_sg.wf02.wt02|       45.0|
|2021-05-11T22:18:44.995+08:00|root.precalculated_sg.wf02.wt02|       79.0|
|2021-05-11T22:18:49.999+08:00|root.precalculated_sg.wf02.wt02|      138.0|
|2021-05-11T22:18:55.003+08:00|root.precalculated_sg.wf02.wt02|       17.0|
|2021-05-11T22:18:24.949+08:00|root.precalculated_sg.wf02.wt01|       46.0|
|2021-05-11T22:18:29.967+08:00|root.precalculated_sg.wf02.wt01|       15.0|
|2021-05-11T22:18:34.979+08:00|root.precalculated_sg.wf02.wt01|      114.0|
|2021-05-11T22:18:39.990+08:00|root.precalculated_sg.wf02.wt01|       12.0|
|2021-05-11T22:18:44.995+08:00|root.precalculated_sg.wf02.wt01|       39.0|
|2021-05-11T22:18:49.999+08:00|root.precalculated_sg.wf02.wt01|      173.0|
|2021-05-11T22:18:55.003+08:00|root.precalculated_sg.wf02.wt01|      125.0|
|2021-05-11T22:18:24.949+08:00|root.precalculated_sg.wf01.wt02|       12.0|
|2021-05-11T22:18:29.967+08:00|root.precalculated_sg.wf01.wt02|       60.0|
|2021-05-11T22:18:34.979+08:00|root.precalculated_sg.wf01.wt02|       30.0|
|2021-05-11T22:18:39.990+08:00|root.precalculated_sg.wf01.wt02|       53.0|
|2021-05-11T22:18:44.995+08:00|root.precalculated_sg.wf01.wt02|      124.0|
|2021-05-11T22:18:49.999+08:00|root.precalculated_sg.wf01.wt02|      136.0|
|2021-05-11T22:18:55.003+08:00|root.precalculated_sg.wf01.wt02|      184.0|
|2021-05-11T22:18:24.949+08:00|root.precalculated_sg.wf01.wt01|       15.0|
|2021-05-11T22:18:29.967+08:00|root.precalculated_sg.wf01.wt01|      182.0|
|2021-05-11T22:18:34.979+08:00|root.precalculated_sg.wf01.wt01|      181.0|
|2021-05-11T22:18:39.990+08:00|root.precalculated_sg.wf01.wt01|       20.0|
|2021-05-11T22:18:44.995+08:00|root.precalculated_sg.wf01.wt01|       53.0|
|2021-05-11T22:18:49.999+08:00|root.precalculated_sg.wf01.wt01|      194.0|
|2021-05-11T22:18:55.003+08:00|root.precalculated_sg.wf01.wt01|       19.0|
+-----------------------------+-------------------------------+-----------+
连续查询的管理
查询系统已有的连续查询
展示集群中所有的已注册的连续查询
SHOW (CONTINUOUS QUERIES | CQS)
SHOW (CONTINUOUS QUERIES | CQS)会将结果集按照cq_id排序。
例子
SHOW CONTINUOUS QUERIES;
执行以上sql,我们将会得到如下的查询结果:
| cq_id | query | state |
|---|---|---|
| s1_count_cq | CREATE CQ s1_count_cq BEGIN SELECT count(s1) INTO root.sg_count.d.count_s1 FROM root.sg.d GROUP BY(30m) END | active |
删除已有的连续查询
删除指定的名为cq_id的连续查询:
DROP (CONTINUOUS QUERY | CQ) <cq_id>
DROP CQ并不会返回任何结果集。
例子
删除名为s1_count_cq的连续查询:
DROP CONTINUOUS QUERY s1_count_cq;
修改已有的连续查询
目前连续查询一旦被创建就不能再被修改。如果想要修改某个连续查询,只能先用DROP命令删除它,然后再用CREATE命令重新创建。
连续查询的使用场景
对数据进行降采样并对降采样后的数据使用不同的保留策略
可以使用连续查询,定期将高频率采样的原始数据(如每秒1000个点),降采样(如每秒仅保留一个点)后保存到另一个 database 的同名序列中。高精度的原始数据所在 database 的TTL可能设置的比较短,比如一天,而低精度的降采样后的数据所在的 database TTL可以设置的比较长,比如一个月,从而达到快速释放磁盘空间的目的。
预计算代价昂贵的查询
我们可以通过连续查询对一些重复的查询进行预计算,并将查询结果保存在某些目标序列中,这样真实查询并不需要真的再次去做计算,而是直接查询目标序列的结果,从而缩短了查询的时间。
预计算查询结果尤其对一些可视化工具渲染时序图和工作台时有很大的加速作用。
作为子查询的替代品
IoTDB现在不支持子查询,但是我们可以通过创建连续查询得到相似的功能。我们可以将子查询注册为一个连续查询,并将子查询的结果物化到目标序列中,外层查询再直接查询哪个目标序列。
例子
IoTDB并不会接收如下的嵌套子查询。这个查询会计算s1序列每隔30分钟的非空值数量的平均值:
SELECT avg(count_s1) from (select count(s1) as count_s1 from root.sg.d group by([0, now()), 30m));
为了得到相同的结果,我们可以:
1. 创建一个连续查询
这一步执行内层子查询部分。下面创建的连续查询每隔30分钟计算一次root.sg.d.s1序列的非空值数量,并将结果写入目标序列root.sg_count.d.count_s1中。
CREATE CQ s1_count_cq
BEGIN
    SELECT count(s1)
        INTO root.sg_count.d.count_s1
        FROM root.sg.d
        GROUP BY(30m)
END
2. 查询连续查询的结果
这一步执行外层查询的avg([...])部分。
查询序列root.sg_count.d.count_s1的值,并计算平均值:
SELECT avg(count_s1) from root.sg_count.d;
连续查询相关的配置参数
| 参数名 | 描述 | 类型 | 默认值 |
|---|---|---|---|
continuous_query_submit_thread | 用于周期性提交连续查询执行任务的线程数 | int32 | 2 |
continuous_query_min_every_interval_in_ms | 系统允许的连续查询最小的周期性时间间隔 | duration | 1000 |
用户自定义函数
UDF(User Defined Function)即用户自定义函数。IoTDB 提供多种内建函数来满足您的计算需求,同时您还可以通过创建自定义函数来满足更多的计算需求。
根据此文档,您将会很快学会 UDF 的编写、注册、使用等操作。
UDF 类型
IoTDB 支持两种类型的 UDF 函数,如下表所示。
| UDF 分类 | 描述 |
|---|---|
| UDTF(User Defined Timeseries Generating Function) | 自定义时间序列生成函数。该类函数允许接收多条时间序列,最终会输出一条时间序列,生成的时间序列可以有任意多数量的数据点。 |
| UDAF(User Defined Aggregation Function) | 自定义聚合函数。该类函数接受一条时间序列数据,最终会根据用户指定的 GROUP BY 类型,为每个组生成一个聚合后的数据点。 |
UDF 依赖
如果您使用 Maven ,可以从 Maven 库 中搜索下面示例中的依赖。请注意选择和目标 IoTDB 服务器版本相同的依赖版本。
<dependency>
  <groupId>org.apache.iotdb</groupId>
  <artifactId>udf-api</artifactId>
  <version>1.0.0</version>
  <scope>provided</scope>
</dependency>
UDTF(User Defined Timeseries Generating Function)
编写一个 UDTF 需要继承org.apache.iotdb.udf.api.UDTF类,并至少实现beforeStart方法和一种transform方法。
下表是所有可供用户实现的接口说明。
| 接口定义 | 描述 | 是否必须 |
|---|---|---|
void validate(UDFParameterValidator validator) throws Exception | 在初始化方法beforeStart调用前执行,用于检测UDFParameters中用户输入的参数是否合法。 | 否 |
void beforeStart(UDFParameters parameters, UDTFConfigurations configurations) throws Exception | 初始化方法,在 UDTF 处理输入数据前,调用用户自定义的初始化行为。用户每执行一次 UDTF 查询,框架就会构造一个新的 UDF 类实例,该方法在每个 UDF 类实例被初始化时调用一次。在每一个 UDF 类实例的生命周期内,该方法只会被调用一次。 | 是 |
void transform(Row row, PointCollector collector) throws Exception | 这个方法由框架调用。当您在beforeStart中选择以RowByRowAccessStrategy的策略消费原始数据时,这个数据处理方法就会被调用。输入参数以Row的形式传入,输出结果通过PointCollector输出。您需要在该方法内自行调用collector提供的数据收集方法,以决定最终的输出数据。 | 与下面的方法二选一 |
void transform(RowWindow rowWindow, PointCollector collector) throws Exception | 这个方法由框架调用。当您在beforeStart中选择以SlidingSizeWindowAccessStrategy或者SlidingTimeWindowAccessStrategy的策略消费原始数据时,这个数据处理方法就会被调用。输入参数以RowWindow的形式传入,输出结果通过PointCollector输出。您需要在该方法内自行调用collector提供的数据收集方法,以决定最终的输出数据。 | 与上面的方法二选一 |
void terminate(PointCollector collector) throws Exception | 这个方法由框架调用。该方法会在所有的transform调用执行完成后,在beforeDestory方法执行前被调用。在一个 UDF 查询过程中,该方法会且只会调用一次。您需要在该方法内自行调用collector提供的数据收集方法,以决定最终的输出数据。 | 否 |
void beforeDestroy() | UDTF 的结束方法。此方法由框架调用,并且只会被调用一次,即在处理完最后一条记录之后被调用。 | 否 |
在一个完整的 UDTF 实例生命周期中,各个方法的调用顺序如下:
void validate(UDFParameterValidator validator) throws Exceptionvoid beforeStart(UDFParameters parameters, UDTFConfigurations configurations) throws Exceptionvoid transform(Row row, PointCollector collector) throws Exception或者void transform(RowWindow rowWindow, PointCollector collector) throws Exceptionvoid terminate(PointCollector collector) throws Exceptionvoid beforeDestroy()
注意,框架每执行一次 UDTF 查询,都会构造一个全新的 UDF 类实例,查询结束时,对应的 UDF 类实例即被销毁,因此不同 UDTF 查询(即使是在同一个 SQL 语句中)UDF 类实例内部的数据都是隔离的。您可以放心地在 UDTF 中维护一些状态数据,无需考虑并发对 UDF 类实例内部状态数据的影响。
下面将详细介绍各个接口的使用方法。
- void validate(UDFParameterValidator validator) throws Exception
validate方法能够对用户输入的参数进行验证。
您可以在该方法中限制输入序列的数量和类型,检查用户输入的属性或者进行自定义逻辑的验证。
UDFParameterValidator的使用方法请见 Javadoc。
- void beforeStart(UDFParameters parameters, UDTFConfigurations configurations) throws Exception
beforeStart方法有两个作用:
1. 帮助用户解析 SQL 语句中的 UDF 参数
2. 配置 UDF 运行时必要的信息,即指定 UDF 访问原始数据时采取的策略和输出结果序列的类型
3. 创建资源,比如建立外部链接,打开文件等。
UDFParameters
UDFParameters的作用是解析 SQL 语句中的 UDF 参数(SQL 中 UDF 函数名称后括号中的部分)。参数包括序列类型参数和字符串 key-value 对形式输入的属性参数。
例子:
SELECT UDF(s1, s2, 'key1'='iotdb', 'key2'='123.45') FROM root.sg.d;
用法:
void beforeStart(UDFParameters parameters, UDTFConfigurations configurations) throws Exception {
  String stringValue = parameters.getString("key1"); // iotdb
  Float floatValue = parameters.getFloat("key2"); // 123.45
  Double doubleValue = parameters.getDouble("key3"); // null
  int intValue = parameters.getIntOrDefault("key4", 678); // 678
  // do something

  // configurations
  // ...
}
UDTFConfigurations
您必须使用 UDTFConfigurations 指定 UDF 访问原始数据时采取的策略和输出结果序列的类型。
用法:
void beforeStart(UDFParameters parameters, UDTFConfigurations configurations) throws Exception {
  // parameters
  // ...

  // configurations
  configurations
    .setAccessStrategy(new RowByRowAccessStrategy())
    .setOutputDataType(Type.INT32);
}
其中setAccessStrategy方法用于设定 UDF 访问原始数据时采取的策略,setOutputDataType用于设定输出结果序列的类型。
- setAccessStrategy
注意,您在此处设定的原始数据访问策略决定了框架会调用哪一种transform方法 ,请实现与原始数据访问策略对应的transform方法。当然,您也可以根据UDFParameters解析出来的属性参数,动态决定设定哪一种策略,因此,实现两种transform方法也是被允许的。
下面是您可以设定的访问原始数据的策略:
| 接口定义 | 描述 | 调用的transform方法 |
|---|---|---|
RowByRowAccessStrategy | 逐行地处理原始数据。框架会为每一行原始数据输入调用一次transform方法。当 UDF 只有一个输入序列时,一行输入就是该输入序列中的一个数据点。当 UDF 有多个输入序列时,一行输入序列对应的是这些输入序列按时间对齐后的结果(一行数据中,可能存在某一列为null值,但不会全部都是null)。 | void transform(Row row, PointCollector collector) throws Exception |
SlidingTimeWindowAccessStrategy | 以滑动时间窗口的方式处理原始数据。框架会为每一个原始数据输入窗口调用一次transform方法。一个窗口可能存在多行数据,每一行数据对应的是输入序列按时间对齐后的结果(一行数据中,可能存在某一列为null值,但不会全部都是null)。 | void transform(RowWindow rowWindow, PointCollector collector) throws Exception |
SlidingSizeWindowAccessStrategy | 以固定行数的方式处理原始数据,即每个数据处理窗口都会包含固定行数的数据(最后一个窗口除外)。框架会为每一个原始数据输入窗口调用一次transform方法。一个窗口可能存在多行数据,每一行数据对应的是输入序列按时间对齐后的结果(一行数据中,可能存在某一列为null值,但不会全部都是null)。 | void transform(RowWindow rowWindow, PointCollector collector) throws Exception |
SessionTimeWindowAccessStrategy | 以会话窗口的方式处理原始数据,框架会为每一个原始数据输入窗口调用一次transform方法。一个窗口可能存在多行数据,每一行数据对应的是输入序列按时间对齐后的结果(一行数据中,可能存在某一列为null值,但不会全部都是null)。 | void transform(RowWindow rowWindow, PointCollector collector) throws Exception |
StateWindowAccessStrategy | 以状态窗口的方式处理原始数据,框架会为每一个原始数据输入窗口调用一次transform方法。一个窗口可能存在多行数据。目前仅支持对一个物理量也就是一列数据进行开窗。 | void transform(RowWindow rowWindow, PointCollector collector) throws Exception |
RowByRowAccessStrategy的构造不需要任何参数。
如图是SlidingTimeWindowAccessStrategy的开窗示意图。
SlidingTimeWindowAccessStrategy有多种构造方法,您可以向构造方法提供 3 类参数:
- 时间轴显示时间窗开始和结束时间
- 划分时间轴的时间间隔参数(必须为正数)
- 滑动步长(不要求大于等于时间间隔,但是必须为正数)
时间轴显示时间窗开始和结束时间不是必须要提供的。当您不提供这类参数时,时间轴显示时间窗开始时间会被定义为整个查询结果集中最小的时间戳,时间轴显示时间窗结束时间会被定义为整个查询结果集中最大的时间戳。
滑动步长参数也不是必须的。当您不提供滑动步长参数时,滑动步长会被设定为划分时间轴的时间间隔。
3 类参数的关系可见下图。策略的构造方法详见 Javadoc。
注意,最后的一些时间窗口的实际时间间隔可能小于规定的时间间隔参数。另外,可能存在某些时间窗口内数据行数量为 0 的情况,这种情况框架也会为该窗口调用一次transform方法。
如图是SlidingSizeWindowAccessStrategy的开窗示意图。
SlidingSizeWindowAccessStrategy有多种构造方法,您可以向构造方法提供 2 个参数:
- 窗口大小,即一个数据处理窗口包含的数据行数。注意,最后一些窗口的数据行数可能少于规定的数据行数。
- 滑动步长,即下一窗口第一个数据行与当前窗口第一个数据行间的数据行数(不要求大于等于窗口大小,但是必须为正数)
滑动步长参数不是必须的。当您不提供滑动步长参数时,滑动步长会被设定为窗口大小。
如图是SessionTimeWindowAccessStrategy的开窗示意图。时间间隔小于等于给定的最小时间间隔 sessionGap 则分为一组。
SessionTimeWindowAccessStrategy有多种构造方法,您可以向构造方法提供 2 类参数:
- 时间轴显示时间窗开始和结束时间。
- 会话窗口之间的最小时间间隔。
如图是StateWindowAccessStrategy的开窗示意图。对于数值型数据,状态差值小于等于给定的阈值 delta 则分为一组。
StateWindowAccessStrategy有四种构造方法。
- 针对数值型数据,可以提供时间轴显示时间窗开始和结束时间以及对于单个窗口内部允许变化的阈值delta。
- 针对文本数据以及布尔数据,可以提供时间轴显示时间窗开始和结束时间。对于这两种数据类型,单个窗口内的数据是相同的,不需要提供变化阈值。
- 针对数值型数据,可以只提供单个窗口内部允许变化的阈值delta,时间轴显示时间窗开始时间会被定义为整个查询结果集中最小的时间戳,时间轴显示时间窗结束时间会被定义为整个查询结果集中最大的时间戳。
- 针对文本数据以及布尔数据,可以不提供任何参数,开始与结束时间戳见3中解释。
StateWindowAccessStrategy 目前只能接收一列输入。策略的构造方法详见 Javadoc。
- setOutputDataType
注意,您在此处设定的输出结果序列的类型,决定了transform方法中PointCollector实际能够接收的数据类型。setOutputDataType中设定的输出类型和PointCollector实际能够接收的数据输出类型关系如下:
setOutputDataType中设定的输出类型 | PointCollector实际能够接收的输出类型 |
|---|---|
INT32 | int |
INT64 | long |
FLOAT | float |
DOUBLE | double |
BOOLEAN | boolean |
TEXT | java.lang.String 和 org.apache.iotdb.udf.api.type.Binary |
UDTF 输出序列的类型是运行时决定的。您可以根据输入序列类型动态决定输出序列类型。
下面是一个简单的例子:
void beforeStart(UDFParameters parameters, UDTFConfigurations configurations) throws Exception {
  // do something
  // ...

  configurations
    .setAccessStrategy(new RowByRowAccessStrategy())
    .setOutputDataType(parameters.getDataType(0));
}
- void transform(Row row, PointCollector collector) throws Exception
当您在beforeStart方法中指定 UDF 读取原始数据的策略为 RowByRowAccessStrategy,您就需要实现该方法,在该方法中增加对原始数据处理的逻辑。
该方法每次处理原始数据的一行。原始数据由Row读入,由PointCollector输出。您可以选择在一次transform方法调用中输出任意数量的数据点。需要注意的是,输出数据点的类型必须与您在beforeStart方法中设置的一致,而输出数据点的时间戳必须是严格单调递增的。
下面是一个实现了void transform(Row row, PointCollector collector) throws Exception方法的完整 UDF 示例。它是一个加法器,接收两列时间序列输入,当这两个数据点都不为null时,输出这两个数据点的代数和。
import org.apache.iotdb.udf.api.UDTF;
import org.apache.iotdb.udf.api.access.Row;
import org.apache.iotdb.udf.api.collector.PointCollector;
import org.apache.iotdb.udf.api.customizer.config.UDTFConfigurations;
import org.apache.iotdb.udf.api.customizer.parameter.UDFParameters;
import org.apache.iotdb.udf.api.customizer.strategy.RowByRowAccessStrategy;
import org.apache.iotdb.udf.api.type.Type;

public class Adder implements UDTF {

  @Override
  public void beforeStart(UDFParameters parameters, UDTFConfigurations configurations) {
    configurations
        .setOutputDataType(Type.INT64)
        .setAccessStrategy(new RowByRowAccessStrategy());
  }

  @Override
  public void transform(Row row, PointCollector collector) throws Exception {
    if (row.isNull(0) || row.isNull(1)) {
      return;
    }
    collector.putLong(row.getTime(), row.getLong(0) + row.getLong(1));
  }
}
- void transform(RowWindow rowWindow, PointCollector collector) throws Exception
当您在beforeStart方法中指定 UDF 读取原始数据的策略为 SlidingTimeWindowAccessStrategy或者SlidingSizeWindowAccessStrategy时,您就需要实现该方法,在该方法中增加对原始数据处理的逻辑。
该方法每次处理固定行数或者固定时间间隔内的一批数据,我们称包含这一批数据的容器为窗口。原始数据由RowWindow读入,由PointCollector输出。RowWindow能够帮助您访问某一批次的Row,它提供了对这一批次的Row进行随机访问和迭代访问的接口。您可以选择在一次transform方法调用中输出任意数量的数据点,需要注意的是,输出数据点的类型必须与您在beforeStart方法中设置的一致,而输出数据点的时间戳必须是严格单调递增的。
下面是一个实现了void transform(RowWindow rowWindow, PointCollector collector) throws Exception方法的完整 UDF 示例。它是一个计数器,接收任意列数的时间序列输入,作用是统计并输出指定时间范围内每一个时间窗口中的数据行数。
import java.io.IOException;
import org.apache.iotdb.udf.api.UDTF;
import org.apache.iotdb.udf.api.access.RowWindow;
import org.apache.iotdb.udf.api.collector.PointCollector;
import org.apache.iotdb.udf.api.customizer.config.UDTFConfigurations;
import org.apache.iotdb.udf.api.customizer.parameter.UDFParameters;
import org.apache.iotdb.udf.api.customizer.strategy.SlidingTimeWindowAccessStrategy;
import org.apache.iotdb.udf.api.type.Type;

public class Counter implements UDTF {

  @Override
  public void beforeStart(UDFParameters parameters, UDTFConfigurations configurations) {
    configurations
        .setOutputDataType(Type.INT32)
        .setAccessStrategy(new SlidingTimeWindowAccessStrategy(
            parameters.getLong("time_interval"),
            parameters.getLong("sliding_step"),
            parameters.getLong("display_window_begin"),
            parameters.getLong("display_window_end")));
  }

  @Override
  public void transform(RowWindow rowWindow, PointCollector collector) throws Exception {
    if (rowWindow.windowSize() != 0) {
      collector.putInt(rowWindow.windowStartTime(), rowWindow.windowSize());
    }
  }
}
- void terminate(PointCollector collector) throws Exception
在一些场景下,UDF 需要遍历完所有的原始数据后才能得到最后的输出结果。terminate接口为这类 UDF 提供了支持。
该方法会在所有的transform调用执行完成后,在beforeDestory方法执行前被调用。您可以选择使用transform方法进行单纯的数据处理,最后使用terminate将处理结果输出。
结果需要由PointCollector输出。您可以选择在一次terminate方法调用中输出任意数量的数据点。需要注意的是,输出数据点的类型必须与您在beforeStart方法中设置的一致,而输出数据点的时间戳必须是严格单调递增的。
下面是一个实现了void terminate(PointCollector collector) throws Exception方法的完整 UDF 示例。它接收一个INT32类型的时间序列输入,作用是输出该序列的最大值点。
import java.io.IOException;
import org.apache.iotdb.udf.api.UDTF;
import org.apache.iotdb.udf.api.access.Row;
import org.apache.iotdb.udf.api.collector.PointCollector;
import org.apache.iotdb.udf.api.customizer.config.UDTFConfigurations;
import org.apache.iotdb.udf.api.customizer.parameter.UDFParameters;
import org.apache.iotdb.udf.api.customizer.strategy.RowByRowAccessStrategy;
import org.apache.iotdb.udf.api.type.Type;

public class Max implements UDTF {

  private Long time;
  private int value;

  @Override
  public void beforeStart(UDFParameters parameters, UDTFConfigurations configurations) {
    configurations
        .setOutputDataType(TSDataType.INT32)
        .setAccessStrategy(new RowByRowAccessStrategy());
  }

  @Override
  public void transform(Row row, PointCollector collector) {
    if (row.isNull(0)) {
      return;
    }
    int candidateValue = row.getInt(0);
    if (time == null || value < candidateValue) {
      time = row.getTime();
      value = candidateValue;
    }
  }

  @Override
  public void terminate(PointCollector collector) throws IOException {
    if (time != null) {
      collector.putInt(time, value);
    }
  }
}
- void beforeDestroy()
UDTF 的结束方法,您可以在此方法中进行一些资源释放等的操作。
此方法由框架调用。对于一个 UDF 类实例而言,生命周期中会且只会被调用一次,即在处理完最后一条记录之后被调用。
UDAF(User Defined Aggregation Function)
一个完整的 UDAF 定义涉及到 State 和 UDAF 两个类。
State 类
编写一个 State 类需要实现org.apache.iotdb.udf.api.State接口,下表是需要实现的方法说明。
| 接口定义 | 描述 | 是否必须 |
|---|---|---|
void reset() | 将 State 对象重置为初始的状态,您需要像编写构造函数一样,在该方法内填入 State 类中各个字段的初始值。 | 是 |
byte[] serialize() | 将 State 序列化为二进制数据。该方法用于 IoTDB 内部的 State 对象传递,注意序列化的顺序必须和下面的反序列化方法一致。 | 是 |
void deserialize(byte[] bytes) | 将二进制数据反序列化为 State。该方法用于 IoTDB 内部的 State 对象传递,注意反序列化的顺序必须和上面的序列化方法一致。 | 是 |
下面将详细介绍各个接口的使用方法。
- void reset()
该方法的作用是将 State 重置为初始的状态,您需要在该方法内填写 State 对象中各个字段的初始值。出于优化上的考量,IoTDB 在内部会尽可能地复用 State,而不是为每一个组创建一个新的 State,这样会引入不必要的开销。当 State 更新完一个组中的数据之后,就会调用这个方法重置为初始状态,以此来处理下一个组。
以求平均数(也就是 avg)的 State 为例,您需要数据的总和 sum 与数据的条数 count,并在 reset() 方法中将二者初始化为 0。
class AvgState implements State {
  double sum;

  long count;

  @Override
  public void reset() {
    sum = 0;
    count = 0;
  }

  // other methods
}
- byte[] serialize()/void deserialize(byte[] bytes)
该方法的作用是将 State 序列化为二进制数据,和从二进制数据中反序列化出 State。IoTDB 作为分布式数据库,涉及到在不同节点中传递数据,因此您需要编写这两个方法,来实现 State 在不同节点中的传递。注意序列化和反序列的顺序必须一致。
还是以求平均数(也就是求 avg)的 State 为例,您可以通过任意途径将 State 的内容转化为 byte[] 数组,以及从 byte[] 数组中读取出 State 的内容,下面展示的是用 Java8 引入的 ByteBuffer 进行序列化/反序列的代码:
@Override
public byte[] serialize() {
  ByteBuffer buffer = ByteBuffer.allocate(Double.BYTES + Long.BYTES);
  buffer.putDouble(sum);
  buffer.putLong(count);

  return buffer.array();
}

@Override
public void deserialize(byte[] bytes) {
  ByteBuffer buffer = ByteBuffer.wrap(bytes);
  sum = buffer.getDouble();
  count = buffer.getLong();
}
UDAF 类
编写一个 UDAF 类需要实现org.apache.iotdb.udf.api.UDAF接口,下表是需要实现的方法说明。
| 接口定义 | 描述 | 是否必须 |
|---|---|---|
void validate(UDFParameterValidator validator) throws Exception | 在初始化方法beforeStart调用前执行,用于检测UDFParameters中用户输入的参数是否合法。该方法与 UDTF 的validate相同。 | 否 |
void beforeStart(UDFParameters parameters, UDAFConfigurations configurations) throws Exception | 初始化方法,在 UDAF 处理输入数据前,调用用户自定义的初始化行为。与 UDTF 不同的是,这里的 configuration 是 UDAFConfiguration 类型。 | 是 |
State createState() | 创建State对象,一般只需要调用默认构造函数,然后按需修改默认的初始值即可。 | 是 |
void addInput(State state, Column[] columns, BitMap bitMap) | 根据传入的数据Column[]批量地更新State对象,注意 column[0] 总是代表时间列。另外BitMap表示之前已经被过滤掉的数据,您在编写该方法时需要手动判断对应的数据是否被过滤掉。 | 是 |
void combineState(State state, State rhs) | 将rhs状态合并至state状态中。在分布式场景下,同一组的数据可能分布在不同节点上,IoTDB 会为每个节点上的部分数据生成一个State对象,然后调用该方法合并成完整的State。 | 是 |
void outputFinal(State state, ResultValue resultValue) | 根据State中的数据,计算出最终的聚合结果。注意根据聚合的语义,每一组只能输出一个值。 | 是 |
void beforeDestroy() | UDAF 的结束方法。此方法由框架调用,并且只会被调用一次,即在处理完最后一条记录之后被调用。 | 否 |
在一个完整的 UDAF 实例生命周期中,各个方法的调用顺序如下:
State createState()void validate(UDFParameterValidator validator) throws Exceptionvoid beforeStart(UDFParameters parameters, UDAFConfigurations configurations) throws Exceptionvoid addInput(State state, Column[] columns, BitMap bitMap)void combineState(State state, State rhs)void outputFinal(State state, ResultValue resultValue)void beforeDestroy()
和 UDTF 类似,框架每执行一次 UDAF 查询,都会构造一个全新的 UDF 类实例,查询结束时,对应的 UDF 类实例即被销毁,因此不同 UDAF 查询(即使是在同一个 SQL 语句中)UDF 类实例内部的数据都是隔离的。您可以放心地在 UDAF 中维护一些状态数据,无需考虑并发对 UDF 类实例内部状态数据的影响。
下面将详细介绍各个接口的使用方法。
- void validate(UDFParameterValidator validator) throws Exception
同 UDTF, validate方法能够对用户输入的参数进行验证。
您可以在该方法中限制输入序列的数量和类型,检查用户输入的属性或者进行自定义逻辑的验证。
- void beforeStart(UDFParameters parameters, UDAFConfigurations configurations) throws Exception
beforeStart方法的作用 UDAF 相同:
1. 帮助用户解析 SQL 语句中的 UDF 参数
2. 配置 UDF 运行时必要的信息,即指定 UDF 访问原始数据时采取的策略和输出结果序列的类型
3. 创建资源,比如建立外部链接,打开文件等。
其中,UDFParameters 类型的作用可以参照上文。
UDAFConfigurations
和 UDTF 的区别在于,UDAF 使用了 UDAFConfigurations 作为 configuration 对象的类型。
目前,该类仅支持设置输出数据的类型。
void beforeStart(UDFParameters parameters, UDAFConfigurations configurations) throws Exception {
  // parameters
  // ...

  // configurations
  configurations
    .setOutputDataType(Type.INT32);
}
setOutputDataType 中设定的输出类型和 ResultValue 实际能够接收的数据输出类型关系如下:
setOutputDataType中设定的输出类型 | ResultValue实际能够接收的输出类型 |
|---|---|
INT32 | int |
INT64 | long |
FLOAT | float |
DOUBLE | double |
BOOLEAN | boolean |
TEXT | org.apache.iotdb.udf.api.type.Binary |
UDAF 输出序列的类型也是运行时决定的。您可以根据输入序列类型动态决定输出序列类型。
下面是一个简单的例子:
void beforeStart(UDFParameters parameters, UDAFConfigurations configurations) throws Exception {
  // do something
  // ...

  configurations
    .setOutputDataType(parameters.getDataType(0));
}
- State createState()
为 UDAF 创建并初始化 State。由于 Java 语言本身的限制,您只能调用 State 类的默认构造函数。默认构造函数会为类中所有的字段赋一个默认的初始值,如果该初始值并不符合您的要求,您需要在这个方法内进行手动的初始化。
下面是一个包含手动初始化的例子。假设您要实现一个累乘的聚合函数,State 的初始值应该设置为 1,但是默认构造函数会初始化为 0,因此您需要在调用默认构造函数之后,手动对 State 进行初始化:
public State createState() {
  MultiplyState state = new MultiplyState();
  state.result = 1;
  return state;
}
- void addInput(State state, Column[] columns, BitMap bitMap)
该方法的作用是,通过原始的输入数据来更新 State 对象。出于性能上的考量,也是为了和 IoTDB 向量化的查询引擎相对齐,原始的输入数据不再是一个数据点,而是列的数组 Column[]。注意第一列(也就是 column[0] )总是时间列,因此您也可以在 UDAF 中根据时间进行不同的操作。
由于输入参数的类型不是一个数据点,而是多个列,您需要手动对列中的部分数据进行过滤处理,这就是第三个参数 BitMap 存在的意义。它用来标识这些列中哪些数据被过滤掉了,您在任何情况下都无需考虑被过滤掉的数据。
下面是一个用于统计数据条数(也就是 count)的 addInput() 示例。它展示了您应该如何使用 BitMap 来忽视那些已经被过滤掉的数据。注意还是由于 Java 语言本身的限制,您需要在方法的开头将接口中定义的 State 类型强制转化为自定义的 State 类型,不然后续无法正常使用该 State 对象。
public void addInput(State state, Column[] column, BitMap bitMap) {
  CountState countState = (CountState) state;

  int count = column[0].getPositionCount();
  for (int i = 0; i < count; i++) {
    if (bitMap != null && !bitMap.isMarked(i)) {
      continue;
    }
    if (!column[1].isNull(i)) {
      countState.count++;
    }
  }
}
- void combineState(State state, State rhs)
该方法的作用是合并两个 State,更加准确的说,是用第二个 State 对象来更新第一个 State 对象。IoTDB 是分布式数据库,同一组的数据可能分布在多个不同的节点上。出于性能考虑,IoTDB 会为每个节点上的部分数据先进行聚合成 State,然后再将不同节点上的、属于同一个组的 State 进行合并,这就是 combineState 的作用。
下面是一个用于求平均数(也就是 avg)的 combineState() 示例。和 addInput 类似,您都需要在开头对两个 State 进行强制类型转换。另外需要注意是用第二个 State 的内容来更新第一个 State 的值。
public void combineState(State state, State rhs) {
  AvgState avgState = (AvgState) state;
  AvgState avgRhs = (AvgState) rhs;

  avgState.count += avgRhs.count;
  avgState.sum += avgRhs.sum;
}
- void outputFinal(State state, ResultValue resultValue)
该方法的作用是从 State 中计算出最终的结果。您需要访问 State 中的各个字段,求出最终的结果,并将最终的结果设置到 ResultValue 对象中。IoTDB 内部会为每个组在最后调用一次这个方法。注意根据聚合的语义,最终的结果只能是一个值。
下面还是一个用于求平均数(也就是 avg)的 outputFinal 示例。除了开头的强制类型转换之外,您还将看到 ResultValue 对象的具体用法,即通过 setXXX(其中 XXX 是类型名)来设置最后的结果。
public void outputFinal(State state, ResultValue resultValue) {
  AvgState avgState = (AvgState) state;

  if (avgState.count != 0) {
    resultValue.setDouble(avgState.sum / avgState.count);
  } else {
    resultValue.setNull();
  }
}
- void beforeDestroy()
UDAF 的结束方法,您可以在此方法中进行一些资源释放等的操作。
此方法由框架调用。对于一个 UDF 类实例而言,生命周期中会且只会被调用一次,即在处理完最后一条记录之后被调用。
完整 Maven 项目示例
如果您使用 Maven,可以参考我们编写的示例项目udf-example。您可以在 这里 找到它。
UDF 注册
注册一个 UDF 可以按如下流程进行:
- 实现一个完整的 UDF 类,假定这个类的全类名为
org.apache.iotdb.udf.UDTFExample - 将项目打成 JAR 包,如果您使用 Maven 管理项目,可以参考上述 Maven 项目示例的写法
- 进行注册前的准备工作,根据注册方式的不同需要做不同的准备,具体可参考以下例子
- 使用以下 SQL 语句注册 UDF
CREATE FUNCTION <UDF-NAME> AS <UDF-CLASS-FULL-PATHNAME> (USING URI URI-STRING)?
示例:注册名为example的 UDF,以下两种注册方式任选其一即可
不指定URI
准备工作:
使用该种方式注册时,您需要提前将 JAR 包放置到目录 iotdb-server-1.X.X-all-bin/ext/udf(该目录可配置) 下。
注意,如果您使用的是集群,那么需要将 JAR 包放置到所有 DataNode 的该目录下
注册语句:
CREATE FUNCTION example AS 'org.apache.iotdb.udf.UDTFExample'
指定URI
准备工作:
使用该种方式注册时,您需要提前将 JAR 包上传到 URI 服务器上并确保执行注册语句的 IoTDB 实例能够访问该 URI 服务器。
注意,您无需手动放置 JAR 包,IoTDB 会下载 JAR 包并正确同步到整个集群
注册语句:
CREATE FUNCTION example AS 'org.apache.iotdb.udf.UDTFExample' USING URI 'http://jar/example.jar'
注意
由于 IoTDB 的 UDF 是通过反射技术动态装载的,因此您在装载过程中无需启停服务器。
UDF 函数名称是大小写不敏感的。
请不要给 UDF 函数注册一个内置函数的名字。使用内置函数的名字给 UDF 注册会失败。
不同的 JAR 包中最好不要有全类名相同但实现功能逻辑不一样的类。例如 UDF(UDAF/UDTF):udf1、udf2分别对应资源udf1.jar、udf2.jar。如果两个 JAR 包里都包含一个org.apache.iotdb.udf.UDTFExample类,当同一个 SQL 中同时使用到这两个 UDF 时,系统会随机加载其中一个类,导致 UDF 执行行为不一致。
UDF 卸载
卸载 UDF 的 SQL 语法如下:
DROP FUNCTION <UDF-NAME>
可以通过如下 SQL 语句卸载上面例子中的 UDF:
DROP FUNCTION example
UDF 查询
UDF 的使用方法与普通内建函数的类似。
支持的基础 SQL 语法
SLIMIT/SOFFSETLIMIT/OFFSET- 支持值过滤
- 支持时间过滤
带 * 查询
假定现在有时间序列 root.sg.d1.s1和 root.sg.d1.s2。
- 执行
SELECT example(*) from root.sg.d1
那么结果集中将包括example(root.sg.d1.s1)和example(root.sg.d1.s2)的结果。
- 执行
SELECT example(s1, *) from root.sg.d1
那么结果集中将包括example(root.sg.d1.s1, root.sg.d1.s1)和example(root.sg.d1.s1, root.sg.d1.s2)的结果。
- 执行
SELECT example(*, *) from root.sg.d1
那么结果集中将包括example(root.sg.d1.s1, root.sg.d1.s1),example(root.sg.d1.s2, root.sg.d1.s1),example(root.sg.d1.s1, root.sg.d1.s2) 和 example(root.sg.d1.s2, root.sg.d1.s2)的结果。
带自定义输入参数的查询
您可以在进行 UDF 查询的时候,向 UDF 传入任意数量的键值对参数。键值对中的键和值都需要被单引号或者双引号引起来。注意,键值对参数只能在所有时间序列后传入。下面是一组例子:
SELECT example(s1, 'key1'='value1', 'key2'='value2'), example(*, 'key3'='value3') FROM root.sg.d1;
SELECT example(s1, s2, 'key1'='value1', 'key2'='value2') FROM root.sg.d1;
与其他查询的嵌套查询
SELECT s1, s2, example(s1, s2) FROM root.sg.d1;
SELECT *, example(*) FROM root.sg.d1 DISABLE ALIGN;
SELECT s1 * example(* / s1 + s2) FROM root.sg.d1;
SELECT s1, s2, s1 + example(s1, s2), s1 - example(s1 + example(s1, s2) / s2) FROM root.sg.d1;
查看所有注册的 UDF
SHOW FUNCTIONS
用户权限管理
用户在使用 UDF 时会涉及到 1 种权限:USE_UDF
- 具备该权限的用户才被允许执行 UDF 注册操作
- 具备该权限的用户才被允许执行 UDF 卸载操作
- 具备该权限的用户才被允许使用 UDF 进行查询
更多用户权限相关的内容,请参考 权限管理语句。
配置项
使用配置项 udf_lib_dir 来配置 udf 的存储目录.
在 SQL 语句中使用自定义函数时,可能提示内存不足。这种情况下,您可以通过更改配置文件iotdb-system.properties中的udf_initial_byte_array_length_for_memory_control,udf_memory_budget_in_mb和udf_reader_transformer_collector_memory_proportion并重启服务来解决此问题。
贡献 UDF
该部分主要讲述了外部用户如何将自己编写的 UDF 贡献给 IoTDB 社区。
前提条件
UDF 具有通用性。
通用性主要指的是:UDF 在某些业务场景下,可以被广泛使用。换言之,就是 UDF 具有复用价值,可被社区内其他用户直接使用。
如果您不确定自己写的 UDF 是否具有通用性,可以发邮件到
dev@iotdb.apache.org或直接创建 ISSUE 发起讨论。UDF 已经完成测试,且能够正常运行在用户的生产环境中。
贡献清单
- UDF 的源代码
- UDF 的测试用例
- UDF 的使用说明
源代码
- 在
iotdb-core/node-commons/src/main/java/org/apache/iotdb/commons/udf/builtin中创建 UDF 主类和相关的辅助类。 - 在
iotdb-core/node-commons/src/main/java/org/apache/iotdb/commons/udf/builtin/BuiltinTimeSeriesGeneratingFunction.java中注册您编写的 UDF。
测试用例
您至少需要为您贡献的 UDF 编写集成测试。
您可以在integration-test/src/test/java/org/apache/iotdb/db/it/udf中为您贡献的 UDF 新增一个测试类进行测试。
使用说明
使用说明需要包含:UDF 的名称、UDF 的作用、执行函数必须的属性参数、函数的适用的场景以及使用示例等。
使用说明需包含中英文两个版本。应分别在 docs/zh/UserGuide/Operation Manual/DML Data Manipulation Language.md 和 docs/UserGuide/Operation Manual/DML Data Manipulation Language.md 中新增使用说明。
提交 PR
当您准备好源代码、测试用例和使用说明后,就可以将 UDF 贡献到 IoTDB 社区了。在 Github 上面提交 Pull Request (PR) 即可。具体提交方式见:贡献指南。
当 PR 评审通过并被合并后,您的 UDF 就已经贡献给 IoTDB 社区了!
已知实现的UDF
内置UDF
- Aggregate Functions 聚合函数
- Arithmetic Operators and Functions 算数函数
- Comparison Operators and Functions 比较函数
- String Processing 字符串处理函数
- Data Type Conversion Function 数据类型转换函数
- Constant Timeseries Generating Functions 常序列生成函数
- Selector Functions 选择函数
- Continuous Interval Functions 区间查询函数
- Variation Trend Calculation Functions 趋势计算函数
- Sample Functions 采样函数
- Time-Series 时间序列处理函数
数据质量函数库
关于
对基于时序数据的应用而言,数据质量至关重要。基于用户自定义函数能力,IoTDB 提供了一系列关于数据质量的函数,包括数据画像、数据质量评估与修复等,能够满足工业领域对数据质量的需求。
快速上手
该函数库中的函数不是内置函数,使用前要先加载到系统中。 操作流程如下:
- 在 iotdb 根目录下执行编译指令;
mvn clean package -pl library-udf -am -DskipTests -Pget-jar-with-dependencies
- 将在 target 下生成的带依赖的 jar 包复制到 IoTDB 程序目录的
ext\udf目录下(若您使用的是集群,请将jar包复制到所有DataNode的该目录下),如下图所示;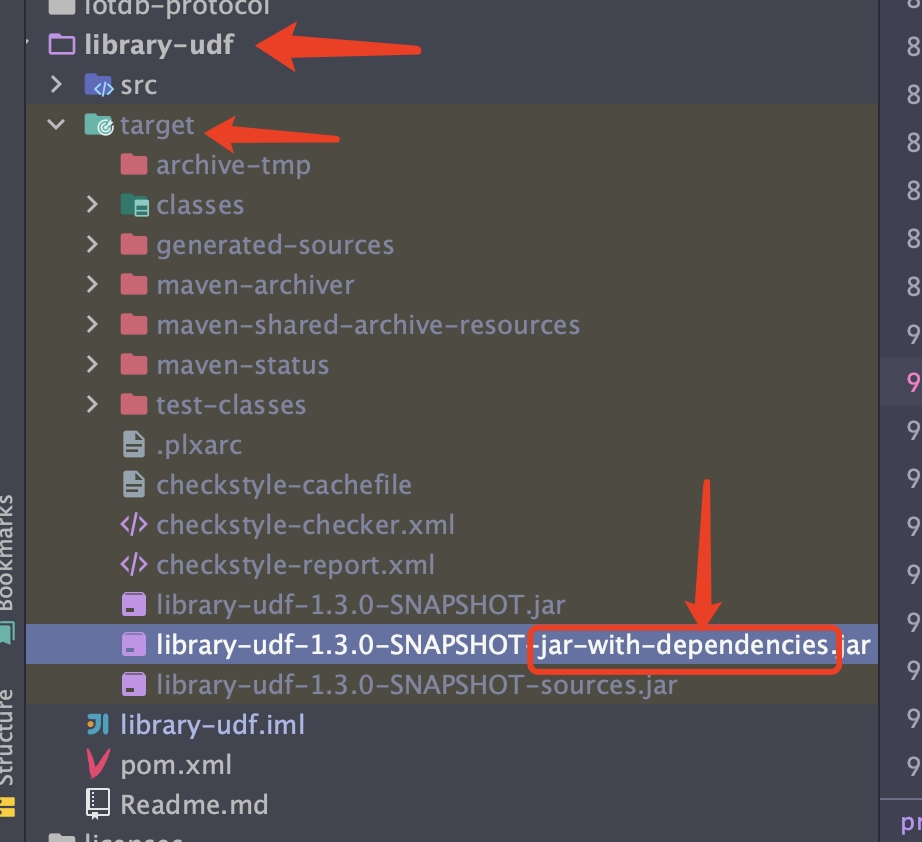
- 下载注册脚本:linux, windows;
- 将注册脚本复制到 IoTDB 的
sbin目录下,修改脚本中的参数(默认为host=127.0.0.1,rpcPort=6667,user=root,pass=root); - 启动 IoTDB 服务;
- 运行注册脚本
register-UDF.sh以注册 UDF。
已经实现的函数
- Data-Quality 数据质量
- Data-Profiling 数据画像
- Anomaly-Detection 异常检测
- Frequency-Domain 频域分析
- Data-Matching 数据匹配
- Data-Repairing 数据修复
- Series-Discovery 序列发现
- Machine-Learning 机器学习
Q&A
Q1: 如何修改已经注册的 UDF?
A1: 假设 UDF 的名称为example,全类名为org.apache.iotdb.udf.UDTFExample,由example.jar引入
- 首先卸载已经注册的
example函数,执行DROP FUNCTION example - 删除
iotdb-server-1.0.0-all-bin/ext/udf目录下的example.jar - 修改
org.apache.iotdb.udf.UDTFExample中的逻辑,重新打包,JAR 包的名字可以仍然为example.jar - 将新的 JAR 包上传至
iotdb-server-1.0.0-all-bin/ext/udf目录下 - 装载新的 UDF,执行
CREATE FUNCTION example AS "org.apache.iotdb.udf.UDTFExample"