| <!-- |
| Licensed to the Apache Software Foundation (ASF) under one |
| or more contributor license agreements. See the NOTICE file |
| distributed with this work for additional information |
| regarding copyright ownership. The ASF licenses this file |
| to you under the Apache License, Version 2.0 (the |
| "License"); you may not use this file except in compliance |
| with the License. You may obtain a copy of the License at |
| |
| http://www.apache.org/licenses/LICENSE-2.0 |
| |
| Unless required by applicable law or agreed to in writing, |
| software distributed under the License is distributed on an |
| "AS IS" BASIS, WITHOUT WARRANTIES OR CONDITIONS OF ANY |
| KIND, either express or implied. See the License for the |
| specific language governing permissions and limitations |
| under the License. |
| --> |
| |
| # Apache Liminal |
| |
| Apache Liminal is an end-to-end platform for data engineers & scientists, allowing them to build, |
| train and deploy machine learning models in a robust and agile way. |
| |
| The platform provides the abstractions and declarative capabilities for |
| data extraction & feature engineering followed by model training and serving. |
| Liminal's goal is to operationalize the machine learning process, allowing data scientists to |
| quickly transition from a successful experiment to an automated pipeline of model training, |
| validation, deployment and inference in production, freeing them from engineering and |
| non-functional tasks, and allowing them to focus on machine learning code and artifacts. |
| |
| # Basics |
| |
| Using simple YAML configuration, create your own schedule data pipelines (a sequence of tasks to |
| perform), application servers, and more. |
| |
| ## Getting Started |
| |
| A simple getting stated guide for Liminal can be found [here](docs/getting-started/hello_world.md) |
| |
| ## Apache Liminal Documentation |
| |
| Full documentation of Apache Liminal can be found [here](docs/liminal) |
| |
| ## High Level Architecture |
| |
| High level architecture documentation can be found [here](docs/architecture.md) |
| |
| ## Example YAML config file |
| |
| ```yaml |
| --- |
| name: MyLiminalStack |
| owner: Bosco Albert Baracus |
| volumes: |
| - volume: myvol1 |
| local: |
| path: /Users/me/myvol1 |
| images: |
| - image: my_python_task_img |
| type: python |
| source: write_inputs |
| - image: my_parallelized_python_task_img |
| source: write_outputs |
| - image: my_server_image |
| type: python_server |
| source: myserver |
| endpoints: |
| - endpoint: /myendpoint1 |
| module: my_server |
| function: myendpoint1func |
| pipelines: |
| - pipeline: my_pipeline |
| start_date: 1970-01-01 |
| timeout_minutes: 45 |
| schedule: 0 * 1 * * |
| metrics: |
| namespace: TestNamespace |
| backends: [ 'cloudwatch' ] |
| tasks: |
| - task: my_python_task |
| type: python |
| description: static input task |
| image: my_python_task_img |
| env_vars: |
| NUM_FILES: 10 |
| NUM_SPLITS: 3 |
| mounts: |
| - mount: mymount |
| volume: myvol1 |
| path: /mnt/vol1 |
| cmd: python -u write_inputs.py |
| - task: my_parallelized_python_task |
| type: python |
| description: parallelized python task |
| image: my_parallelized_python_task_img |
| env_vars: |
| FOO: BAR |
| executors: 3 |
| mounts: |
| - mount: mymount |
| volume: myvol1 |
| path: /mnt/vol1 |
| cmd: python -u write_inputs.py |
| services: |
| - service: my_python_server |
| description: my python server |
| image: my_server_image |
| ``` |
| |
| # Installation |
| |
| 1. Install this repository (HEAD) |
| |
| ```bash |
| pip install git+https://github.com/apache/incubator-liminal.git |
| ``` |
| |
| 2. Optional: set LIMINAL_HOME to path of your choice (if not set, will default to ~/liminal_home) |
| |
| ```bash |
| echo 'export LIMINAL_HOME=</path/to/some/folder>' >> ~/.bash_profile && source ~/.bash_profile |
| ``` |
| |
| # Authoring pipelines |
| |
| This involves at minimum creating a single file called liminal.yml as in the example above. |
| |
| If your pipeline requires custom python code to implement tasks, they should be organized |
| [like this](https://github.com/apache/incubator-liminal/tree/master/tests/runners/airflow/liminal) |
| |
| If your pipeline introduces imports of external packages which are not already a part |
| of the liminal framework (i.e. you had to pip install them yourself), you need to also provide |
| a requirements.txt in the root of your project. |
| |
| # Testing the pipeline locally |
| |
| When your pipeline code is ready, you can test it by running it locally on your machine. |
| |
| 1. Ensure you have The Docker engine running locally, and enable a local Kubernetes cluster: |
| |
| 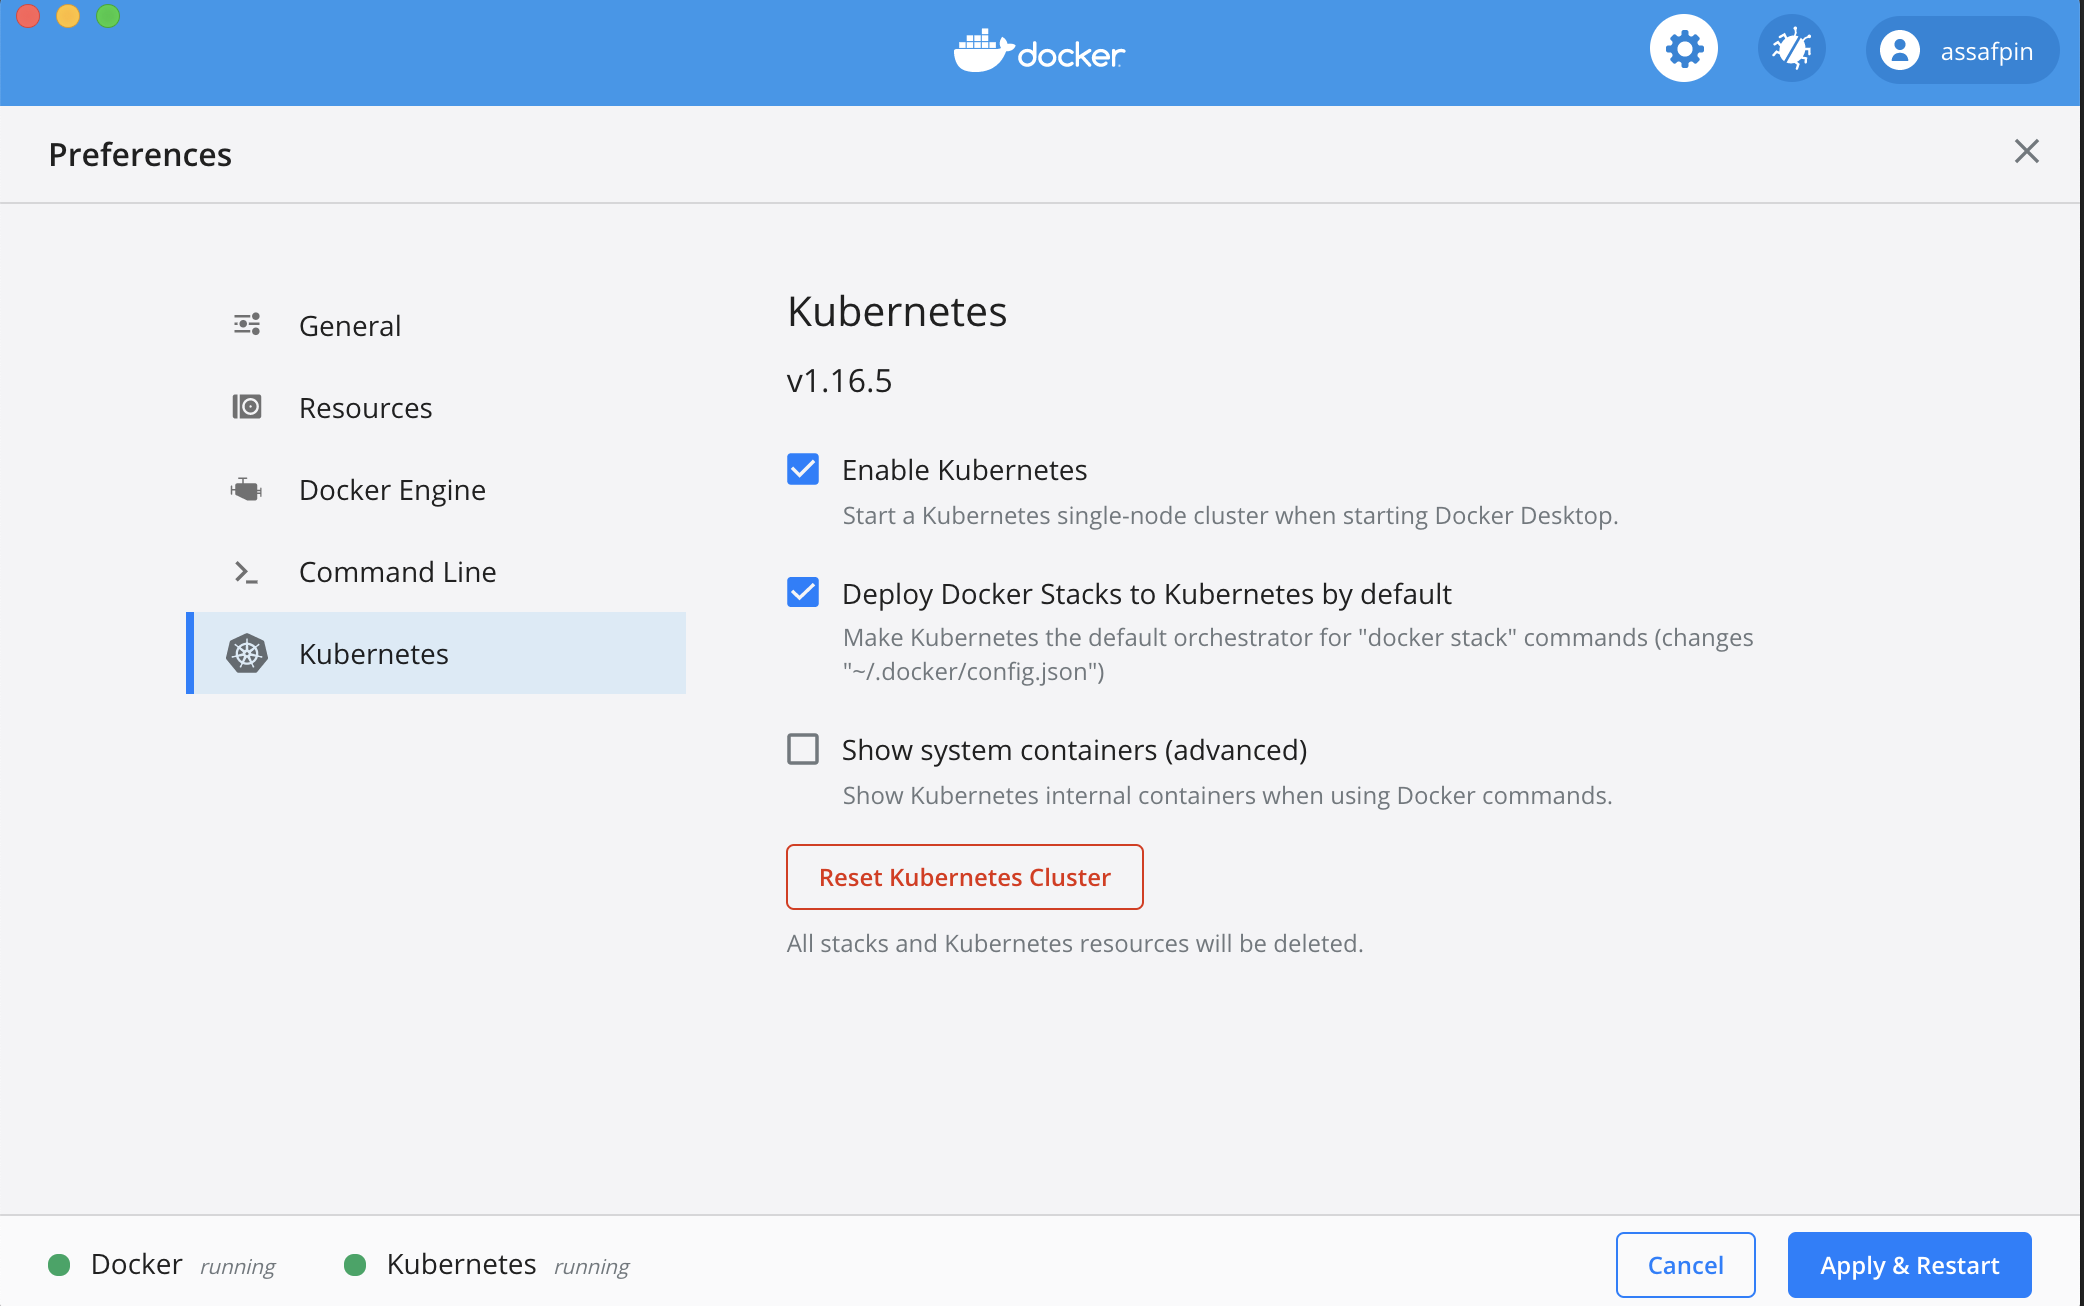 |
| |
| And allocate it at least 3 CPUs (under "Resources" in the Docker preference UI). |
| |
| If you want to execute your pipeline on a remote kubernetes cluster, make sure the cluster is configured using: |
| |
| ```bash |
| kubectl config set-context <your remote kubernetes cluster> |
| ``` |
| |
| 2. Build the docker images used by your pipeline. |
| |
| In the example pipeline above, you can see that tasks and services have an "image" field - such as |
| "my_static_input_task_image". This means that the task is executed inside a docker container, and the docker container |
| is created from a docker image where various code and libraries are installed. |
| |
| You can take a look at what the build process looks like, e.g. |
| [here](https://github.com/apache/incubator-liminal/tree/master/liminal/build/image/python) |
| |
| In order for the images to be available for your pipeline, you'll need to build them locally: |
| |
| ```bash |
| cd </path/to/your/liminal/code> |
| liminal build |
| ``` |
| |
| You'll see that a number of outputs indicating various docker images built. |
| |
| 3. Create a kubernetes local volume \ |
| In case your Yaml includes working with [volumes](https://github.com/apache/incubator-liminal/blob/6253f8b2c9dc244af032979ec6d462dc3e07e170/docs/getting_started.md#mounted-volumes) |
| please first run the following command: |
| |
| ```bash |
| cd </path/to/your/liminal/code> |
| liminal create |
| ``` |
| |
| 4. Deploy the pipeline: |
| |
| ```bash |
| cd </path/to/your/liminal/code> |
| liminal deploy |
| ``` |
| |
| Note: after upgrading liminal, it's recommended to issue the command |
| |
| ```bash |
| liminal deploy --clean |
| ``` |
| |
| This will rebuild the airlfow docker containers from scratch with a fresh version of liminal, ensuring consistency. |
| |
| 5. Start the server |
| |
| ```bash |
| liminal start |
| ``` |
| |
| 6. Stop the server |
| |
| ```bash |
| liminal stop |
| ``` |
| |
| 7. Display the server logs |
| |
| ```bash |
| liminal logs --follow/--tail |
| |
| Number of lines to show from the end of the log: |
| liminal logs --tail=10 |
| |
| Follow log output: |
| liminal logs --follow |
| ``` |
| |
| 8. Navigate to [http://localhost:8080/admin](http://localhost:8080/admin) |
| |
| 9. You should see your 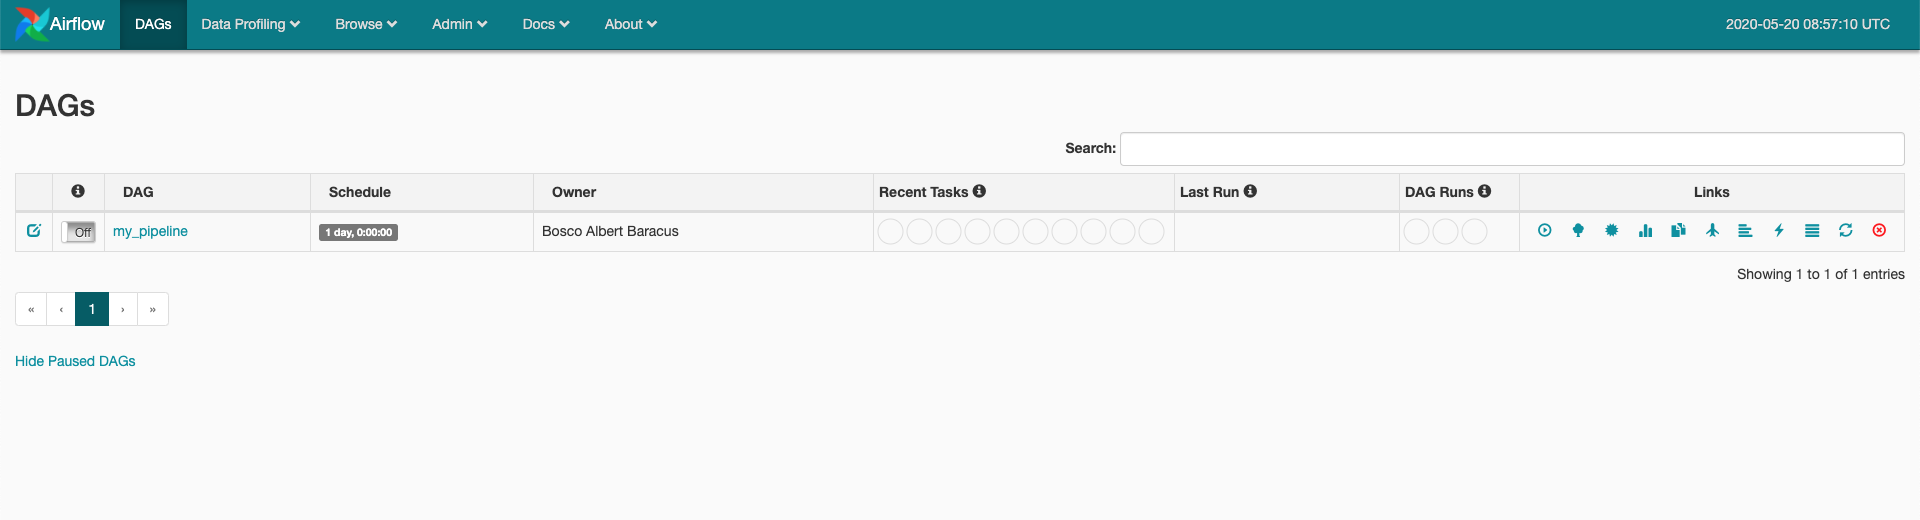 |
| The pipeline is scheduled to run according to the ```json schedule: 0 * 1 * *``` field in the .yml file you provided. |
| |
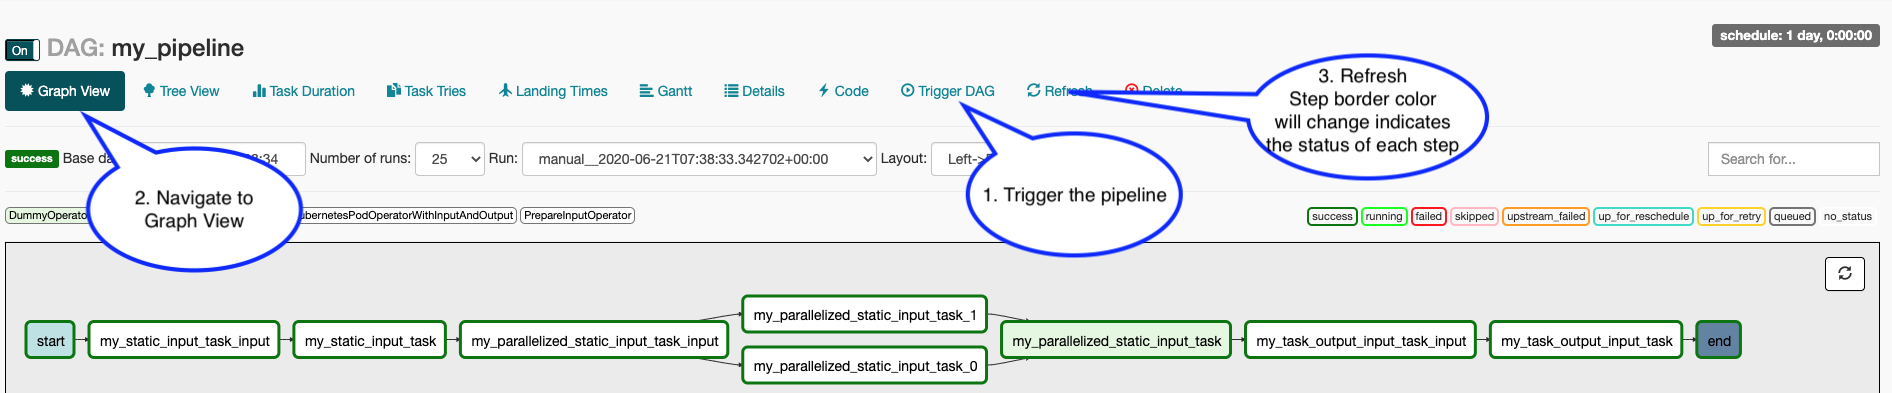
| 10. To manually activate your pipeline: |
| |
| - Click your pipeline and then click "trigger DAG" |
| - Click "Graph view" |
| You should see the steps in your pipeline getting executed in "real time" by clicking "Refresh" periodically. |
| |
|  |
| |
| # Contributing |
| |
| More information on contributing can be found [here](CONTRIBUTING.md) |
| |
| # Community |
| |
| The Liminal community holds a public call every Monday |
| |
| - [Liminal Community Calendar](https://calendar.google.com/calendar/u/0/r?cid=jom1i20emghura6s6ookhe2skk@group.calendar.google.com) |
| - [Dev-Mailing-List](https://lists.apache.org/list.html?dev@liminal.apache.org) |
| |
| ## Running Tests (for contributors) |
| |
| When doing local development and running Liminal unit-tests, make sure to set LIMINAL_STAND_ALONE_MODE=True |