| --- |
| title: skywalking-logger |
| keywords: |
| - Apache APISIX |
| - API 网关 |
| - Plugin |
| - SkyWalking |
| description: skywalking-logger 将请求和响应日志作为 JSON 对象批量推送到 SkyWalking OAP 服务器,并支持日志格式的自定义。 |
| --- |
| |
| <!-- |
| # |
| # Licensed to the Apache Software Foundation (ASF) under one or more |
| # contributor license agreements. See the NOTICE file distributed with |
| # this work for additional information regarding copyright ownership. |
| # The ASF licenses this file to You under the Apache License, Version 2.0 |
| # (the "License"); you may not use this file except in compliance with |
| # the License. You may obtain a copy of the License at |
| # |
| # http://www.apache.org/licenses/LICENSE-2.0 |
| # |
| # Unless required by applicable law or agreed to in writing, software |
| # distributed under the License is distributed on an "AS IS" BASIS, |
| # WITHOUT WARRANTIES OR CONDITIONS OF ANY KIND, either express or implied. |
| # See the License for the specific language governing permissions and |
| # limitations under the License. |
| # |
| --> |
| |
| <head> |
| <link rel="canonical" href="https://docs.api7.ai/hub/skywalking-logger" /> |
| </head> |
| |
| ## 描述 |
| |
| `skywalking-logger` 插件将请求和响应日志作为 JSON 对象批量推送到 SkyWalking OAP 服务器,并支持日志格式的自定义。 |
| |
| 如果存在现有的跟踪上下文,它会自动设置跟踪日志关联并依赖于 [SkyWalking 跨进程传播标头协议](https://skywalking.apache.org/docs/main/next/en/api/x-process-propagation-headers-v3/)。 |
| |
| ## 属性 |
| |
| | 名称 | 类型 | 必选项 | 默认值 | 有效值 | 描述 | |
| | ---------------------- | ------- | ------ | -------------------- | ------------- | ---------------------------------------------------------------- | |
| | endpoint_addr | string | 是 | | | SkyWalking OAP 服务器的 URI。 | |
| | service_name | string | 否 |"APISIX" | | SkyWalking 服务名称。 | |
| | service_instance_name | string | 否 |"APISIX Instance Name"| | SkyWalking 服务的实例名称。当设置为 `$hostname` 会直接获取本地主机名。 | |
| | log_format | object | 否 | | | 以 JSON 格式的键值对来声明日志格式。对于值部分,仅支持字符串。如果是以 `$` 开头,则表明是要获取 [APISIX 变量](../apisix-variable.md) 或 [NGINX 内置变量](http://nginx.org/en/docs/varindex.html)。 | |
| | timeout | integer | 否 | 3 | [1,...] | 发送请求后保持连接活动的时间。 | |
| | name | string | 否 | "skywalking logger" | | 标识 logger 的唯一标识符。如果您使用 Prometheus 监视 APISIX 指标,名称将以 `apisix_batch_process_entries` 导出。 | |
| | include_req_body | boolean | 否 | false |如果为 true,则将请求主体包含在日志中。请注意,如果请求主体太大而无法保存在内存中,则由于 NGINX 的限制而无法记录。| |
| | include_req_body_expr | array[array] | 否 | | 一个或多个条件的数组,形式为 [lua-resty-expr](https://github.com/api7/lua-resty-expr)。在 `include_req_body` 为 true 时使用。仅当此处配置的表达式计算结果为 true 时,才会记录请求主体。| |
| | include_resp_body | boolean | 否 | false | 如果为 true,则将响应主体包含在日志中。| |
| | include_resp_body_expr | array[array] | 否 | | 一个或多个条件的数组,形式为 [lua-resty-expr](https://github.com/api7/lua-resty-expr)。在 `include_resp_body` 为 true 时使用。仅当此处配置的表达式计算结果为 true 时,才会记录响应主体。| |
| |
| 该插件支持使用批处理器来聚合并批量处理条目(日志/数据)。这样可以避免插件频繁地提交数据,默认设置情况下批处理器会每 `5` 秒钟或队列中的数据达到 `1000` 条时提交数据,如需了解批处理器相关参数设置,请参考 [Batch-Processor](../batch-processor.md#配置)。 |
| |
| ## 元数据 |
| |
| 您还可以通过配置插件元数据来设置日志的格式。可用的配置如下: |
| |
| | 名称 | 类型 | 必选项 | 默认值 | 有效值 | 描述 | |
| | ---------------------- | ------- | ------ | -------------------- | ------------- | ---------------------------------------------------------------- | |
| | log_format | object | 否 | | 以 JSON 格式的键值对来声明日志格式。对于值部分,仅支持字符串。如果是以 `$` 开头,则表明是要获取 [APISIX 变量](../apisix-variable.md) 或 [NGINX 内置变量](http://nginx.org/en/docs/varindex.html)。 | |
| |
| ## 示例 |
| |
| 以下示例演示了如何为不同场景配置 `skywalking-logger` 插件。 |
| |
| 要按照示例操作,请按照 [Skywalking 的文档](https://skywalking.apache.org/docs/main/next/en/setup/backend/backend-docker/) 使用 Docker Compose 启动存储、OAP 和 Booster UI。设置完成后,OAP 服务器应在 `12800` 上监听,并且您应该能够通过 [http://localhost:8080](http://localhost:8080) 访问 UI。 |
| |
| :::note |
| |
| 您可以这样从 `config.yaml` 中获取 `admin_key` 并存入环境变量: |
| |
| ```bash |
| admin_key=$(yq '.deployment.admin.admin_key[0].key' conf/config.yaml | sed 's/"//g') |
| ``` |
| |
| ::: |
| |
| ### 以默认日志格式记录请求 |
| |
| 以下示例演示了如何在路由上配置 `skywalking-logger` 插件,以记录到达路由的请求信息。 |
| |
| 使用 `skywalking-logger` 插件创建路由,并使用 OAP 服务器 URI 配置插件: |
| |
| ```shell |
| curl "http://127.0.0.1:9180/apisix/admin/routes" -X PUT \ |
| -H "X-API-KEY: ${admin_key}" \ |
| -d '{ |
| "id": "skywalking-logger-route", |
| "uri": "/anything", |
| "plugins": { |
| "skywalking-logger": { |
| "endpoint_addr": "http://192.168.2.103:12800" |
| } |
| }, |
| "upstream": { |
| "nodes": { |
| "httpbin.org:80": 1 |
| }, |
| "type": "roundrobin" |
| } |
| }' |
| ``` |
| |
| 向路由发送请求: |
| |
| ```shell |
| curl -i "http://127.0.0.1:9080/anything" |
| ``` |
| |
| 您应该会收到 `HTTP/1.1 200 OK` 响应。 |
| |
| 在 [Skywalking UI](http://localhost:8080) 中,导航至 __General Service__ > __Services__。您应该会看到一个名为 `APISIX` 的服务,其中包含与您的请求相对应的日志条目: |
| |
| ```json |
| { |
| "upstream_latency": 674, |
| "request": { |
| "method": "GET", |
| "headers": { |
| "user-agent": "curl/8.6.0", |
| "host": "127.0.0.1:9080", |
| "accept": "*/*" |
| }, |
| "url": "http://127.0.0.1:9080/anything", |
| "size": 85, |
| "querystring": {}, |
| "uri": "/anything" |
| }, |
| "client_ip": "192.168.65.1", |
| "route_id": "skywalking-logger-route", |
| "start_time": 1736945107345, |
| "upstream": "3.210.94.60:80", |
| "server": { |
| "version": "3.11.0", |
| "hostname": "7edbcebe8eb3" |
| }, |
| "service_id": "", |
| "response": { |
| "size": 619, |
| "status": 200, |
| "headers": { |
| "content-type": "application/json", |
| "date": "Thu, 16 Jan 2025 12:45:08 GMT", |
| "server": "APISIX/3.11.0", |
| "access-control-allow-origin": "*", |
| "connection": "close", |
| "access-control-allow-credentials": "true", |
| "content-length": "391" |
| } |
| }, |
| "latency": 764.9998664856, |
| "apisix_latency": 90.999866485596 |
| } |
| ``` |
| |
| ### 使用插件元数据记录请求和响应标头 |
| |
| 以下示例演示了如何使用插件元数据和内置变量自定义日志格式,以记录来自请求和响应的特定标头。 |
| |
| 在 APISIX 中,插件元数据用于配置同一插件的所有插件实例的通用元数据字段。当插件在多个资源中启用并需要对其元数据字段进行通用更新时,它很有用。 |
| |
| 首先,使用 `skywalking-logger` 插件创建路由,并使用您的 OAP 服务器 URI 配置插件: |
| |
| ```shell |
| curl "http://127.0.0.1:9180/apisix/admin/routes" -X PUT \ |
| -H "X-API-KEY: ${admin_key}" \ |
| -d '{ |
| "id": "skywalking-logger-route", |
| "uri": "/anything", |
| "plugins": { |
| "skywalking-logger": { |
| "endpoint_addr": "http://192.168.2.103:12800" |
| } |
| }, |
| "upstream": { |
| "nodes": { |
| "httpbin.org:80": 1 |
| }, |
| "type": "roundrobin" |
| } |
| }' |
| ``` |
| |
| 接下来,配置 `skywalking-logger` 的插件元数据,以记录自定义请求头 `env` 和响应头 `Content-Type`: |
| |
| ```shell |
| curl "http://127.0.0.1:9180/apisix/admin/plugin_metadata/skywalking-logger" -X PUT \ |
| -H "X-API-KEY: ${admin_key}" \ |
| -d '{ |
| "log_format": { |
| "host": "$host", |
| "@timestamp": "$time_iso8601", |
| "client_ip": "$remote_addr", |
| "env": "$http_env", |
| "resp_content_type": "$sent_http_Content_Type" |
| } |
| }' |
| ``` |
| |
| 使用 `env` 标头向路由发送请求: |
| |
| ```shell |
| curl -i "http://127.0.0.1:9080/anything" -H "env: dev" |
| ``` |
| |
| 您应该收到 `HTTP/1.1 200 OK` 响应。在 [Skywalking UI](http://localhost:8080) 中,导航至 __General Service__ > __Services__。您应该会看到一个名为 `APISIX` 的服务,其中包含与您的请求相对应的日志条目: |
| |
| ```json |
| [ |
| { |
| "route_id": "skywalking-logger-route", |
| "client_ip": "192.168.65.1", |
| "@timestamp": "2025-01-16T12:51:53+00:00", |
| "host": "127.0.0.1", |
| "env": "dev", |
| "resp_content_type": "application/json" |
| } |
| ] |
| ``` |
| |
| ### 有条件地记录请求主体 |
| |
| 以下示例演示了如何有条件地记录请求主体。 |
| |
| 使用 `skywalking-logger` 插件创建一个路由,仅当 URL 查询字符串 `log_body` 为 `yes` 时才包含请求主体: |
| |
| ```shell |
| curl "http://127.0.0.1:9180/apisix/admin/routes" -X PUT \ |
| -H "X-API-KEY: ${admin_key}" \ |
| -d '{ |
| "id": "skywalking-logger-route", |
| "uri": "/anything", |
| "plugins": { |
| "skywalking-logger": { |
| "endpoint_addr": "http://192.168.2.103:12800", |
| "include_req_body": true, |
| "include_req_body_expr": [["arg_log_body", "==", "yes"]] |
| } |
| }, |
| "upstream": { |
| "nodes": { |
| "httpbin.org:80": 1 |
| }, |
| "type": "roundrobin" |
| } |
| }' |
| ``` |
| |
| 使用满足以下条件的 URL 查询字符串向路由发送请求: |
| |
| ```shell |
| curl -i "http://127.0.0.1:9080/anything?log_body=yes" -X POST -d '{"env": "dev"}' |
| ``` |
| |
| 您应该收到 `HTTP/1.1 200 OK` 响应。在 [Skywalking UI](http://localhost:8080) 中,导航到 __General Service__ > __Services__。您应该看到一个名为 `APISIX` 的服务,其中包含与您的请求相对应的日志条目,并记录了请求正文: |
| |
| ```json |
| [ |
| { |
| "request": { |
| "url": "http://127.0.0.1:9080/anything?log_body=yes", |
| "querystring": { |
| "log_body": "yes" |
| }, |
| "uri": "/anything?log_body=yes", |
| ..., |
| "body": "{\"env\": \"dev\"}", |
| }, |
| ... |
| } |
| ] |
| ``` |
| |
| 向路由发送一个没有任何 URL 查询字符串的请求: |
| |
| ```shell |
| curl -i "http://127.0.0.1:9080/anything" -X POST -d '{"env": "dev"}' |
| ``` |
| |
| 您不应该观察到没有请求正文的日志条目。 |
| |
| :::info |
| |
| 如果您除了将 `include_req_body` 或 `include_resp_body` 设置为 `true` 之外还自定义了 `log_format`,则插件不会在日志中包含正文。 |
| |
| 作为一种解决方法,您可以在日志格式中使用 NGINX 变量 `$request_body`,例如: |
| |
| ```json |
| { |
| "skywalking-logger": { |
| ..., |
| "log_format": {"body": "$request_body"} |
| } |
| } |
| ``` |
| |
| ::: |
| |
| ### 将跟踪与日志关联 |
| |
| 以下示例演示了如何在路由上配置 `skywalking-logger` 插件,以记录到达路由的请求信息。 |
| |
| 使用 `skywalking-logger` 插件创建路由,并使用 OAP 服务器 URI 配置插件: |
| |
| ```shell |
| curl "http://127.0.0.1:9180/apisix/admin/routes" -X PUT \ |
| -H "X-API-KEY: ${admin_key}" \ |
| -d '{ |
| "id": "skywalking-logger-route", |
| "uri": "/anything", |
| "plugins": { |
| "skywalking": { |
| "sample_ratio": 1 |
| }, |
| "skywalking-logger": { |
| "endpoint_addr": "http://192.168.2.103:12800" |
| } |
| }, |
| "upstream": { |
| "nodes": { |
| "httpbin.org:80": 1 |
| }, |
| "type": "roundrobin" |
| } |
| }' |
| ``` |
| |
| 生成几个对路由的请求: |
| |
| ```shell |
| curl -i "http://127.0.0.1:9080/anything" |
| ``` |
| |
| 您应该会收到 `HTTP/1.1 200 OK` 响应。 |
| |
| 在 [Skywalking UI](http://localhost:8080) 中,导航到 __General Service__ > __Services__。您应该会看到一个名为 `APISIX` 的服务,其中包含与您的请求相对应的跟踪,您可以在其中查看相关日志: |
| |
| 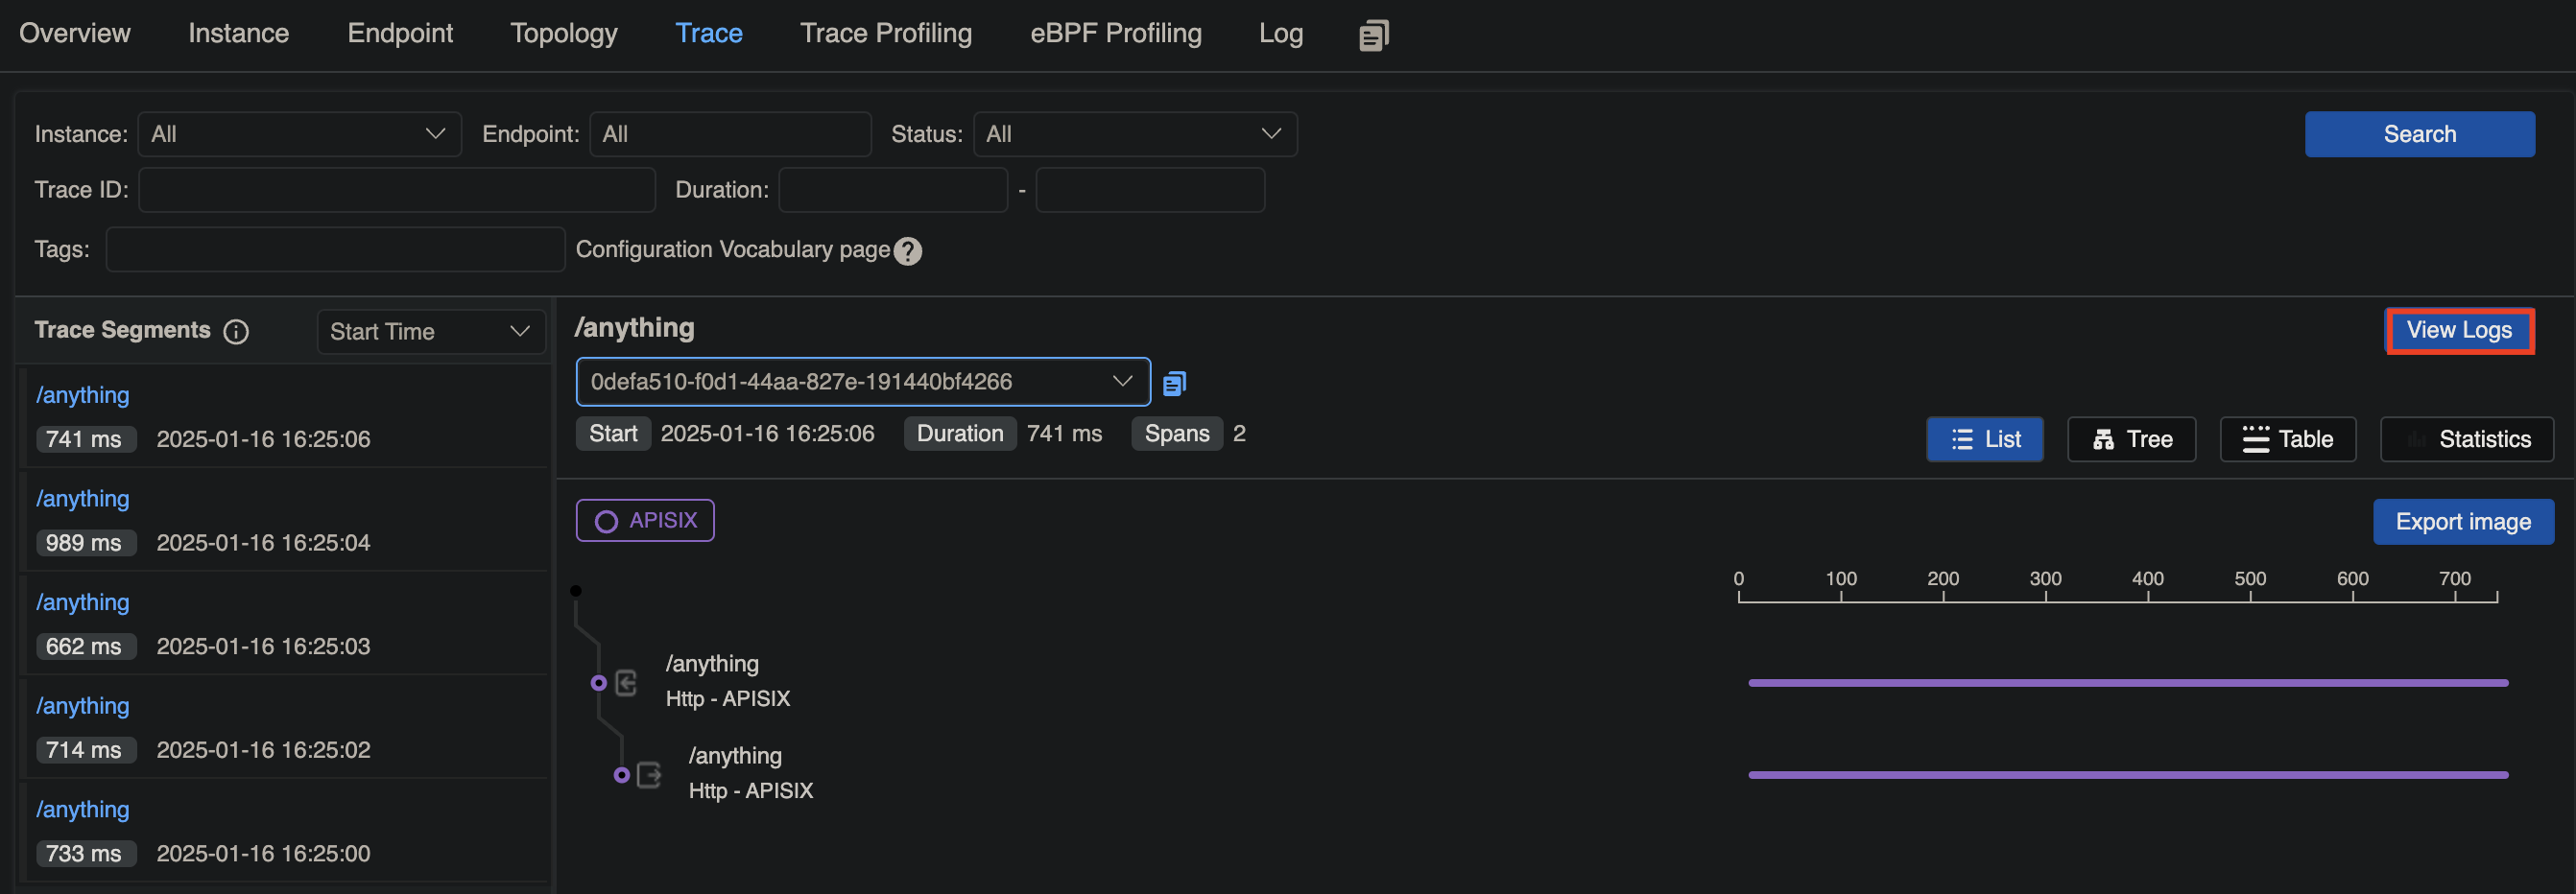 |
| |
|  |