title: Getting started keywords:
- APISIX
- Getting Started description: This document walks you through how you can get started with Apache APISIX.
import Tabs from ‘@theme/Tabs’; import TabItem from ‘@theme/TabItem’;
The guide walks you through the concepts, features and how you can get started with Apache APISIX.
You will learn:
- What Apache APISIX is.
- Architecture and key concepts of APISIX.
- How to install and run APISIX in Docker.
- How to create your first Route and configure an Upstream using Admin API.
- How to use APISIX dashboard.
- Where you can reach out for help.
What is Apache APISIX?
Apache APISIX is an open source, dynamic, scalable, and high-performance cloud native API gateway for all your APIs and microservices.
APISIX facilitates interface traffic handling for websites, mobile and IoT applications by providing services such as load balancing, dynamic upstream, canary release, fine-grained routing, rate limiting, and many more.
Features
- Multi-platform support: APISIX can run from bare-metal machines to Kubernetes providing a vendor neutral, multi-platform solution. It also provides integration to cloud services like AWS Lambda, Azure Function, Lua functions and Apache OpenWhisk.
- Fully dynamic: APISIX supports hot-reloading, meaning you don't need to restart the service to reflect changes in the configuration.
- Fine-grained routing: APISIX supports using all built-in NGINX variables for routing. You can define custom matching functions to filter requests and match Route.
- Ops-friendly: APISIX is renowned for its ops-friendliness by DevOps teams. It integrates with tools and platforms like HashiCorp Vault, Zipkin, Apache SkyWalking, Consul, Nacos and Eureka. With APISIX Dashboard, operators can configure APISIX through an easy-to-use and intuitive UI.
- Multi-language Plugin support: APISIX supports multiple programming languages for Plugin development. Developers can choose a language-specific SDK to write custom Plugins.
Key concepts
Here is a high-level overview of APISIX's software architecture:
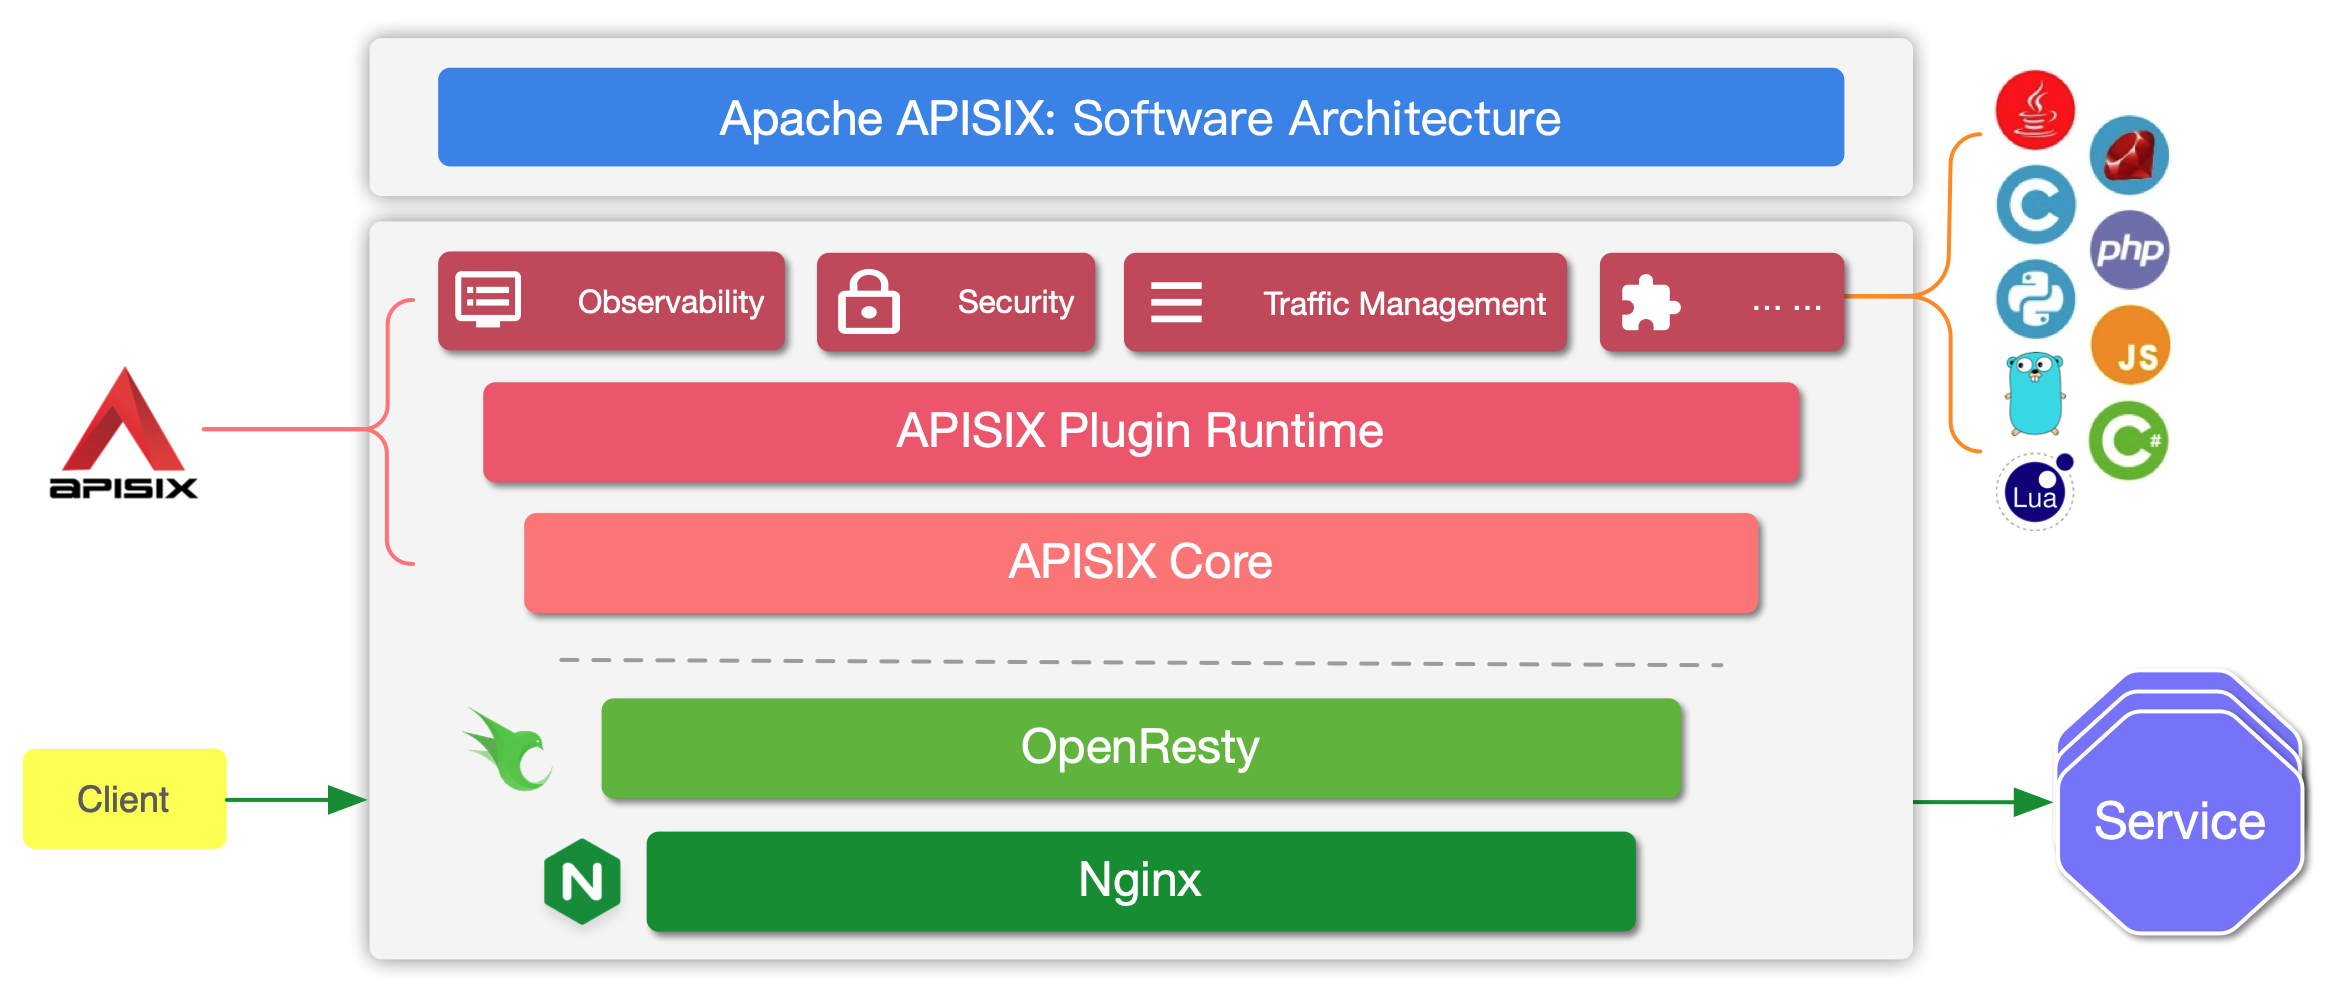
The table below defines the key concepts and components of APISIX referenced in this guide:
| Concept/Component | Description |
|---|---|
| Route | Routes specify how requests to APISIX are forwarded to the Upstream. They match a client's request based on defined rules and loads and executes the configured Plugins. |
| Upstream | Upstream is the service to forward your requests to. They can be configured to a Route or abstracted out to an Upstream object. |
| Admin API | API that lets users control their deployed APISIX instance. |
Before you begin
Before you start with APISIX, make sure you have the following tools installed:
- Docker and Docker Compose.
- curl for testing the API. Alternatively, you can use tools like Hoppscotch.
The example Upstream service used here is httpbin.org and you can use it for your testing.
This is an echo service, meaning it will return back the parameters we pass in the request.
Request
The components of the request URL are shown and explained below:

- Protocol: The network transport protocol.
HTTPprotocol is used for this example. - Port: The port.
80is used for this example. - Host: The host.
httpbin.orgis used for this example. - Path: The path.
/getis used for this example. - Query Parameters: The query string. Two strings
foo1andfoo2are used for this example.
We can use the curl command to send the request:
curl --location --request GET "http://httpbin.org/get?foo1=bar1&foo2=bar2"
Response
We receive a JSON response when we send the request:
{
  "args": {
    "foo1": "bar1",
    "foo2": "bar2"
  },
  "headers": {
    "Accept": "*/*",
    "Host": "httpbin.org",
    "User-Agent": "curl/7.29.0",
    "X-Amzn-Trace-Id": "Root=1-6088fe84-24f39487166cce1f0e41efc9"
  },
  "origin": "58.152.81.42",
  "url": "http://httpbin.org/get?foo1=bar1&foo2=bar2"
}
Install Apache APISIX
To get started, we will install Apache APISIX with Docker and enable the Admin API.
First clone the apisix-docker repository:
git clone https://github.com/apache/apisix-docker.git
cd apisix-docker/example
Now, you can use docker-compose to start APISIX.
<Tabs groupId=“cpu-arch” defaultValue=“x86” values={[ {label: ‘x86’, value: ‘x86’}, {label: ‘ARM/M1’, value: ‘arm’}, ]}>
docker-compose -p docker-apisix up -d
docker-compose -p docker-apisix -f docker-compose-arm64.yml up -d
:::note
You can check out Installing Apache APISIX for different installation methods.
:::
:::info IMPORTANT
Make sure that all the required ports (default: 9080, 9443 and 2379) are available and not used by other system processes.
On Unix-based systems, you can run the command below to terminate a process listening on a specific port:
sudo fuser -k 9443/tcp
If a Docker container is crashing, you can inspect the logs to diagnose the problem:
docker logs -f --tail <container_id>
:::
Once APISIX is running, you can use curl to access the Admin API. You can also check if APISIX is running properly by running this command and checking the response.
curl "http://127.0.0.1:9080/apisix/admin/services/" -H 'X-API-KEY: edd1c9f034335f136f87ad84b625c8f1'
This response indicates that APISIX is running successfully:
{
  "count":0,
  "action":"get",
  "node":{
    "key":"/apisix/services",
    "nodes":[],
    "dir":true
  }
}
Create a Route
From the previous step, we have a running instance of APISIX in Docker. Now let's create a Route.
APISIX provides a powerful Admin API and APISIX Dashboard. Here, we will use the Admin API to create a Route and connect it to an Upstream service. When a request arrives, APISIX will forward the request to the specified Upstream service.
We will configure the Route so that APISIX can forward the request to the corresponding Upstream service:
curl "http://127.0.0.1:9080/apisix/admin/routes/1" -H "X-API-KEY: edd1c9f034335f136f87ad84b625c8f1" -X PUT -d '
{
  "methods": ["GET"],
  "host": "example.com",
  "uri": "/anything/*",
  "upstream": {
    "type": "roundrobin",
    "nodes": {
      "httpbin.org:80": 1
    }
  }
}'
This configuration means that it will forward all matching inbound requests to the Upstream service (httpbin.org:80) if they meet these specified criterion:
- The HTTP method of the request is
GET. - The request header contains the
hostfield, and its value isexample.com. - The request path matches
/anything/*.*means any sub path. For example/anything/foo?arg=10.
With the Route has created, we can access the Upstream service from the address exposed by APISIX:
curl -i -X GET "http://127.0.0.1:9080/anything/foo?arg=10" -H "Host: example.com"
This request will be forwarded to http://httpbin.org:80/anything/foo?arg=10 by APISIX.
Abstracting to Upstream
Instead of configuring the Upstream directly to the Route, you can create an Upstream object and use it in the Route.
To create an Upstream object:
curl "http://127.0.0.1:9080/apisix/admin/upstreams/1" -H "X-API-KEY: edd1c9f034335f136f87ad84b625c8f1" -X PUT -d '
{
  "type": "roundrobin",
  "nodes": {
    "httpbin.org:80": 1
  }
}'
This is the same as the Upstream service we configured directly into the Route on the previous section.
To bind this Upstream to the Route, we can use the upstream_id as 1:
curl "http://127.0.0.1:9080/apisix/admin/routes/1" -H "X-API-KEY: edd1c9f034335f136f87ad84b625c8f1" -X PUT -d '
{
  "methods": ["GET"],
  "host": "example.com",
  "uri": "/anything/*",
  "upstream_id": "1"
}'
With the Route has created, we can access the Upstream service from the address exposed by APISIX:
curl -i -X GET "http://127.0.0.1:9080/anything/foo?arg=10" -H "Host: example.com"
This request will be forwarded to http://httpbin.org:80/anything/foo?arg=10 by APISIX.
Using the APISIX Dashboard
You can also use the APISIX Dashboard to create and configure Routes similar to the Admin API.
If you have followed the steps above, you would be able to access the dashboard at localhost:9000.
Click on Route from the sidebar to view a list of configured Routes. You would be able to see the Routes you created using the Admin API as well.
You can create a new Route through the dashboard by clicking the Create button and following the instructions:

The newly created Route is added to the list of Routes:

Check out the APISIX Dashboard documentation to learn more.
Where to go next?
If you have followed the steps above, you should have APISIX running and you would have configured a Route.
You can now look into adding Plugins to provide features like authentication, security, traffic control and observability. See the Plugin Hub to learn more.
If you ever get stuck, you can ask for help in the APISIX community channels or open an issue on GitHub.