Ambari Cluster Provision with Docker
This project presents a tool to quickly provide a large Ambari cluster on a cloud environment, with all Ambari-Agents running inside Docker containers. And each Virtual Machine is used to hold many Docker containers running Ambari-Agents. It's supposed to be a complementary to the work of Cloudbreak.
All of the Docker containers and VMs are part of the same Weave network, so they can all communicate with each other. SSH service is provided to log into Docker containers from the VMs inside the cluster. All of the master services are on VMs with a public IP, so that you can still use the UIs for services like NameNode, ResourceManager, etc.
Because of multiple Docker containers in one VM, we end up saving a lot of resources on cloud environments. And the Docker image can be pre-installed with HDP bits to save space and time during the Ambari installation (which can be done via UI or blueprints).
Usage:
Only the command “request” depends on Google Compute Engine. Other parts of this tool are platform independent. See section “Extend to Any Other Platform” for more information Run python launcher_cluster.py to see usage
python launcher_cluster.py request
--request a cluster from GCE, generate the configuration for the cluster. Parameters:
<the name of the cluster>, suggestion: {yourname}-group-a
<number of VMs>
<number of dockers each VMs>
<number of service servers>, directly install Ambari-Agent, not inside Dockers
<number of ambari-server>, either 0 or 1
python launcher_cluster.py up
--run all Ambari-agents and Ambari-server of the cluster. Parameters:
<the name of the cluster>
python launcher_cluster.py merge
--run all Ambari-agents in the cluster, use the Ambari-Server in another cluster. Parameters:
<the name of the cluster to be merged>
<the name of the cluster to be extended>
python launcher_cluster.py merge
--run all Ambari-agents in the cluster, providing the Ambari-Server. Parameters:
<the name of the cluster to be merged>
<Weave IP of the Ambari-server>
<External IP of the Ambari-server>
python launcher_cluster.py list
--list all the cluster
python launcher_cluster.py show
--show cluster information. Parameters:
<the name of the cluster>
python launcher_cluster.py help
show help info
Quick Start
Step 1: Download the code to your own computer, or anywhere has the access to GCE controller
Step 2: Copy example/config.ini to config/config.ini
Step 3: Modify the following values in config/config.ini
- output_folder
- gce_controller_ip
- gce_controller_key_file
- vm_key_file
Step 4: Add SSH key and password for your Ambari-Agents in Docker
- open file: docker_image/Yum_Dockerfile
- change the two lines: {ENV AUTHORIZED_KEYS} and {ENV ROOT_PASS}
Step 5: Use the command line to request 2 Virtual Machine from GCE, each Virtual Machine is configured to have 6 Docker containers (which means 6 Ambari-Agents). Also this command request 2 Virtual Machine to install Ambari-Agent directly (not in Docker), these 2 Virtual Machines are supposed to hold Masters like NameNode or HBase Master. Finally this command request 1 Virtual Machine to install Ambari-Server
python launcher_cluster.py request {yourname}-group-a 2 6 2 1Step 6: Run all configuration for this cluster
python launcher_cluster.py up {yourname}-group-aStep 7: This is supposed to be a bug, see section “Issues” for more information
- Log into your Ambari-server machine, run “ambari-server start”.
Step 8: Operate on Ambari-server web GUI
- Add agents: docker-[0-11]-{yourname}-group-a.weave.local
- Add agents: {yourname}-group-a-service-server-[1-2].weave.local
- Choose manual registration
- Choose to install HDFS, YARN, HBase, Zookeeper, Ambari-Metrics
Add More Ambari-Agents
Step 9: Use the following command to request 2 Virtual Machine, each with 5 Ambari-agents.
python launcher_cluster.py request {yourname}-group-b 2 5 0 0Step 10: Merge this new cluster to existing one
python launcher_cluster.py merge {yourname}-group-b {yourname}-group-aStep 11: Operate on Ambari-server web GUI
- Add agents: docker-[0-9]-{yourname}-group-b.weave.local
Introduction to Weave Networking
Weave is a tool to connect Docker containers distributed across different hosts. This project uses Weave to assign each Docker container (with Ambari-agent) a unique internal IP and a domain name. In each VM, a special Docker container will be launched by Weave to act as a Router, and to connect all the Docker containers in this VM with other Docker containers in other VMs. Also, another special Docker container will be launched by Weave to act as a DNS for this VM. Each Docker container can connect with each other by using the internal IP, host name or domain name.
All the Weave internal IP will be configured by this tool automatically. You can also modify Weave internal IP by hand in the cluster.txt file, but usually you won't like to do it.
This is the networking architecture of the cluster.
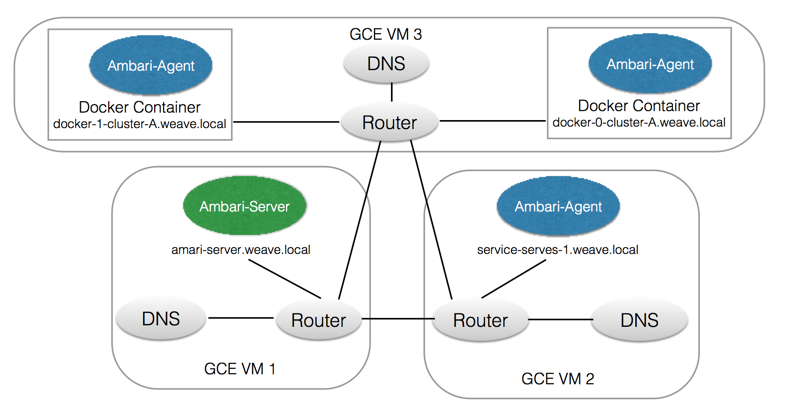
Virtual Machine Type
There are three types of Virtual Machines inside the cluster.
Agent Virtual Machine installs Docker, and run multiple Docker containers to hold multiple Ambari-Agents
Service Server will install Ambari-Agent directly, not inside Docker container. This type of machine is supposed to hold the master of different Hadoop Service, like NameNode. Installing Ambari-Agent directly enables service server to have all the resource of this machine, and provide a convenient way to access its web UI from the outside.
Ambari Server will install Ambari-Server directly inside the machine.
Request, Up and Merge
The command “request” is very simple. It will ask for a number of Virtual Machine from GCE, then it will generate the information about the cluster. Up this time, we have 2 things. First, we have a bunch of VMs, which are ready to use and have nothing installed. Second, we have made a “plan” about how we are going to configure the VMs. This “plan” is saved into JSON file config/cluster.txt. You can modify the JSON cluster.txt file to change the “plan” of the cluster before using command “up” or “merge”.
The command “request” is only used for GCE. This command is not necessary. As long as we have the 2 things, mentioned above, we can then use “up” command. For more information, see section “Extend to Any Other Platform”
The command “up” is supplied with the name of the cluster. This command will fetch the information about this cluster, and actually configure and install everything according to the “plan” The command “up” is platform independent
The command “merge” is the same as “up”, except one difference. The command “up” requires that the cluster defines one VM to be Ambari-Server. While, the command “merge” simply set the Ambari-Server of other cluster as the Ambari-Server of this cluster.
Cluster Information and History
By default, the file config/cluster.txt is used to store the information of clusters. The file is in JSON format. Every time you use “request” command, the information about the new cluster will be saved into this JSON file.
The command “list” will list brief information about all clusters you created by simply reading this JSON file. The command “show” will print more detail about one cluster specified by a name. For more detail information, you can just open the JSON file and search, for example, when you try to find out which Virtual Machine hold a specific Ambari-Agent.
Remember the data in config/cluster.txt will continue to grow, and all your history data will remain in the file, even if you destroy a cluster and no longer use it. In this case, the data in config/cluster.txt becomes stale. You may want to delete config/cluster.txt when you no longer need your history cluster.
If there are two clusters with the same name in the JSON file config/cluster.txt, only the latest one will take effect. Say, you use “up” command to run a cluster named “cluster-D”, only the latest “cluster-D” will be run.
Log into Docker Container
Inside each Docker container, there is a SSH service running. You can log into the Docker container from Ambari-Server or Service-Server.
Do not use “docker attach” to access the container.
Access Server Web UI
Use the public IP of the Service-Server to access the web UI. The list of accessible ports is defined by value “server_port_list” in config/config.ini.
If you want to access more ports after running the cluster, you can use the script network/set_ui_port_forward.sh
Image for Docker Container
The Docker image can be either downloaded from Docker Hub or built alive inside Virtual Machine.
With “pull_docker_hub=yes”, the program will pull Docker image named by “docker_image_name” from Docker Hub. This Docker image has to be built in the same way as this program builds the image.
Typical, use “pull_docker_hub=no” to build the image alive. You can add more yum package into file docker_image/package_list.txt. These packages will be pre-installed into the image, and will be shared by all Docker containers inside this Virtual Machine, therefore saving disk space and accelerating the actual Hadoop service installation steps.
Use Different Partition for Docker Container
The value “use_partition” will set the Docker to use the disk space of another partition. Make sure that partition is available
Naming Convention
Cluster Name: the name of the cluster must be unique to make sure every VM on GCE has its unique name. The suggestion is using {your name}-group-{a-z}
VM Name: each VM has a domain name assigned by GCE, its host name is {cluster name}-{index}
Docker Container Name: the domain name of Docker container is docker-{index}-{cluster name}.weave.local, the prefix “docker” can be configured by value container_hostname_fix in config/config.ini.
The Weave Internal IP Assign Mechanism
Basically, you don't have to worry about IP. The maximum number of IP is limited by weave_ip_base and weave_ip_mask in config/config.ini. The program will automatically assign and increase the IP to make sure everyone has a unique Weave internal IP.
By fault in the configuration file, the subnet is 192.168.#.#/16. Once you have already created 256*256 agents (the real number is smaller, since the DNS on the VM also uses IP address), The IP assigned will continue to increase to 192.169.#.#/16. some address might fall into subnet 192.168.#.#/16, and others fall into subnet 192.169.#.#/16. This causes a connection issue. The function related is cluster._increase_ip(). You might want to wrap the IP around, but corner cases are always there, there is no silver bullet.
Extend to Any Other Platform
We can use the command “up” to set up any machines on any platform, even hybrid, as long as we meet the following requirements:
- A list of machines (or Virtual Machines)
- All machines are CentOS 7
- All machines use the same SSH key
- All machines are accessible from where you run this program by IP
- All machines are accessible by each other using IP
- All machines can access the Internet
- The information about the Ambari cluster (the “plan”)
The above requirements are met using command “request” on Google Compute Engine. On other platform, we can do it manually.
Let's go through the following example. We assume that you have 3 machines, they are:
- east-1.aws.net, 111.1.1.1
- east-2.aws.net, 122.2.2.2
- east-3.aws.net, 133.3.3.3
If these machines do not have domain names, just make up one for each of them. It is just for naming issue, the program will not use domain name of the machine to do connection.
First, modify the value of vm_key_file in the file config/config.ini. And, of course, modify other attributes specified in “Quick Start”. You also need to check the value of “use_partition”.
Then, we decide the structure of the Ambari cluster in Docker containers, use the following JSON object
{
    "cluster_name": "tutorial",
    "state": "FREE",
    "create_time": "2015-08-06 10:35:51.913465",
    "ambari_agent_vm_list": [
        {
            "external_ip": "111.1.1.1",
            "weave_dns_ip": "192.168.1.1",
            "weave_internal_ip": "192.168.1.2",
            "domain_name": "east-1.aws.net",
            "weave_domain_name": "east-1.weave.local",
            "weave_ip_mask": "16",
            "docker_list": [
                {
                    "weave_domain_name": "docker-0-tutorial.weave.local",
                    "weave_ip": "192.168.1.3/16"
                },
                {
                    "weave_domain_name": "docker-1-tutorial.weave.local",
                    "weave_ip": "192.168.1.4/16"
                }
            ]
        }
    ],
    "ambari_server_vm": [
        {
            "external_ip": "122.2.2.2",
            "weave_dns_ip": "192.168.1.5",
            "weave_internal_ip": "192.168.1.6",
            "domain_name": "east-2.aws.net",
            "weave_domain_name": "east-2.weave.local",
            "weave_ip_mask": "16",
            "docker_list": []
        }
    ],
    "service_server_vm_list": [
        {
            "external_ip": "133.3.3.3",
            "weave_dns_ip": "192.168.1.7",
            "weave_internal_ip": "192.168.1.8",
            "domain_name": "east-3.aws.net",
            "weave_domain_name": "east-3.weave.local",
            "weave_ip_mask": "16",
            "docker_list": []
        }
    ]
}
According to this JSON object, machine 122.2.2.2 is the Ambari-Server. Machine 133.3.3.3 will have Ambari-Agent directly installed, which is supposed to accommodate, for example, NameNode. Machine 111.1.1.1 will have 2 Docker containers.
The regulation about the above attributes:
- The “state” must be “FREE”
- “weave_domain_name” must end up with “weave.local”
- To make command “show” work properly, use the pattern “docker-{index}-{cluster name}.weave.local” for “weave_domain_name” inside “docker_list”
- All the IP and the mask related to “weave” are just made up. Just make sure, all of the IP related to “weave” are different. And make sure, with the mask, all IP related to “weave” are inside the same subnet.
Next, we add this JSON object into config/cluster.txt. This JSON object must be a child of the root “clusters”. This is non-trivial. Notice that the root of the JSON file config/cluster.txt is
{
    "clusters": [
    ]
}
Finally, we use “up” command to run this cluster.
Issues
- After use command “up”, you need to log into Ambari-Server, and use “ambari-server start” to manually start Ambari-Server, This is supposed to be a bug. If you check the log of Ambari-Server, you will see that, actually Ambari-Server has run for a short time, but then gets terminated. The reason might be related to SSH.
- This tool does NOT support parallel usage
- If GCE has no enough resource, the cluster returned to you will have a smaller number of VM
- Don‘t merge your cluster into someone else’s cluster. Actually you can do it, but you have to dig into the network, and make sure the IP configuration is right (all in one subnet and no overlap).
Suggestions
- Make sure your cluster name is unique, or you might cause trouble to other people's VM on GCE
- Do NOT use “docker attach” any more, just use SSH. If you did it, Use CTRL + P, then CTRL + Q to exit Docker container.
- Remove ~/.ssh/know_hosts files, especially if you run a large cluster. You might get a warning from SSH, because the new GCE VM assigned to you might have the same IP with the VMs you saved in know_hosts file. Remove .ssh/know_hosts before run this script.
- Ambari-agent and Ambari-server have to be the same version to successfully register.